Leaderboard


Popular Content
Showing content with the highest reputation on 02/14/2023 in all areas
-
Last year we visited my daughter in Savannah which is a foodie heaven. The background is from a DS kit called "Golden Hour." The fonts are Flamingo Shadow, Franciehmkbold and Farewell Angelina. I made the plaid border using another paper from the Golden Hour, and of course, I had to play with Carole's edge brushes. The heart holder is from my vector objects, the glitter is my own brush. The top edges were made with Carole's heart punch brushes. The pictures are mine taken at the restaurant(one of the best meals that we have ever had.)
 13 points
 -
So great to now know how to make templates into masks. I usually do not do scrapbook pages as I am more of a tagger for myself, friends, & family. Anyway, I moved the photos around once I figured out what text to use and how much space I would need for it (aging eyes require larger fonts now). The font is Cotton Candies. I also recoloured the photo frames to subdue them. I don't post any people photos on the internet so I used a stock photo from a graphics site to which I have a paid subscription. The background paper is by Anitess at Deviant Art. Since the mask effect erased a bit of the tree drawing on the left side of the paper, I did a cut & paste of the original paper on top of the merged image to correct that. Wonderful lesson. Am eagerly anticipating the next one. Sharon
12 points
-
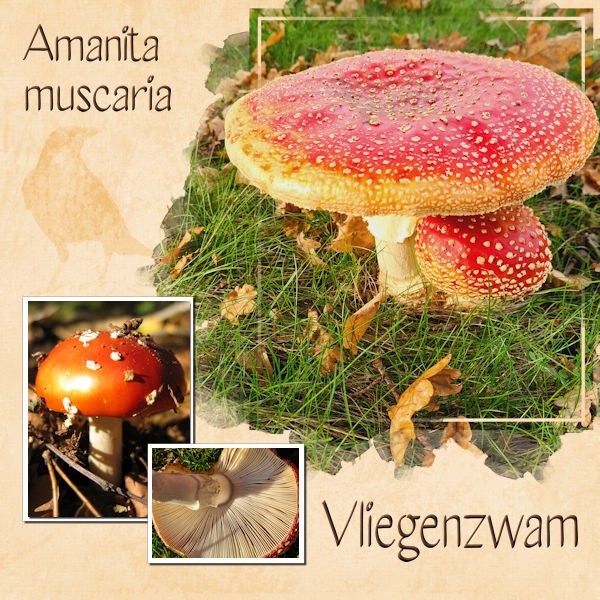
My theme for this Workshop will be mushrooms, I have so many photos of them and often choose flowers instead. I'll add the names in Dutch and and in Latin because I don't know all the names in English and Google nor the dictionary is that helpful for this subject. I didn't have much time today so it is a simple layout and a good rehearsel of the masking technique because most of the time I use Carole's Raster to Mask script.
12 points
-
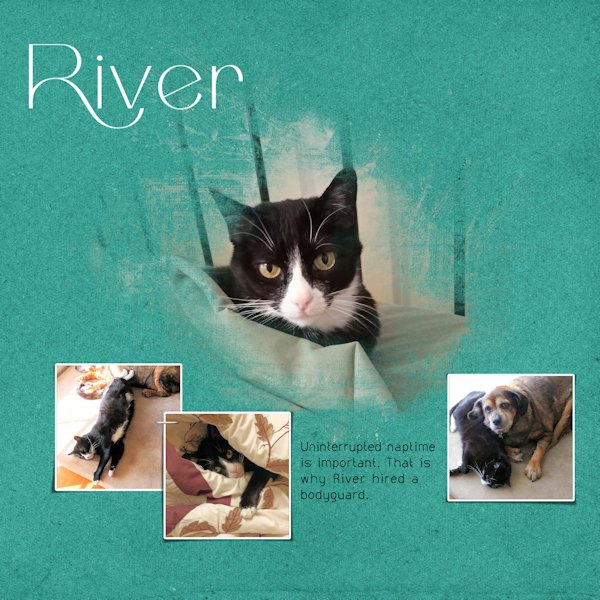
The layout with River features my departed dog, Lynda. She was The Mother of the House, raising Rudy and River from crusty kittens. Although she feigned grumpiness at their antics, she was always watching over them. The card uses a picture from Pixabay and a paper from Creative Fabrica. The third layout is my eldest niece and her family. The paper and element are from the kit Escale Amoureuse. The wordart is from Creative Fabrica.
11 points
-
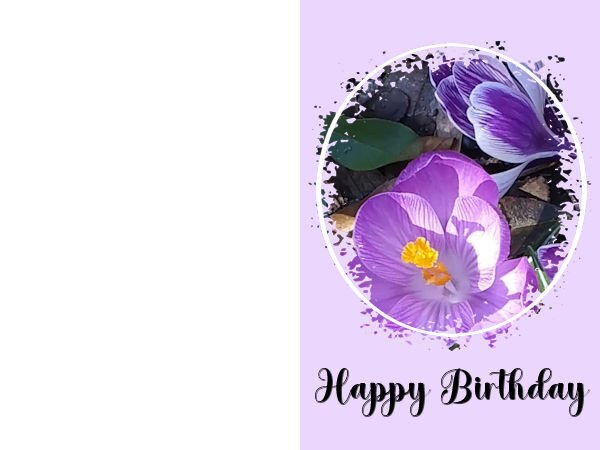
And this is the 2nd extra. Think I'll save this in my cards folder. This is a picture of the crocuses in our garden last year. They haven't appeared yet this year.
10 points
-
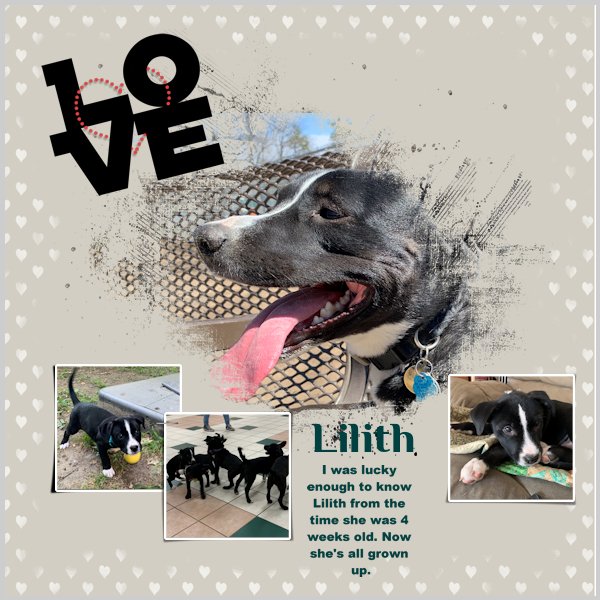
Here is the baby of the family, all grown up now. No matter how many times I do the steps to convert a PSD mask to a PSP mask, I always have to go back and redo it at least once. Eventually muscle memory will kick in.
10 points
-
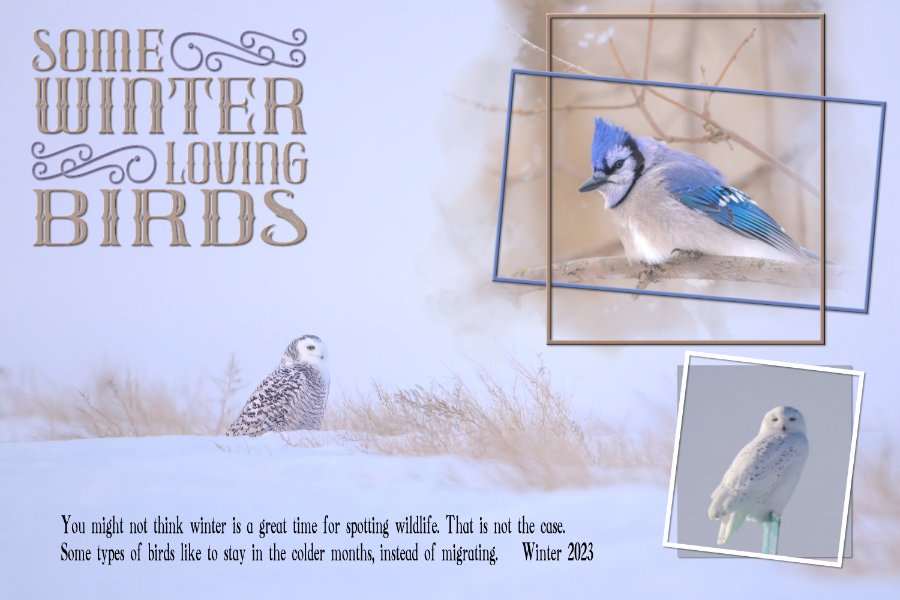
I had already put my mind to using the background photo as the main photo for day 1 of the Mask challenge. We can have clear blue skies, but when the wind blows with such force, visibility is greatly diminished by blowing snow. I used the mask which came with Day 1 of the Love story challenge (Masks) back in 2017. I did have to edit it to accommodate the Blue Jay. The mask suited the layout I had in mind. I placed the blue frame, over and under the brown one. The page itself came together quickly, the word art took a little longer. I didn't use a 12x12 scrap page, I used the size of the photo.
10 points
-
This is the 1st extra for Project 1 - my daughter's and my favorite park near our home. Title font is Bollywod from CF. Date font is arial.
9 points
-
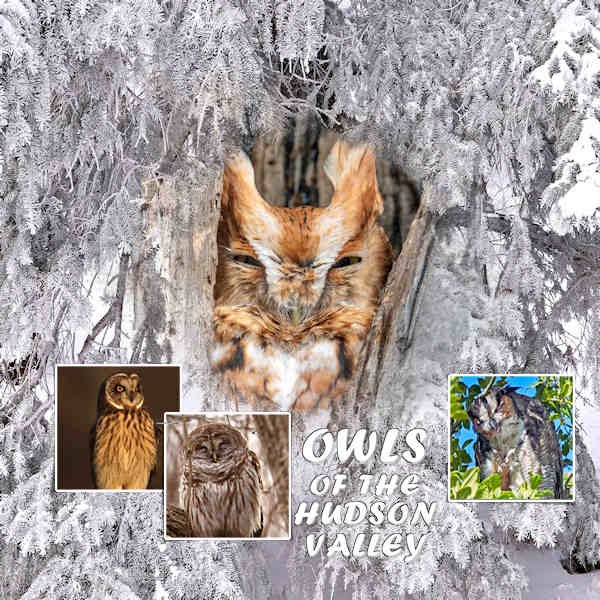
DAY 1 - OWLS OF THE HUDSON VALLEY
9 points
-
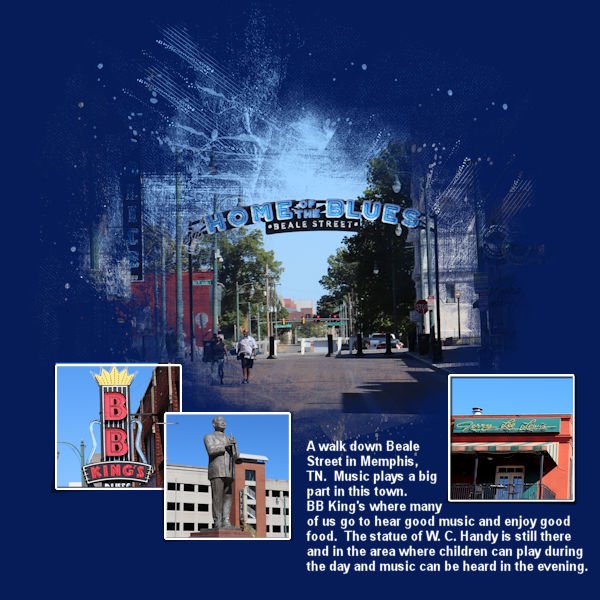
Memphis, TN is my theme. Fun relearning how to make a shape into a mask. I've been using the ClipToIt script so much of this year and last year (it's so easy and does all the work for you) but it is important to know what the steps are so that is how I shall continue. The journaling font is Arial. The pictures are mine.
9 points
-
normally when using templates I am mostly open my old CS2 because of the clipping mask feature. So now I learned it for PSP , thank you Carole for this workshop, here is my 5 year youmger Sister, she died suddenly in October 20229 points
-
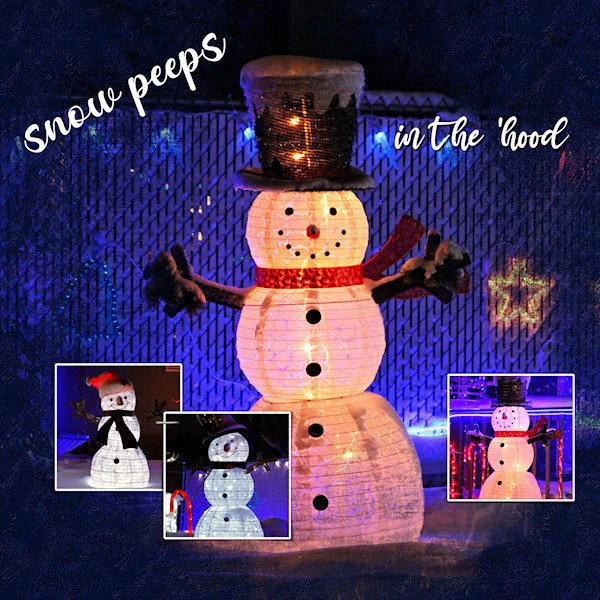
Late getting started. Hopefully more from Day 1 tomorrow. I enlarged the mask quite a bit because I wanted the little star and bell from the fence to show. Fonts are Moma Love and Mama from Creative Fabrica. I textured the background but likely doesnt show here, it's a frosty sort of look. Photo's are mind from a quick drive around the neighbourhood Dec 23, 2022. I am really loving everyones mask layouts. I'm finding myself thinking, that's awesome, why didnt I think of that. Where did all the extras come from? Oops, I'm a dumby, I just found it, helps to scrool ALL the way to the bottom. yeesh.
8 points
-
I found my unfinished Day 1 from last year's mask workshop so finished it and did another one (I had computer problems and couldn't complete the workshop at that time). The Blue Jay is from 2022, the birds is current. Photos of the birds are from last week. They like to hang out in my one tree. One day I had close to 30 of them.8 points
-
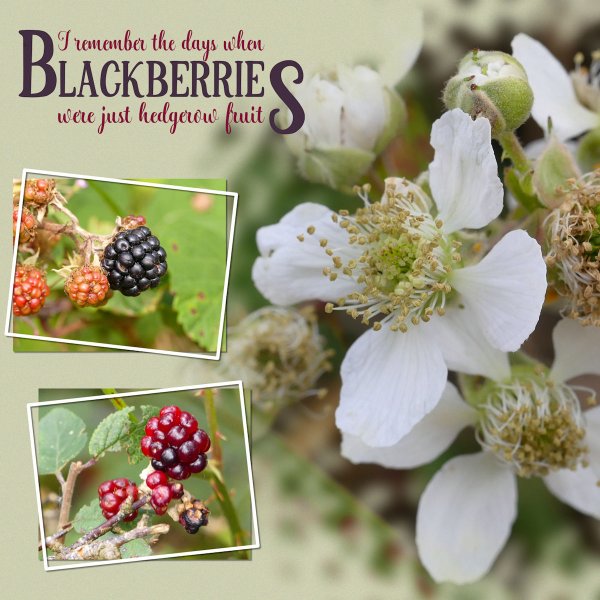
My first recollection of blackberry picking was when I was around 4 with my gran and mum. Then my mum and I. I continued blackberry picking after I got married, introducing my own children, as young as babies in arms. My grandfather and father wouldn't start hedge cutting until after we had finished harvesting the hedgerows. My husband wouldn't start either until I gave him the go ahead. Sloes, Damsons, Rosehips and Elderberries were also gathered for acholic beverages, such as Sloe Gin and tea. When I was home last year, I took my 2 granddaughters blackberry picking several times, what an absolute joy it was. We ate as much as we picked, which was always the norn. I can still smell the blackberry and apple tarts we made, and ate with piping hot custard. I don't half miss the fruit picking season.
7 points
-
Day 1 I made a Valentine's Day card for my husband. It took me a few times to get the hang of this. I kept messing up. I'm going to try again later to see if I get it down. This was amazing to learn! Happy Valentine's Day, everyone!
7 points
-
It doesn't matter how many times I do the steps for converting to a mask, I still manage to mix it up and have to re-do and re-do! This one was fairly straightforward to do, but I had so many interruptions while I was trying to do it! But, done for Day 1. (It was, however, easier than the first time I did this workshop.)
7 points
-
The results from Lesson One. I already feel more accomplished. Why did I wait so long to learn this?
6 points
-
here is again my Sister Claudia back in 2005 buttons ,bow, and datestamp with scripts by cassel plaids selfmade animal silhouette from one of my photos6 points
-
This is Day 1 Extra and I made a card for an upcoming birthday, so I won't post this on Facebook otherwise the card will maybe seen before the actual birthday date.
6 points
-
Another entry for Masks-Day 2 - An exhausted Barred Owl sleeping off a busy night. ? Photos by Dan Tooker. Background pattern Tibetan Grasscloth Spice. Vole from a .png site. I cribbed the staple from Day 1.5 points
-
My entry for Day 2 - using the alternative template. My grandson and family's vacation photos from Costa Rica. The title was included on their photo so I copied it and applied the plaid background to match. I did move the small photos to the left.
5 points
-
One of the extras from Day 1 - a photo of great-grand Magic, font is Cabin Sketch, frame was a Corel freebie from a past year. Magic was proud of finishing a Bluey puzzle. Edit: I changed the mask to the colors of the February Palette.
5 points
-
@Julie MagerkaGlad to hear that it is getting easier. As Sue has mentioned, keep going and with practice, it will become easier and more automatic. @Rene MarkerNice to get back to an older layout. Did you not post it last year? @Sue Thomas Your wordart is always a masterpiece! @Anja PelzerSorry for your loss. I am glad you are learning to use masks in PSP. You know, the idea of the clipping mask in PS is exactly the inspiration for the script Clip to It! @Mary SolaasDid you use the wrapped text for the journaling? The effect is lovely. I think you are having fun with the other templates! @Lesley Maple Yes, with practice it will become easier. Or if you want it faster (without thinking), the Clip to It script does the same thing, but automatically. @Ann SeeberInteresting how the center owl seems to blend into the background! @Corrie KinkelWhy not show off mushrooms? The pictures of nature are always beautiful. @sharon thompsonIf you ever want to create pages for family and friends, you can always replace the photos when you print the pages for them. And yes, you will be able to use the same technique for tags or other graphic projects if you are not into scrapbooking. @Donna SilliaYou are definitely having fun with those brushes! @Gerry LandrethYou are quite prolific in a single day!!! If you have not yet posted, don't be shy! If you are stumped, post your questions. We are here to help. See you tomorrow for more lessons!4 points
-
Day 1 I used a mini kit from DigitalScrapbook Feb 2023 Blog Train, and the mini kit is from Diane Hiller, on her own blog you can also download a Fan freebie that goes with the mini kit. photos are mine.3 points
-
That is a good observation and you got me to recheck things. However, the Deselect will do the trick. If using the Defloat, the selection would stay and it would require the extra step of deselecting.3 points
-
Day 2 Extra. In order to display the photo I wanted to use I had to rotate the page and relocate the little photos a bit too, otherwise they would have obscured the big mask. It was nice to make a plaid from the colors of the photo, I haven't done that for a while. Having scripts makes me lazy! The fonts used are Chocolate Sprinkle and Arial.
2 points
-
It probably just depends on your habitual workflow. Since there are often different ways to do things, use the method that is more comfortable for you, as long as you get to the same result in the end.2 points
-
It took me a long time too. I had to write the instructions down and follow them every time...still do. But I noticed this time it's feeling more familiar. Sue Thomas is right, only LOTS of practice will make this something I can do without refering to instructions. Keep going.2 points
-
Before a next step... It's a Valentine's Day so I present my mask-work (just for fun). Carole, I've had home problems hence I'm so late to to your pretty difficult lessons for me, sorry.
2 points
-
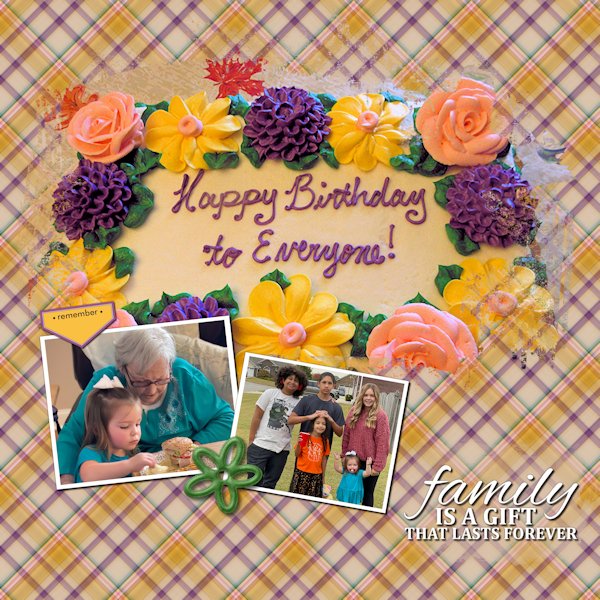
The birthday party was universal for the entire family. We used to get together for each of the kids' birthday, but they got older and would rather go out with friends.
1 point
-
@Liz HubbardWhich instructions are confusing you? Which day? To download the supplies or to use the template? There are very few instructions/supplies that are not in English.1 point
-
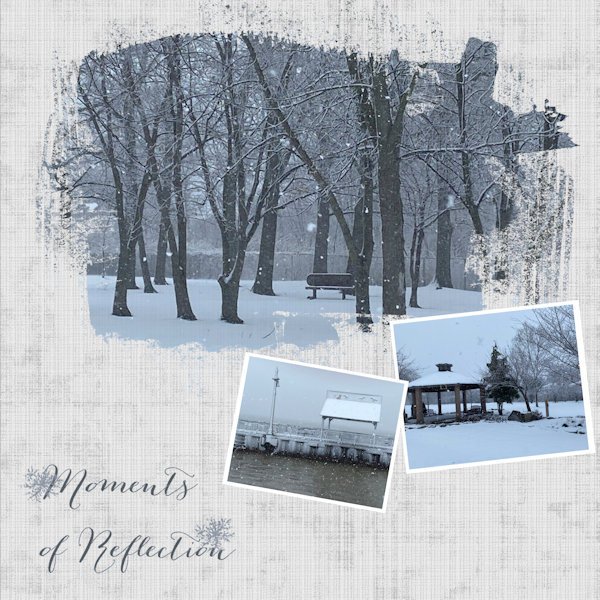
Day 2 mask project: Photos are mine taken on a snowy day we had a couple of weeks ago. We haven't had much all winter, so it was fun to get out (a la Sue Thomas) and get some images. Just a simple background paper with an overlay, some blending, and a bit of text. Voila! C'est fini!
1 point
-
Hello - Just getting started on Day 1...1 point
-
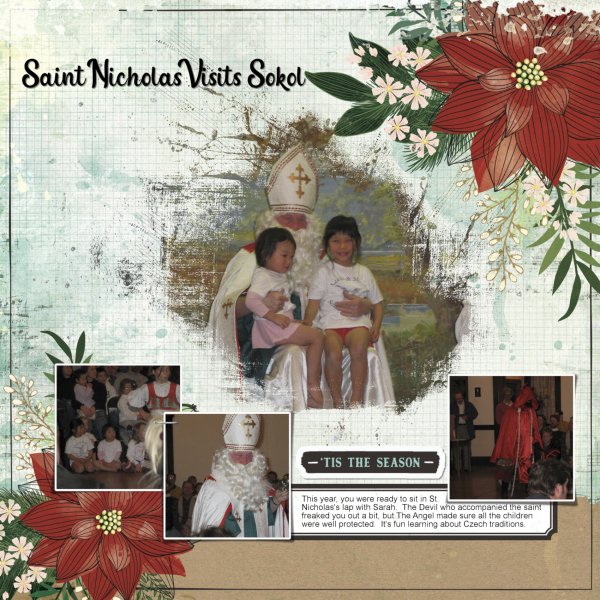
Is that Sokol as in the Czech camps for gymnastics, etc?1 point
-
I like the blue colour a lot! Suits the pics very well!1 point
-
Step #8 was to Deselect the floating layer which fused it with the mask layer1 point
-
Carole, I noticed the written-out directions for Day 1 do NOT include the step to De-Float. That may have been the source of my difficulties.1 point
-
OK . I'll see what I'll do with lesson2. If there are any problems, I'll let you know.1 point
-
Julie, once it clicks, there will be no going back, it will become second nature to you. I will suggest to you though, that you create a mask at every opportunity. Instead of say, using the selection tool to add a photo, until you have mastered the technique. Lovely layout. I love the lifted corners technique and effect it has on a layout. That script saves a lot of time.1 point
-
Hey everyone I can't wait to do this today! and see everyone's work. ?1 point
-
I'm here as well. Getting things setup so I can be somewhat organized.1 point
-
Hi, I am in too ?1 point
-
Hi, good thing I'm here, I seem to have forgotten everything I ever knew about masks.1 point
-
I'm in and happy to be doing this again.1 point
-
I am also in. Like all the other workshops, it is fun and instructive. I also haven't picked any photos yet, and hopefully, I will have time to post one or two layouts... I am very slow! ?1 point
-
I would love that. And everyone can watch the master class which will reach a wider audience for this technique. Your samples were outstanding. I wouldnt have gotten there on my own, especially the shadow part.1 point
-
Here is another one that I just did from a freebie template by Fiddle-Dee-Dee. Kit used is from Bella Gypsy "Here's To The Ears" for sale at The Lily Pad. Cheryl (Fiddle-Dee-Dee) had the shadows already on this template as separate layers. So no shadows had to be added to the 3-D shape.
1 point
-
Maybe I'll change my plans and do a Shadow box tutorial for the March lab module. Or maybe a Master class instead? Hum...1 point
-
I'll be there and will wing it as far as photos go.1 point
-
I will be there will bells on...and nothing else.? Good thing we arent doing this in person, eh?. I havent picked any photo's yet so I will wing it and choose randomly.1 point