Leaderboard


Popular Content
Showing content with the highest reputation on 06/18/2025 in all areas
-
I love these tutorials because I am learning so much. I have a lot of templates and never knew how to make them into masks. Now I have the technique to make them into masks. Wow! This is a game changer for improving my photo library into images worth sharing. These images came from a tour in China that I made with friends from work when I first retired. Merci Carole pour ton soutien indéfectible aux utilisateurs de PaintShop Pro.
 17 points
 -
Lesson 1 - using the Diamond Extra Template I wont be quitting my day job to become a bee photographer. I was actually photographing flowers in the garden and they kept photo bombing my shots. they are so fuzzy, like flying teddy bears. the one in the middle looking at me as if to say, "move along human, nothing to see here." The font is Beauty Nature. Not real sure how readable this is.
16 points
-
In 2012 my wife and I spent a month in Portugal exploring the Pousadas de Portugal. Pousadas are hotels that are in restored historic sites like palaces, fortresses and monasteries. Then one day on a notice board we saw a flyer for a sand sculpture exhibition in the Algarve region and we went to see it. It was perhaps the best sand sculpture exhibit we had ever seen. The works were so realistic and everyone was easily recognizable. Do you know these characters?
16 points
-
Everyone's photos are wonderful! Here's my Lesson 2.
14 points
-
Day 1 using Affinity. I find using masks a little easier with Affinity. Thank you, Cassel, for suggestion to brush off some of the white on my PSP version. I did this with the Affinity one and yes, it looks a lot better and clearer.
14 points
-
Here's my layout for Lesson 2----creating plaids. Very interesting to see what the plaid looks like when you scale it down. A little easier to make the masks work for me today. Practice makes progress!
14 points
-
Day 2 - This is my sister and her husband with their grandchildren this past Easter. The oldest grandchild is 17, and the two youngest both recently had their first birthday.
14 points
-
Dash the Beagle was rehomed through the Beagle trust he belonged to our son and his wife but he would give the children a nip if they went near his toys, they were so sad to see him go but the couple who have him now have had beagles for 20 years. The last beagle they had they had to put a lock on the fridge door as she could open it, they fell in love with Dash in an instant and took him back home with them, the main photo is Dash at his new home looking like he belongs there. I enjoyed learning new things in this lesson like making the patterned paper, the font used was Baby Garland. I kept the plaid background dark as I thought it showed up the mask layer more.
14 points
-
Here is my Day 2 Lesson inAffinity. This photo was taken by my sister-in-law when she and her husband went on a car trip there about 7 years ago. The Purnululu National Park is in the Bungle Bungle Range in Western Australia and is a World Heritage Site. Thank You Carole for showing how to do Plaid using the photos colours which i used on the background paper it is a technique that i am sure will use often. I will again say that everyone is doing beautiful work in this workshop Best wishes to everyone, Dawn
13 points
-
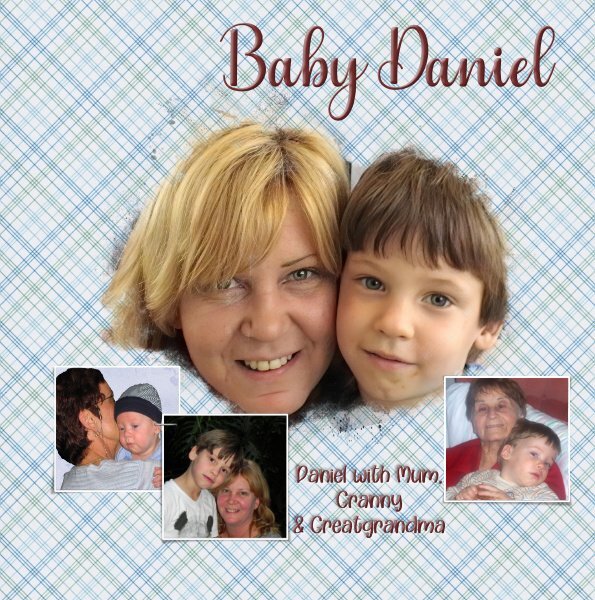
Day 1 PSP. My 5th grandchild and 4th grandson, Daniel, as a baby. Any moment we have with him and his brothers, is precious.
13 points
-
Day 2 in Affinity. I kept the font the same and will try to do so all week. These woodpeckers are huge and they love suet! They come right in our front yard within 6 feet of the house. The male has the full red crest and a red "mustache" where as the female only has a half red crest. The plaid seems a bit intense, but I do like the colors! Thank You Carole for the directions on creating the plaid!
13 points
-
Day 2
13 points
-
Day 2 using Affinity. Daniel loved to have fun around water.
12 points
-
Here is my Lesson 2 - Great granddaughter Magic is taking a dance class, and they produced a cute version of the Wizard of Oz. Magic danced as one of the Munchkin characters. I love the costume! The font is Marguerite for the title and Modern #2 for the text. I tried to make a very subtle plaid and I'm happy with it. Using PSP2023.
11 points
-
Lesson 3. Getting quicker at it. I made two kaleidoscopes and blended down plus changed the layer transparency a bit. Both things completely changed the overall look.
10 points
-
Day 2: Created in Affinity. I made the plaid tile but didn’t like the plaid effect so just enlarged the tile to create a pattern across the page.
10 points
-
Day 1
10 points
-
Day 1 - On a rainy day during our Fredericksburg vacation, we took a day trip to the National Harbor MGM casino in Maryland. I took these photos in the Conservatory of the current exhibit called DMV in honor of DC, Maryland and Virginia. The butterfly and the flower were hanging from the ceiling. The font is a layered Rainboho from CF. The typing is a CF font called Typefont. In PSP, I made my own mask because I couldn't get the effect with the original mask. I used the clip to it script which saves so much time and effort.
10 points
-
Lesson 2: I don't often use plaids (like Sue T). As a matter of fact, I was purging some papers from my too-large stash and deleted many of them. For this layout, I used the Lady22 template. The pix are of my neighbour and his dog. They were such a bonded pair, and they live with lotsa cats owned by his partner. Sadly, Tommy is no longer with us (the Shih Tzu), and it broke all our hearts. The neighbours are as pet-happy as I am! Because it's a "guy" kind of layout, I used darker colours in the plaid and then modified with lighting, opacity and different coloured layers. Bits and bobs from my stash as embellishments.
9 points
-
Day 2 Affinity Sisters Poppy and Ruby, great friends. I used the Lady 22 template, Heart Flair by Neia from her RetroBeachVibes kit, Font is Gonestone Signature
9 points
-
Day 2 PSP Grandies Poppy and Ruby with their mum and dad, Haley and Shawn. I used the Lady22 template, Heart Flair by Neia from her RetroBeachVibes kit, Font – Wendy Medium. .
9 points
-
Day 2 PSP. Daniel at the Beach having fun.
9 points
-
#2 Our special Military Man.
9 points
-
Carole, I only recently got to know them through a suggestion from Facebook. The pictures I have are not of the best quality, and some of them I had to enlarge on PSP. The camera is positioned slightly above the nest and operates in zoom mode, with IR light that is invisible to both eagles and humans at night. It is operated manually and at a slow speed to avoid frightening the homeowners. There is a second camera with a wide view of the area. As the eaglets have already fledged, the nest is mostly empty, and we only see them there at times. Mostly waiting for the parents to bring fish. 😄 Soon, they will leave the area, dispersing on their Grand Journeys, as per the Friends of the Big Bear Valley site. In 2023, during a snowstorm, Jackie sat on the eggs. They were not successful in 2023 and again in 2024, which makes the arrival of eaglets this year such a joy.
8 points
-
Karen, yes it can become second nature. I wrote the steps out so I could refer to them every time, and I made a lot of masks (advice from Sue Thomas). Eventually, I remember them (working in PSP that is).8 points
-
Day 3. Used Affinity. I purposely sized down the background paper, even though I lost a lot of details in doing so, I was pleased with the end result. I also flood filled another layer, with a darker beige, lowering the opacity on the patterned layer to achieve the colour I was looking for.
7 points
-
Lesson 3 using PSP. Went out a took several photo's of the flag flying in the front yard. Created the back ground from the picture.
7 points
-
Here is the link to our group dancing the first dance (good luck if you try to find me!): And here is the second one (that one was a workout!!). Fewer dancers were comfortable with it so some stepped out: And if you want to see more groups dancing the same dances: https://www.facebook.com/linedanceflashmob Are you aware of any participating groups in your area? Share their information if you have it.6 points
-
Lesson 3 - Affinity and this time no problems at all. I like that mirror effect and by turning the dial you can immediately see the what you get and it is easy to go round and see all the different possibilities and choose the one which you like best. I played a bit with different parts of my photo to make the kaleidoscope effect and in the end chose a subtle one. Same fonts and a binocular icon from Freepik.
6 points
-
Here's my Lesson 3 attempt at making my own paper. Pretty cool and the possibilities are endless!
6 points
-
Wow! Those pix are fab!6 points
-
Wow, this was a productive day for you all! @Linda Rexford You must be very fast to capture those hummingbirds. I find that the hummingbirds here come and go so quickly, I would not even have time to lift my camera! If you find any pattern too overpowering, you can always put a solid color layer underneath and reduce the opacity of the pattern. That gives you control on how much of it shows. @Gerry LandrethThat little girl is so photogenic! This is a perfect way to showcase her. I think you are making a whole family album now! @AprilDawnYou had a great idea to color the photo frames to match the flowers. @Cristina Are those birds attracted to the camera? It is amazing how they stare directly into the camera! Back to the plaid "cheat" from Corrie, the reason you need only 1 pixel is that if you have 2 pixels in height and you stretch it, the top half will be one color and the bottom will be another color. That might lead to a mismatch if you want a seamless edge. @kasanyYour cat is modeling? That is such a cute idea. That frame around the Autumn Park layout is quite effective. @Sue ThomasIf you find that plaids are overpowering, you can always choose some sections of your image with less contrast to make a more subtle pattern in the end. @Jannette NieuwboerYou will find out that templates often use layers as masks so you will likely use them in a similar way. @fiona cookThe technique of floating/defloating to create a mask is something I learned after having used PSP for many years. It was actually someone more knowledgeable than me, in the beta-testing group who told me how to do that, when I was suggesting a way to "turn a raster layer into a mask" (similar to how you can convert a vector into a raster). That was a real discovery and now something I teach too! @Robert GarrettIt is good to read that you tweaked the mask layer to match what you wanted to get. Sometimes (especially if a photo is not that great), we might want to mask to give a faded look. Other times, we want to showcase the photo in all its glory! Great work. @Corrie KinkelYes, some settings might be missing if you use a smaller monitor, but sometimes, they just play hide and seek for no reason. I often answer this question on the FB group too. As for the plaid, the way you cheated is perfect. It shows that you understand the steps and you understand how the program works enough to get to the same point with a workaround. @Karen BorgmannYes, the process becomes easier over time. But if you are REALLY struggling, there is a script in the store that can do it automatically for you. I still prefer to teach how to do it manually instead of promoting an automation. It gives you a better understanding of the process and it will be useful in future lessons. @Donna SilliaYou are ahead of the workshop as we will use "outside" masks in lesson 3, but it is ok. It means you are already comfortable with masks. @ClarineI think you squished your grandpa again. Be careful when you resize an image and ALWAYS use a corner handle. Even then, make sure it resized proportionally as sometimes, it might still distort (I am not sure why). @Hank SobahDid you take those pictures? They are fantastic. @SharlaUsually, making just a stretched line instead of a plaid might not work, but in your layout, it works fantastically! @gwen jewittYour plaid works well with the photo and is not overpowering, even if it is dark. It helps show off the pictures. @Carolyn RyeBeautiful layout. If I could offer a little suggestion, I would brush a bit of white on the mask to show the baby's face better. @Art KuiperI didn't know you spoke French!!! I am glad to hear that you now have more uses for all those templates. And templates can be such a time-saver! Time for bed for me, but I am sure others will keep working and tomorrow, we will have even more masterpieces!6 points
-
The North American Robin is also a migratory bird, they nest in Canada, returning south to much warmer climes for the winter . Although there are some that decide to winter in Canada, feasting on native berries, just like those that decide to stay year round in the states. I do have my uses you know!!! lol6 points
-
I wish I could say I love masks.....but not yet! I'm struggling with all the steps involved. Does it ever get to be second nature??? I guess it comes down to ...practice, practice, practice (and some 🫢words). Here's my lesson 1 layout. It took me so long yesterday that, unfortunately, my grandsons are now teenagers! 🫣
6 points
-
Here is lesson 2. I'll be using PaintShop Pro X9 for all the workshops. I had to increase the opacity of the group - masks photo layer to near 100% to keep the background plaid from showing through.
6 points
-
My last Day2 submission did not have a plaid background because the colours were all too similar to get a good result. So here is a do-over for Day2. I wanted to make sure I understood all the steps needed to get a nice plaid result. By the way I find all the other creations inspiring. Well done all.
5 points
-
Lesson 2 Diamond Extra template Font is Fathomi. Wow, the plaid and the rest of the layout was big and I've had to really compress it. Hope it's not too blurry. Just heading out to work and looking forward to reading and seeing all the cool layouts in the forum.
5 points
-
Lesson 3 using Affinity, I had fun with this one so many different patterns to choose from. Photo by Zdeněk Macháček on Unsplash the butterfly is a PSP tube and the font used is Baby Garland.
5 points
-
Here's my Lesson 3 featuring a photo by Laurey of this beautiful Mountain Laurel, when the sisters went to a local park in Pike County, PA. The background paper with the kaleidoscope effect worked nicely with this, I think. The fonts are: Montez and MS Modern #20. Here's the text from the bottom: "The George W. Childs Recreation Site is a former Pennsylvania state park that is the site of a number of cascade waterfalls along Dingmans Creek; it has been part of the Delaware Water Gap National Recreation Area since 1983."
5 points
-
Les 1 Ik heb de hoofdfoto geplaatst zoals het hoort maar er zelf een achtergrond achter gezet en die ik met helderheid en contrast heb bewerkt tot een ondersteund kleurenspectrum. De plaatjes komen uit mijn voorraad bloemen png die ik er los op gezet heb omdat ik het in dit geval mooier vind dan in een kader.
5 points
-
Sharla that is a great idea to use a plaid differently and I'll keep it in mind if I want to use such an effect.5 points
-
Beautiful (bee utiful) and love the delicate honeycomb background. Well done for your photo patience.5 points
-
Excellent work. Very well used a mask's background💕5 points
-
L2-Autumn Park.
5 points
-
Lesson 2- in Affinity I used a mask from Jessica Dunn called Into the Wild. I have a lot of her masks but I choose this one because my photo has landscape orientation. The mask worked again so simple! But I had 2 other problems with this page. For making the plaid I had to select a 1 pixel rectangle! However that wasn't doable with my unsteady hands and I ended up with a 2 pixel one with every try. That was the point that I decided to cheat a little bit and I first resized that 2 px layer to a 1 px layer but still with the same width it had. After that I could resize again following the lesson. One problem solved but there came another problem when I wanted to have some paint behind my text. I have done so many times in PSP and after looking at the lesson I thought that it was a piece of cake. Sadly NO, so I looked again at the video to check if I had missed something but I just did it as in the video and still had no paint if I brushed on a separate raster layer. In the end I discovered that there is a setting in the top right corner of the brushed toolbar which for me is hidden (I work on a laptop). By clicking on a tiny arrow at that point there is a checkbox protect alpha! It was checked, after unchecking I could paint under my text to make it a little bit more visible. If anybody has this same problem, this is the solution.
5 points
-
I'm glad you brought that up because I hadn't noticed it before. 🙂 And now, thanks to Linda Rexford, we know that there is a column marquee and row marquee selection tool, with a thickness of only 1 px.4 points
-
Thank you, Linda, for the tip! I was unaware of the Column Marquee Tool, and tend to forget to use the Transform panel.4 points
-
Your layout is beautiful! Here is a tip that might be easier. There is a column marquee and row marquee selection tool and they are only 1 px in thickness. There is also a transform panel (windows, transform). If you select too many pixels, you can easily change it here. You can also set rotation and other things in this panel. There are choices so you can choose what works best for you. Hope this helps!4 points
-
You must be really good at describing for the AI. I tried and got something a 4 yr old might draw 😞. Either way, they are so cool4 points
-
Lesson 2. Playing around with the masks, using my Foxglove photo but not adding journaling yet. I have found this second time around with the tutorial that it helps to understand (or try to in my case) what each step is actually doing. eg the mask layer takes on the shape by de-floating etc
4 points