Leaderboard


Popular Content
Showing content with the highest reputation on 06/19/2025 in all areas
-
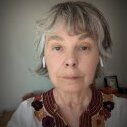
Day 3 - This is my youngest niece, Aminah. The main layout was done in Affinity. The title was done in PSP because I couldn't readily figure out how to do directional text.
 13 points
 -
I'm in the mood for simple pages, but somehow I end up fiddling endlessly anyway! I like making the kaleidoscopes.
12 points
-
Day 3 PSP Using a photograph I took from a garden tour at Wedderburn in the Manioto, in Otago, I used a small square from the statue for the kaleidoscope pattern. The hearts I created to it the hearts in the mask. Affinity This photo was also taken in the Maniototo; it shows a backpacker's hostel close to the rail trail in Central Otago. It was taken on a late afternoon walk back from a long walk, and the light was so different that I couldn't resist. The rail trail is a bicycle trail that runs across Central Otago. I used another Melo mask, this one is called mixed-media-3-spill-frames-mask-01-circle, the fonts are Umbrella and Arial. I nearly placed that text inside the mask, and changed my mind at the last minute.
11 points
-
Day 3 Affinity. I used the mask from Melo, 3 times! We made bluebird houses and I actually raised mealworms to feed them. If you put the mealworms out at the same time every day, they will be there! I tried several different selections to find the background that looked the best. So much fun but so hard to choose!!
11 points
-
Lesson 1 - Masks Workshop using Affinity Photo
10 points
-
#3 Sticking with the Grandpa Great theme, this is the next photo to present. I did the kaleidoscope for the background with a part of my daughter's wedding dress. I darkened it as much as I could be still not really that bold. But, it was a fun exercise to see another part of Corel Paintshop Pro. 🙂
10 points
-
I like the idea of creating plaids and kaleidoscope patterns made up from the exact colours of the host image. So easy and with such nice results. Suddenly all the backgrounds that I see in this blog match perfectly with the image.
10 points
-
Day 3: Created in Affinity. It’s not the type of pattern I’d ordinarily use but it was fun learning how to create it.
9 points
-
Here's my Lesson 3 featuring a photo by Laurey of this beautiful Mountain Laurel, when the sisters went to a local park in Pike County, PA. The background paper with the kaleidoscope effect worked nicely with this, I think. The fonts are: Montez and MS Modern #20. Here's the text from the bottom: "The George W. Childs Recreation Site is a former Pennsylvania state park that is the site of a number of cascade waterfalls along Dingmans Creek; it has been part of the Delaware Water Gap National Recreation Area since 1983."
9 points
-
Lesson 3 - Affinity and this time no problems at all. I like that mirror effect and by turning the dial you can immediately see the what you get and it is easy to go round and see all the different possibilities and choose the one which you like best. I played a bit with different parts of my photo to make the kaleidoscope effect and in the end chose a subtle one. Same fonts and a binocular icon from Freepik.
9 points
-
Lesson 4, continuing with images from my sketchbook ..
8 points
-
Lesson 4. Being a bit abstract in the combination of photos as got carried away again and like Carole says, the effects can be addictive. I've used the overlay blend mode for my background image with a filled layer of a colour taken from the main 'bee' photo. The background image itself applied Effects/Texture Effects, Texture-Plant Leaves.
8 points
-
L3, my rose done with Incendia.
8 points
-
Day 2 - Affinity I was not happy with my plaid and played with some adjustment layers to lighten it.
8 points
-
Day 2 - PSP I am way behind. I spent a lot of time getting the plaid to look ok. The photos are from my grandson, Matthew; the model is his financee, Delaney. The grapes are from Adobe Express. The CF fonts are Andalucia and Action Pencil.
8 points
-
Lesson 2 Diamond Extra template Font is Fathomi. Wow, the plaid and the rest of the layout was big and I've had to really compress it. Hope it's not too blurry. Just heading out to work and looking forward to reading and seeing all the cool layouts in the forum.
8 points
-
Les 1 Ik heb de hoofdfoto geplaatst zoals het hoort maar er zelf een achtergrond achter gezet en die ik met helderheid en contrast heb bewerkt tot een ondersteund kleurenspectrum. De plaatjes komen uit mijn voorraad bloemen png die ik er los op gezet heb omdat ik het in dit geval mooier vind dan in een kader.
8 points
-
Lesson 3: I'm behind, but plugging away at it. Did this one rather fast. Used PSP (2022) since the kaleidoscope effect is much easier than in PSE. Not an effect I would use very much, but nice to be reminded how to do it. Kept it all simple. A friend's dog when he was a pup. He's a big boy now. Elements from my stash. Font Bodoni. I can't keep up with the layouts being produced and displayed! So many great ones, such fun to see. The newcomers are doing a great job with masks. Much better than I did at the start. We're all keeping Carole busy!!!!
7 points
-
My last Day2 submission did not have a plaid background because the colours were all too similar to get a good result. So here is a do-over for Day2. I wanted to make sure I understood all the steps needed to get a nice plaid result. By the way I find all the other creations inspiring. Well done all.
7 points
-
Lesson 3 using Affinity, I had fun with this one so many different patterns to choose from. Photo by Zdeněk Macháček on Unsplash the butterfly is a PSP tube and the font used is Baby Garland.
7 points
-
Day 4 using Affinity I used a photo of hubby relaxing on the grass under a tree with the hills behind him it was a lovely summers day, I changed the photo into a pencil Drawing and made a mask to soften the image by using a photo of the hills which I took from a slighty different angle. I then used a stipple brush over the top to add to it, finished off with Baby Garland Font for the text on a path. Added a second one using the brush set from the link Carole provided added a gradient for the background paper .
6 points
-
Here is Lesson 4. This time I used PSP 2023 Ultimate. I used the Effect Browser - Photo Effects - Retro Lab to get the effect on the background.
6 points
-
Here's my layout for Mask Lesson 4. Enjoyed this one...even uploaded the free brushes all by myself; didn't even require a "Help" note to Carole! Making progress and feeling so good about myself!!! Whoop-Whoop!😉
6 points
-
What a feast for the eyes! @Carolyn Rye Great layout to feature all those connections for Daniel! You might want to add some shadows on the seashells to give them volume. @Susan EwartDid you happen to forget to add some drop shadows on the small photos? With the embossed effect of the background paper, I would be expecting some thickness for those images. Or is it disappearing with the resizing? @Connie CollierGreat page. We can really see the stormy skies. And the plaid is not overpowering either. @AprilDawnYes, creating a plaid from a photo is the perfect way to have matching colors. @Ann SeeberIt is so great to see Magic grow. We have been following her since she was a baby! @CristinaI think I have seen the picture of Jackie in the snow in the news. That looks familiar! @Jeni SimpsonI love that Wendy Medium font. I will have to look for it! That plaid is great and allows to showcase the photos. @Julie MagerkaUsing a dark color is very suitable for this dog. Afterall, he is black and white! Maybe you could consider increasing the intensity of the white in the mask as it looks like it is a light grey (since we see the plaid through the photo). @fiona cookBe careful: the kaleidoscope can be addictive! I love the randomization available in PSP for that. You never know what you will get! @Robert Garrett On your page, we don't really see the "mask" effect. I suspect that the mask was much wider than the photo, so the outside part of the mask didn't have any photo to show. What would you get if you were to size down the mask so we wouldn't see the hard edges of the photo? @Sue ThomasI would not have known that it was a robin if you hadn't labelled it! @Karen BorgmannThat blue paper is perfect for the underwater theme! @Jannette NieuwboerBeautiful flowers! A great colorful montage to showcase the photo! @Corrie KinkelThat is a great background paper. Very subtle but still visible. @gwen jewittSimplicity is so effective! Great composition. @Art KuiperYou chose really great colors to create that plaid. It is a perfect match! @Linda RexfordIt is a great idea to use the same mask more than once. If you want to give them custom looks, you can always flip/mirror them, or add a few white brush strokes along the edges. You will see that in an upcoming lesson. @Donna SilliaEven with similar colors, you managed to get a great plaid! @ClarineIf the mask is much larger than the photo, it loses its "look" so to speak. It is hard when your photo does not have much extra space around the subject, but what would you get if you reduced the size of the mask to fit "inside" of the photo? @Gerry LandrethIf I remember correctly, to get the text to display one letter under each other, you would have to use the Framed Text, inside of a thin rectangular shape. That way, with larger text, only one letter will fit per line. Isn't this thread a fantastic place to share and be inspired? Keep them coming!6 points
-
Here's my Lesson 3 attempt at making my own paper. Pretty cool and the possibilities are endless!
6 points
-
Day 3. Used Affinity. I purposely sized down the background paper, even though I lost a lot of details in doing so, I was pleased with the end result. I also flood filled another layer, with a darker beige, lowering the opacity on the patterned layer to achieve the colour I was looking for.
6 points
-
Day 3 - Affinity I copied the frames from PSP as pngs in order to add them to Affinity and changed the font to Brandish from CF. I also played with the styles settings.
5 points
-
Love the plaid!5 points
-
I love it when a different bird shows up! I have to get a picture and find out what it is!!5 points
-
They look so soft! Beautiful!5 points
-
Nice you used a photo of a robin after all the talk about the different species of them. I like the mirror option in Affinity to create a kaleidoscope effect. I just have to finish my layout and then will be back here to post it.5 points
-
Sharla that is a great idea to use a plaid differently and I'll keep it in mind if I want to use such an effect.5 points
-
Lesson 3. Getting quicker at it. I made two kaleidoscopes and blended down plus changed the layer transparency a bit. Both things completely changed the overall look.
5 points
-
Lesson 2: I don't often use plaids (like Sue T). As a matter of fact, I was purging some papers from my too-large stash and deleted many of them. For this layout, I used the Lady22 template. The pix are of my neighbour and his dog. They were such a bonded pair, and they live with lotsa cats owned by his partner. Sadly, Tommy is no longer with us (the Shih Tzu), and it broke all our hearts. The neighbours are as pet-happy as I am! Because it's a "guy" kind of layout, I used darker colours in the plaid and then modified with lighting, opacity and different coloured layers. Bits and bobs from my stash as embellishments.
5 points
-
Here's my Lesson 4 - Daughter Deb took the photo for this one at The Met (The Metropolitan Museum of Art) in NYC. I played with the brushes a bit, used a solid brush to clear up the center of the painting and a really small watercolor to finish the edges. Then I applied a drop shadow to the whole group. The fonts are Niagara Solid and Copperplate Gothic Bold. The text at the bottom reads: The Metropolitan Museum of Art proudly presents Iba N’Diaye: Between Latitude and Longitude, a landmark exhibition celebrating the legacy of Iba N’Diaye, a pivotal figure in African Modernist painting. Tabaski III celebrates the Muslim ritual of sacrifice. Oil on plywood painted in 1970, it is an imposing size, measuring about 5 feet in height by more than 8 feet in width. EDIT: I'll also post the original photo so you can see my transition.
4 points
-
Our cat works in modeling, from time to time;) L4. JK has been there today.
4 points
-
Here is Day 3 I used the Kaleidoscope paper as the background, and this time I didn’t forget to use the Transform Tool to scale down the other paper - JustJaime-jj-GessoTextures#4.
4 points
-
Jeni, I also prefer to learn how to do it myself first, but after doing that, having and working with Carole's scripts is like a breeze. 😄 She does all the work, including sometimes Math calculations, to make our life easier. 🙂4 points
-
What a cutie this little guy is, Sue. Lovely layout.4 points
-
That script is getting a good mention here. I will have to purchase it; however, I want to learn how to do this manually as well.4 points
-
Corrie, thank you, I am enjoying it. I had already looked at the PSP Mask Workshop last year, so it is not so bad, and Affinity has taken no time to do the masks workshop layouts, IMO.4 points
-
@Jannette Nieuwboer Beautifully done, I love the colours4 points
-
I agree, Corrie. She's just turned 5 this month and is as ethereal as a wood sprite! Thanks!4 points
-
It's a cool tool, turning the dial, then back again to select the one you like.4 points
-
There are far to many unique masterpieces for me to comment on each one. I will congratulate you here by saying that they are a feast for the eyes, and inspirational for the creative mind.4 points
-
Aren't they industrious gorgeous little creatures. Tri coloured bumble bees.4 points
-
Wow Ann, Magic has grown into a very beautiful girl!4 points
-
What a great bee shot and perfectly presented!4 points
-
Thank you I 'm a newbie to Affinity and didn't know this! I made a note and check it out later after the workshop is finished,4 points
-
Lesson 3 using PSP. Went out a took several photo's of the flag flying in the front yard. Created the back ground from the picture.
4 points