Leaderboard


Popular Content
Showing content with the highest reputation on 02/18/2023 in all areas
-
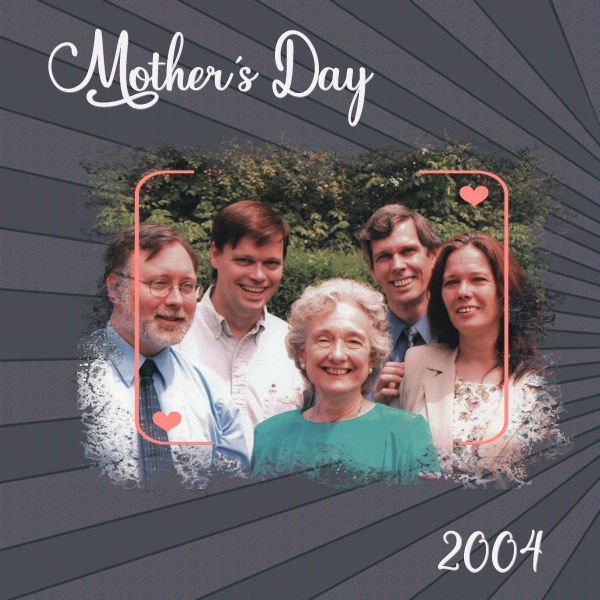
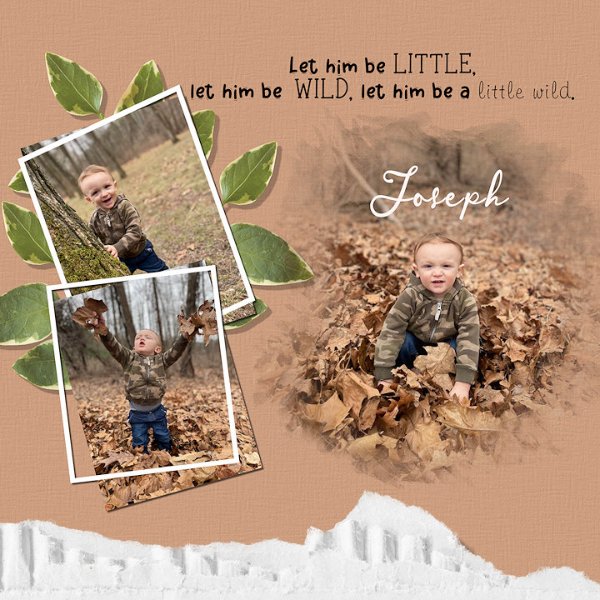
Day 5. I'm burning the mid night oil, after a most enjoyable day hiking in the river hills, in mild weather for the time of year. I used 2 overlays for the background paper. Created a mask using a swirl brush and the vector paint script. All I had to do was apply that mask to the photo. (layers, new mask layer, from image)
 9 points
 -
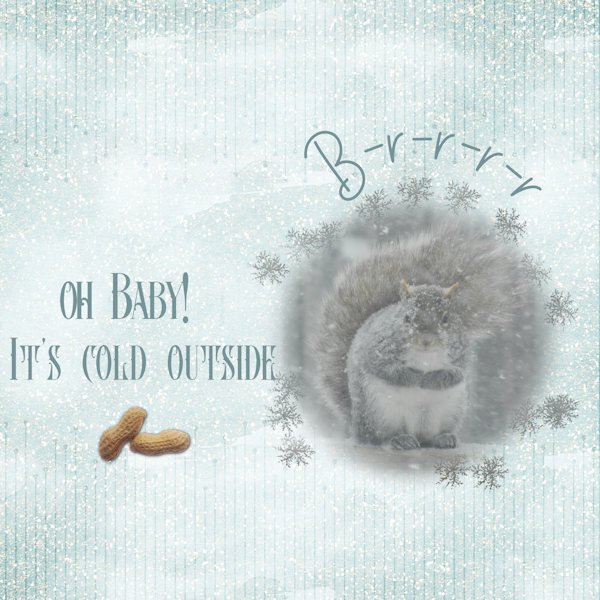
Day 5: I spent the most time trying to get the text on a curve! That always gives me trouble, but I finally realized what I was doing wrong. Used a background paper with an overlay blended with soft light. The pic is mine from a cold, snowy day. It's costing me a small fortune to keep all the critters fed in the cold weather. But I can't say no.
9 points
-
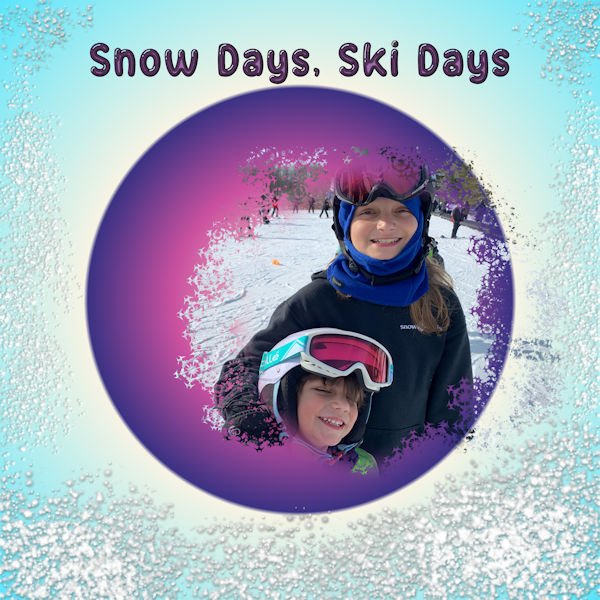
Another ski picture. I really don't care for the mask snowflakes but I did the best that I could. The background is a gradient from group that I downloaded from Resource Boy(free on his website) called 80's gradients. The font is Jelly Bean that I believe that I downloaded from Creative Fabrica. The snow is from a brush that I downloaded many years age for Photoshop and just imported into PSP. The snowflakes are from Hawksmont. All the brushes were free.
9 points
-
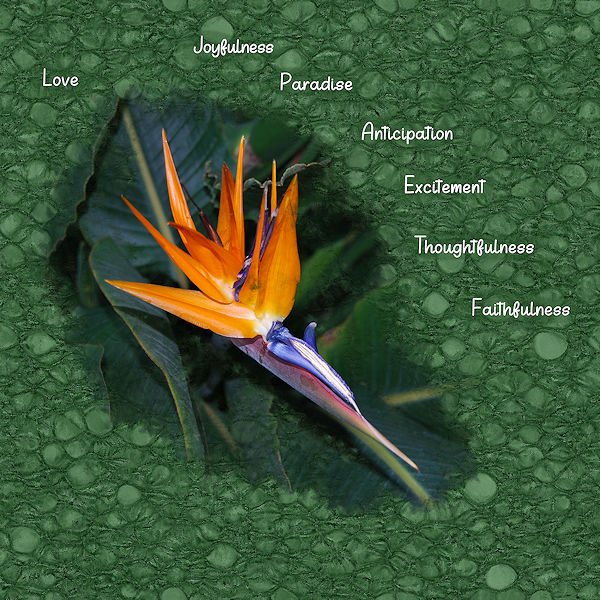
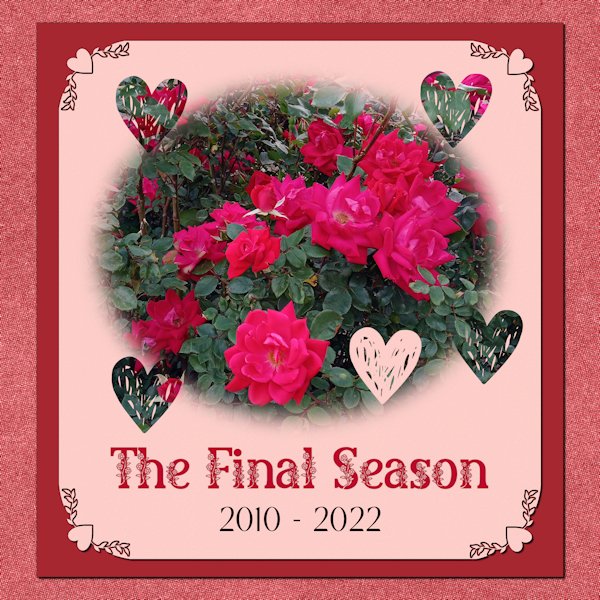
The Knockout Rose bush always showed out every season with spectacular blooms. At the end of this season, it died. A new little bush has taken its place. Soon we will see if it can fill the roots of its predecessor. The decorative font is Beauty Reason from Creative Fabrica. The top and background papers are from Annie Digital. The middle is a simple flood fill using a color from the background paper. The corner punches and heart brushes are from Cassel.
8 points
-
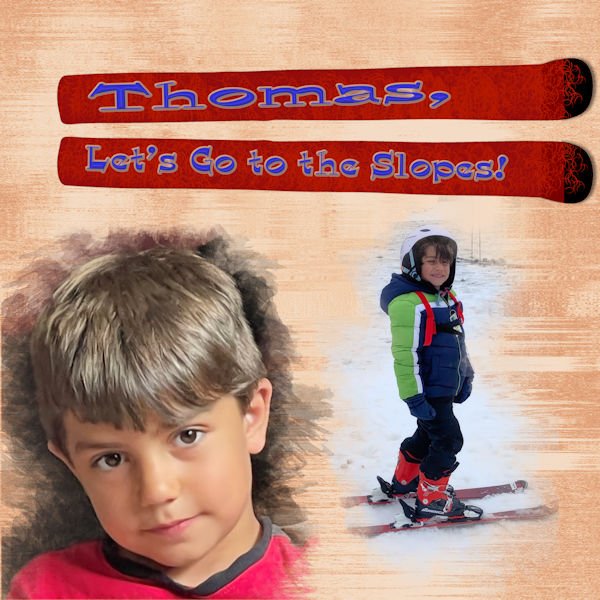
Mask 4 The background color was a color I picked from his face and overlayed with a glitch overlay from deeezy.com. The font is Hornswaggled with a layer styles bevel, rastered then drop shadowed and bevel again. The skis are from DS Janet Kemp. I used the Cass lifted up script and filled them with red and a brush pattern. The photos are my own of my grandson, Thomas. Carole, any comments on my use or lack of use for the drop shadows would be much appreciated.
8 points
-
Day 5 Made another one Font used :Unquiet Spirits Paper created with PatternTile Picture is mine
7 points
-
Day 4 in the bag! I'm finally catching up. Around the same time as the baby squirrely whitetail showed up, this pigeon showed up, strutting her white finery. It left me wondering what's going on, all the wildlife turning up with white pants and white tailcoats. Even the local famous white Magpie made an appearance in my yard this year, far from it's normal territory. None of my pictures were good enough to show this strange sight. When it spreads it's wing and fans it's tail feathers in take off it looks like an angel. So cool. The pigeons are quite comical and thier eye makes them look a little crazy and scatter-brained. Fonts used: Gill Sans Ultra Bold Condensed ("take a walk"), Gold Night ("on the"), Dancing Clarisha ("Crazy"), Good Morning Christmas ("side"). All from Creative Fabrica except Gill Sans...(windows). I used Gina Jones Bright and Cheerful paper 06 for the background, two layers, on upside down and used a blend mode of lighten to get rid of the darker color on the paper. Two borders were used, both by Sheila Reid - at the beach burlap border and Doodlelines page border (both Sheila and Gina are from Digital Scrapbook). Photo's are mine
7 points
-
I've done this workshop several times. Why is it so hard this time? This is the Extra for Project 3. The frame with the hearts had me going for hours trying to get it pink and not covering the picture. I saw where Ann Seeber said "I put an extra mat behind the mask group in order to color the framing and hearts." and so I did. Thank you, Ann. Then I spent several hours trying to get a background. I ended up with 3 layers: the perspective lines, a kaleidescope from a part of the picture, and a patterned layer of Canvas - all with different blend modes. The font is Feeling Blessed from CF.
7 points
-
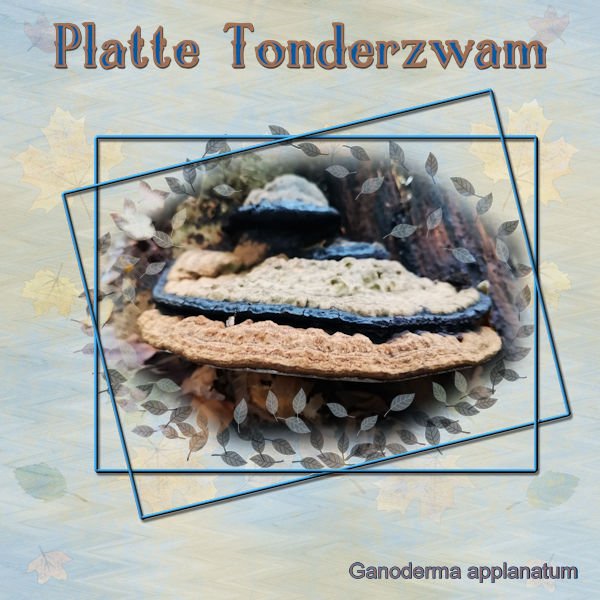
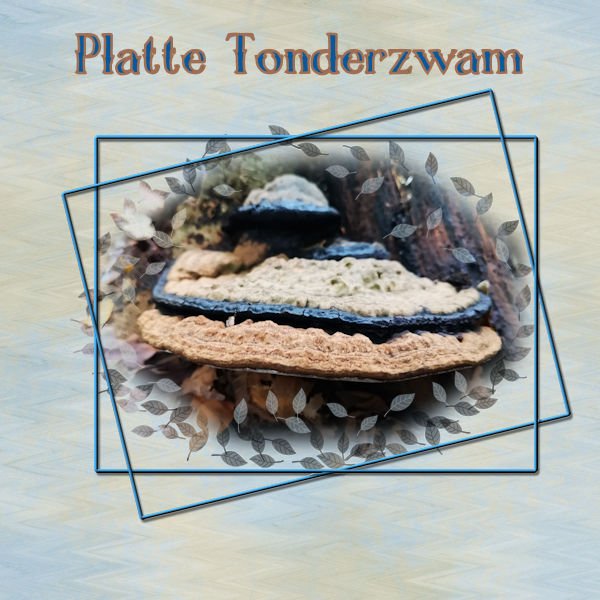
And here is day 5. When making the selection for the mask I used an octagon because of the shape of the mushroom in the photo. This photo was taken in the fall hence the leaves in the mask. The background is made of 2 papers that had the same colors as in the photo with the blend mode set to color and a slightly reduced opacity. After that an overlay with leaves, 2 frames with one over and under the other, thank you Sue T for that idea! The font is Chalk and Friend 4.
7 points
-
Day 4 Masks Workshop - thanks Carole, I didn't even notice the straight line on that day 3 picture. Here's Day 4 with some extra effects.
6 points
-
Day 5 Fonts used : ActionIS-----CK Man's Print Elements from a long time ago ..something i had Paper created from the colors in picture with the Kaleidoscope Effect Picture taken by me
6 points
-
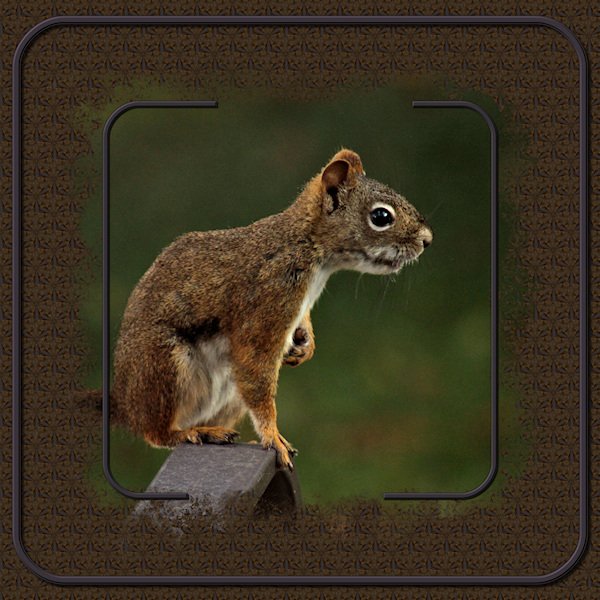
Day 3 Diamond Extra. I call this new baby of 2022 Spider Squirrely, the second. Because after some trial-be-panic learning it became adept at scampering along the rock/glass chip siding of the garage. Remember that stuff from the 60-70's, hurt like crazy if you scraped yourself on it? Turns out, it's great for Squirrels and birds to cling to. I came up from the basement and looked out the window to see the neighbours cat chasing it, and up the wall it went. You could see it was rocky. I was banging on the window and hubby was out the door to yell at the cat. It's only the second squirrel we've seen do that. If I had been able to take a front shot it would have been Super Squirrel as he is in the super hero pose. As it might turn out, he could be a she. The one in our feeder right now looks pudgy, so might have some babies (in our closed-in shed off the garage - there's been several families in there over the years). I think I tried every wrong way to isolate the brackets of the mask and finally remembered about Preset Vector shapes (yay for all the master classes, Q&A's and tutorials - I remember about the preset shapes!). Once I did that I could add a bevel to that shape that I intended to do right from seeing the mask. This layout is similar to other Day layout, they are a set, since it's the same squirrel on the same day. I did the same type of thing for the Kaleidoscope background. Black layer below it, then lower the kaleidoscope layers opacity. this was also set to a small size and I think I did 30% angle.
6 points
-
I now have a profound respect for people who make those ornate masks as it certainly isn't easy. I couldn't quite get what I was going for in this lesson but attempt 5 was better than its predecessors. The bottom text is not fully centered as I prefer to offset text a bit if I am using elements in only one corner. I probably should have stayed with a watercolor brush for the dog and just kept the snowflake brushes for the corner as the dog was on a dark background. Anyway, I compensated a bit by adding a white drop shadow to the masked image. The paper is from Rawpixel, and the font is Cotton Candies. The "Magical Snowflakes" brush set is by Papercaptain on Deviant Art and is still available for a free download of anyone wants them.
6 points
-
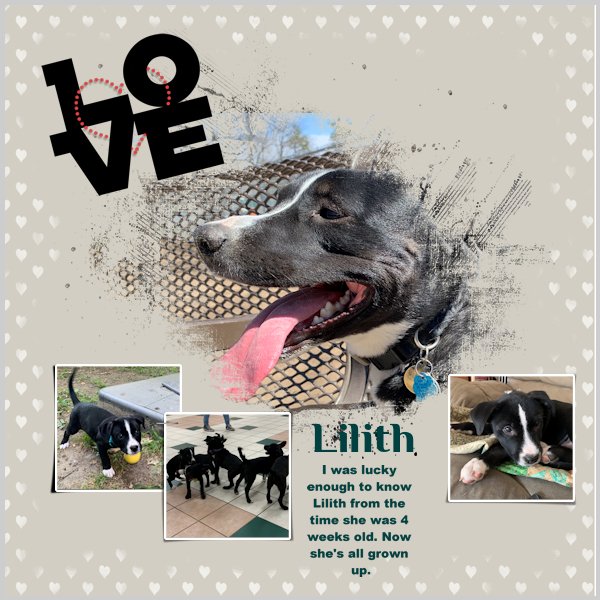
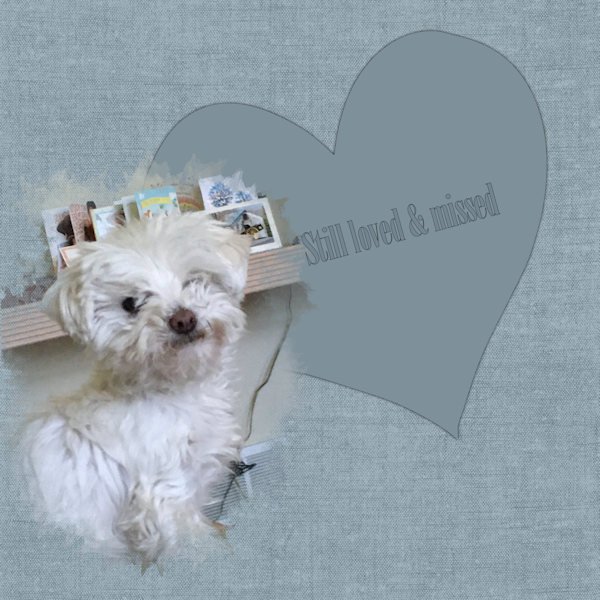
I had a really hard time with Lesson 5's project, finding a picture, getting the size of the photo right, getting the size of the circle right (though I'm still not sure of that), finding the right brushes, etc. I'm not sure if this project properly hits the points that we were supposed to hit, but here goes. This is Annie. She was one of ours.5 points
-
Day 3 The notebook paper and washi-tape are from Janet Kemp on Digitalscrapbook. The paw is from a freebie :Dogs & Cats " kit on the lady22.eklablog.com I hope you don't get tired of seeing pictures of my dog ?
5 points
-
Hi Leslie. Many of the scrapbook designers give template freebies either occasionally or regularly, sometimes through their blogs or FB pages, and often through various blogtrains. I have three good and safe sites for you to browse in. If you want somewhere easy to start, try the blogtrain by ALFLT (a love for layout templates). It comes out every 2 months (Feb is the current one) with about 12 free templates though you do have to hop from one contributor's link to the next to get them all. Their templates are a bit more complicated and perhaps not the best to start with but you can build up quite a stash if you follow their blogtrain regularly. Here is the link ALFLT OFFICIAL BLOG/FB TRAIN FAN GROUP | Facebook The DCS forum also hosts free blogtrain template from their designers (the Escale Amoureuse kit that you downloaded in lesson 1 was from one of the designers there). They offer things other than just templates so the quickest way is to go to their main page and in the top right corner is a search area where you can enter "templates"). They do groups of 6-10 templates at a time. Their templates are a bit simpler with less layers and fussy bits than in some other places so are easier to use when you are learning something. Here is the link The DCS Forum Blog (le-blog-clean-et-simple.blogspot.com) Then there is the Digital Scrapbook forum which has a lot of free templates but if you register as a free user, you are limited to the types & numbers of things that you can download free. it is worth a look at Browse Graphics | DigitalScrapbook.com Digital Scrapbooking but be careful to use your daily download limits for the psd rather than the jpg of any item as I made that mistake myself a number of times.
5 points
-
I ended up using the mask to "extract" the bird. The double, transparent frame is a PSP frame. The chains are a Picture Tube. I made the rings from circular selections, filled with a gold gradient. The bird photo is by Kim Gragert. Kestrels are pretty, colorful little falcons but I've never seen one in person.
5 points
-
Sorry posted the wrong one that wasn't quit finished, the frames were not correctly crossing each other.
5 points
-
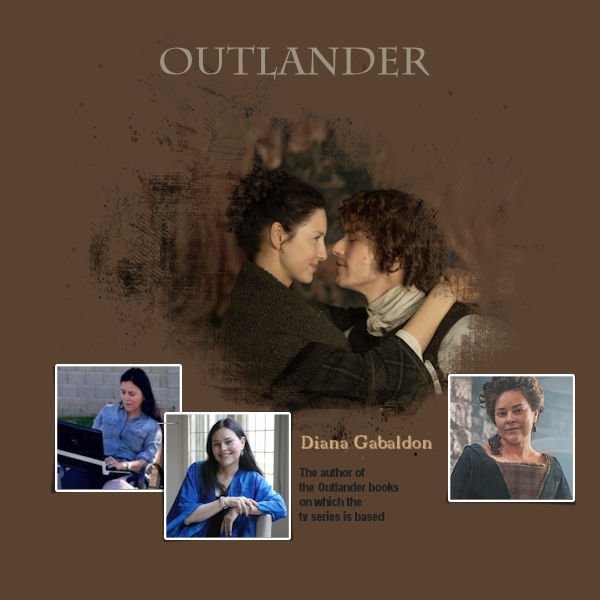
Finally, my day one? I originally wanted to use my granddaughter as subject, but I have to blur everything I make during this workshop, not so nice to look at, so I changed to Outlander , didn't want to use flowers or photo's from our trips in the Netherlands. Well anyway my first project:
5 points
-
@Ann SeeberI'm a pet sitter and dog walker. Seven years ago after being a family law attorney for 10 years, I realized I liked dogs more than I liked people so I quit my job and never looked back. It really is my dream job.4 points
-
Hello, here is my Day 4. I stayed up half the night on Paint Shop Pro! This was amazing. I can't wait to become a Diamond member. I'm just waiting for the kids to get out of school so I have all the time in the world to use it! Homeschooling is a lot on top of two babies under two. ?
4 points
-
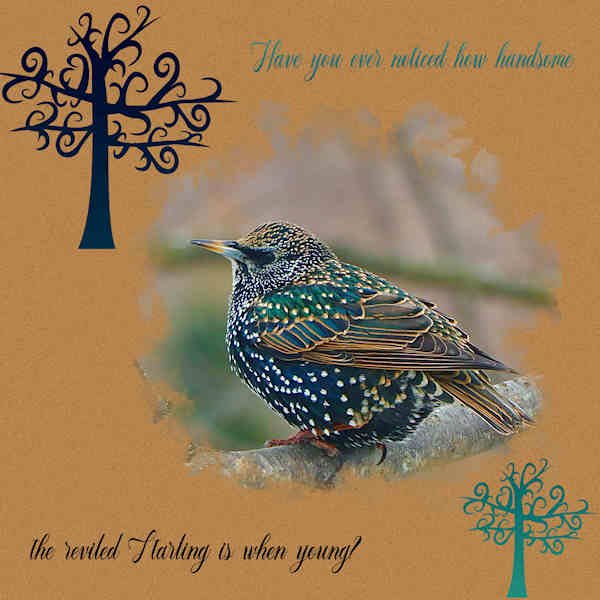
I think I need a Q & A on how to adjust the brush variants. They seem to jump with a mind of their own! I don't understand the settings very well. This cutie is one of my favorite bird photos. He looks a lot different when mature, a drab black with orange beak and spinning huge, pulsing murmurtions in the sky rather ominously. The trees are brushes from Sheila Reed that I used with the eraser to punch down to a lower gradient layer that I made from the bird's colors.. The font is "The Hardcover-Personal Use" (yes, really, and I don't know where I got it ?)
3 points
-
Loving learning this. So much fun!!
3 points
-
Day 3 Mask Workshop, with Instant Effects, textures, additional mask layer for shadow, and illumination
3 points
-
Just got a chance to work on Day 4 project. Photo is a wee foster dog I had for the last two years of her life. She lived, barked, and loved with the pack here. Masking the photo is a good way to use a pic with a cluttered background to soften it.
3 points
-
Day6 Font used :Cardinal Paper created from Picture Quote from the internet Picture is mine Elements are from years ago ,most of them are probably from PNG Tree
2 points
-
Day 6
1 point
-
Day 3 I created several kaliedoscopes...they are in PSP image format and I cannot see the layers...there are more than one kaliedoscope in each PSP image. Yes, I could open them and PSP and give an accurate count...but not right now.
1 point
-
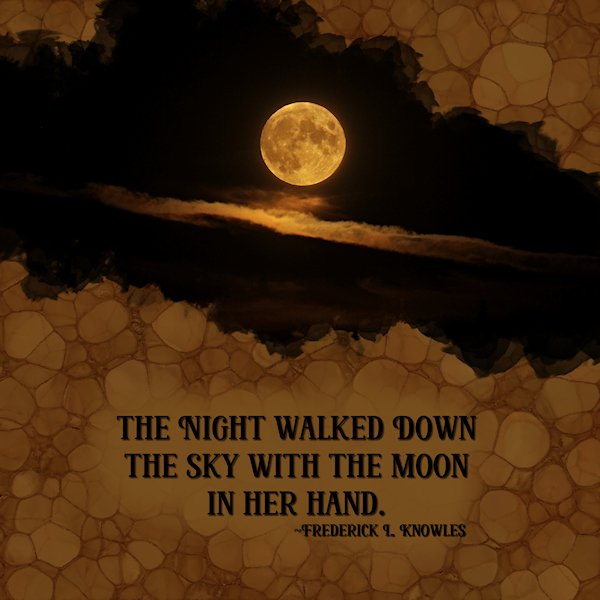
Day 6. All about Linoleum paper. It's almost as fun kaleidoscope paper. This is two lino papers (a yellow and light brown one), with the yellow as the top layer I used multiply and it gave me a darker brown. but it wasnt dark enough so I put a black layer under the two lino layers and reduced the opacity of the middle of these three layers (or the layer above the black which was the light brown one). That way I got it dark and moody for the shot. The moon and clouds are a composite shot of two photo's taken less than a minute a part. I extracted the moon and placed it over the blown out white moon that was in the cloud photo. Font: Risen (from Creative Fabrica) Quote: Frederick L. Knowles (found by searching "moon at night quotes") Photos: mine from Oct. 2022 I'm feeling more comfortable on my second time through the Masks Workshop and trying for adventures things: like the preset shape tool....I know, going where I've never gone before.?
1 point
-
Carole, Thank you for the advice on the skis. Since I had used the flip it up script, shadows were already made. Instead of using drop shadow again, I manipulated the shadows already there. Do you think the new one is better, and how can it be improved?
1 point
-
Remember that you can always tweak a mask by brushing some black or white in strategic places, so you can always have the "perfect" mask at your fingertips.1 point
-
I just looked and I do have both scripts, but they are way down the list and if they don't say "cass" initially I tend to miss them. Thanks. I'll have to experiment.1 point
-
Sue, that's a very handsome mask. What exactly does the vector paint script do in this situation?1 point
-
Thank you Sue, Carole did mention that. So hard to remember all the masterclasses and what was in each one. I'm glad the rest of you have a much better memory than I do.1 point
-
Corrie, another lovely fungi page. I'm delighted to have given you the idea for the framing. I've been doing that kind of framing for years, along with adding fonts and brushes to the frames, and lifting the corners of photos over the frame. It adds a really nice touch to any page. If my memory serves me well Susan Ewart, Carole did a master class several months back, I think it's called dynamic frames, where Carole demonstrates how to create the over and under frames, and other cool frames.1 point
-
here is now day 4 with my Sister and my Daughter in 1988 visiting our zoo in Aachen paper made with the same brushes I used for the mask strips made from the paper1 point
-
@Mary SolaasOK, good to know you have already tried changing the scaling. In fact, once you get comfortable trying things, you can then have more options to find what works and what you like. @GabrielaSince your background is dark, have you considered using a lighter color for the title? I wonder if it would make it easier to read. Goot to see you catching up. @Ann SeeberInteresting way to use the mask and the "holes" with a different color. To answer your question about the "stripes", it is called "banding". It usuallly happens when fewer colors are used, which is common when you are compressing AND resizing too. Consider that instead of 3600 different colors in the gradient, you end up with only 600 since the image is only 600 pixels. @cindy harrisI will ask permission from Lady22 to see if I can share her template to help those who get completely lost with her French site. @TonimarieI am glad you are finding new ways to use what you used before. @Anne LampIt is interesting how you used the kaleidoscope effect without making it into a tile. Often, it is too powerful, but you managed it very well. And the way you placed the image on the background, it really put the focus on it. @Carol Anne WallIsn't that easy, in the end, to make a mask? And now that you understand how to make them, you will surely try again! @Rene MarkerGreat layout. It is interesting how your background, being the same blue as the sky of the image, the masking makes it nicely blended. @Sue ThomasIt is great how you worked with the perspective and layered in a way that it appears under the rope. @MoniqueN.Looking forward to your work. No rush though: enjoy the nice interruption! @Marie-ClaireI am so glad to see that tag being used! And seeing all those photos of your dog, I almost wish I had one (although I am a cat person more than a dog person). @Susan EwartThank you for sharing your process and how it helps in the end. I am sure it will help others too. @Corrie KinkelIs that title a single word for the name of that mushroom? I am not sure I would be able to pronounce it! @Lesley MapleGlad you are getting comfortable in making your own masks. You will see that you will find more opportunities to use them. I would suggest being careful having text on top of a ribbon, especially for a ribbon that is not completely flat. Are you able to put the ribbon on top of the text, and resizing it or moving it in a way to not hide the text too much? @sharon thompsonYES, masks can be used in many other projects than scrapbooking. And once you understand the principle of masking, you can use other adjustment layers in even more creative ways. For those who do have access to the DIAMOND membership, the Fantasy World master class uses those adjustment layers to create... adjustments. @Gerry LandrethThanks for the name of that font. As a subscriber, I might be able to get it. I love the quote for your layout. I think it can also apply to families with young children!! This thread is so busy that I heard some members mention they get flooded with notifications. If you don't want to get an email for every single post in this thread (which the default if you have posted in it), you can change that either by unsubscribing, or getting only one daily notification. For that, go to the top of the thread where you should see the red button that says "Following". Click on it to change your preferences. I also wanted to let you know that this weekend, I will be at the computer a little less than usual, but I won't neglect you. If you have issues, don't hesitate to contact me or to post in the forum. I might just be a little slower than usual.1 point
-
Masks Workshop Day 2 Diamond Extra. This is baby Squirrely White Tail. Her's (or His) dad used to frequent our feeder. Sadly he had a run in with a transformer and did not make it. I'm glad to see he has passed down his white markings. I know, I know, never point the subject out of the frame....but, in my defence, there are TWO ends to this little creature and one of them is surely pointed inward right at you. ? It's all about the base, 'bout the base, no treble (with apologies to the singer of that song). Fonts used: A: Quentara. Tale: Amnestia Normal. Of A: Allicia. Tail: Audiciti. All from Creative Fabrica. Photos: min. I used the plaid at 45 degrees and as large as you can make it (250 I think), with a black layer below and a reduced opacity on the plaid layer. I changed the sizes of the small masks (before they were masks). I remembered learning that if it's in a group I can resize all the group at once so before I made a mask I made a group of the black square and the frame, resized it, ungrouped it and made the mask of the black square. I also bring my photo into the layout and lower the opacity a lot to see the size against the raster layer (before it's a mask) to get the sizing. Once i'm happy with the size of the photo and soon-to-be mask I can then go ahead and make the mask and drag the photo in. It might be a long way but I found before I'd bring in the image and I always wished it was either a bit bigger or small or wider or taller. This takes all that away and I can make the best decision before I make the mask. Love all the layouts, you are all so creative. I'm learning a lot from you.
1 point
-
Day 2 The tag is a freebie of Cassel : Acrylic hobbies tags1 point
-
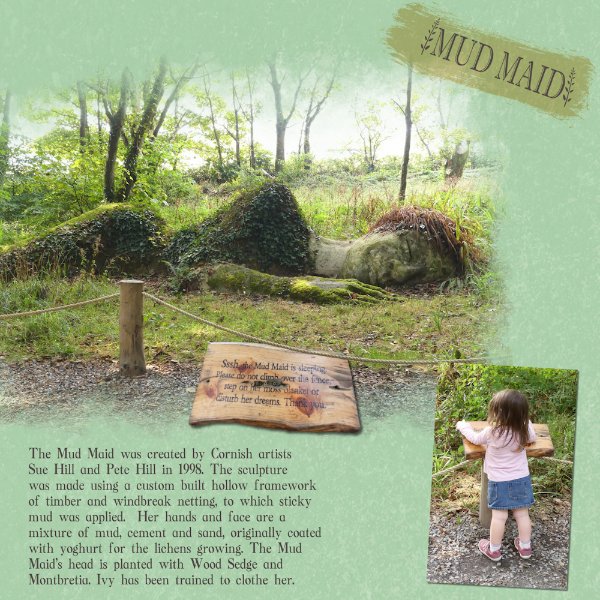
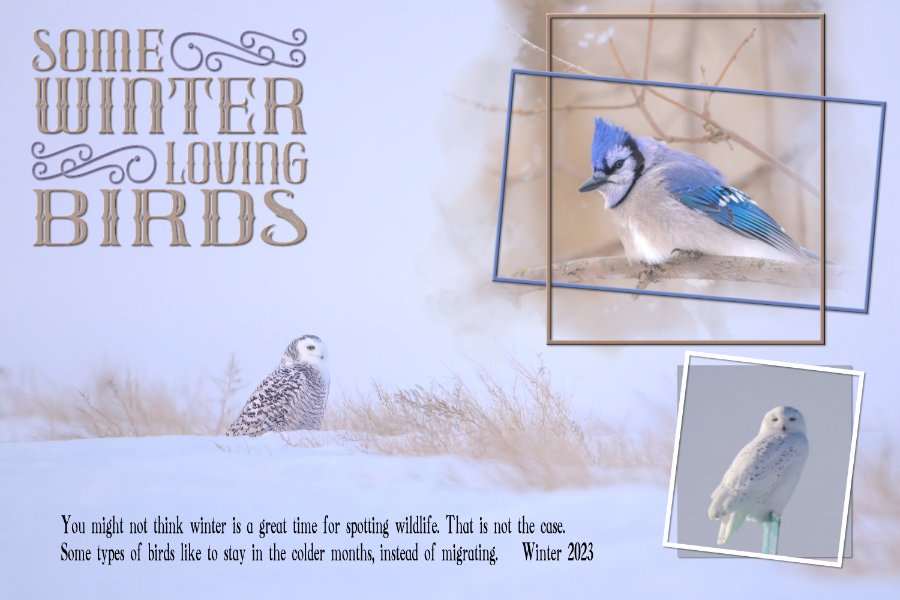
Day 4. I applied 2 overlays to the background paper. Extracted the notice from a photo, perspective, placed it just a tad under the rope. I wanted to make a visual reference, As a reference to the rope is in the notice. It's the same notice which my granddaughter is reading out to me. She had memorized the words, as she had been there many times before. Which reads, in case it's not very legible, after being resized down. Ssssh, the Mud Maid is sleeping, Please do not climb over the fence, step on her moss blanket, or disturb her dreams. Thank you. Ann, I afraid I don't have an answer for the gradient. I haven't experienced that before. With regard to your text, I notice that your joined up writing isn't joined up. Was the kerning set to 0, if it was try a minus number to join the letters. A lovely Male Snowy, I see far more females, than males. Maybe because they are harder to spot, being almost all snow white.
1 point
-
Hi. That plaid trick is wicked cool really neat. (Gah, I've live in Massachusetts too long and I'm picking up the slang over here). I made the plaid from a photo that I decided not to use but I still felt that the plaid I made from it worked. I remembered my shadows this time, too.
1 point
-
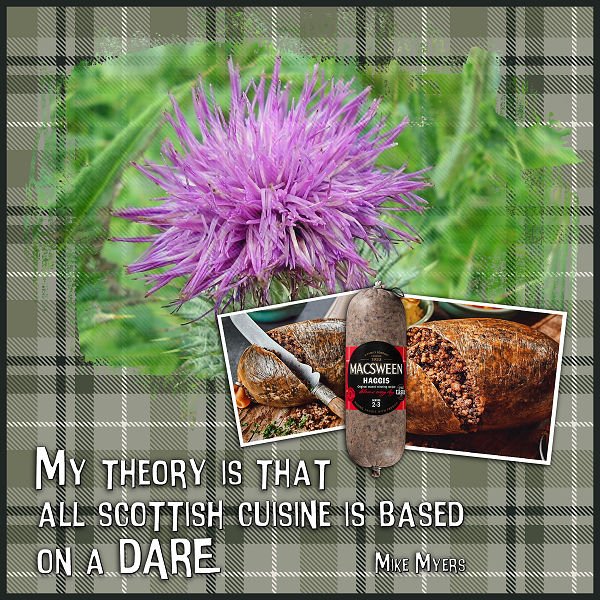
I was working on some Scottish themed tags for friends so though I would continue the same theme here. I found that I have to rename all the template layers before I even start and then renamed them again as I add things.... best way to not get too confused. I snagged the haggis images from internet food sites. The paper is from Aleksander Gusev over at Creative Fabrica. The font is intensa fuente. Sharon
1 point
-
Day 2 Extra. In order to display the photo I wanted to use I had to rotate the page and relocate the little photos a bit too, otherwise they would have obscured the big mask. It was nice to make a plaid from the colors of the photo, I haven't done that for a while. Having scripts makes me lazy! The fonts used are Chocolate Sprinkle and Arial.
1 point
-
Day 1 I used a mini kit from DigitalScrapbook Feb 2023 Blog Train, and the mini kit is from Diane Hiller, on her own blog you can also download a Fan freebie that goes with the mini kit. photos are mine.1 point
-
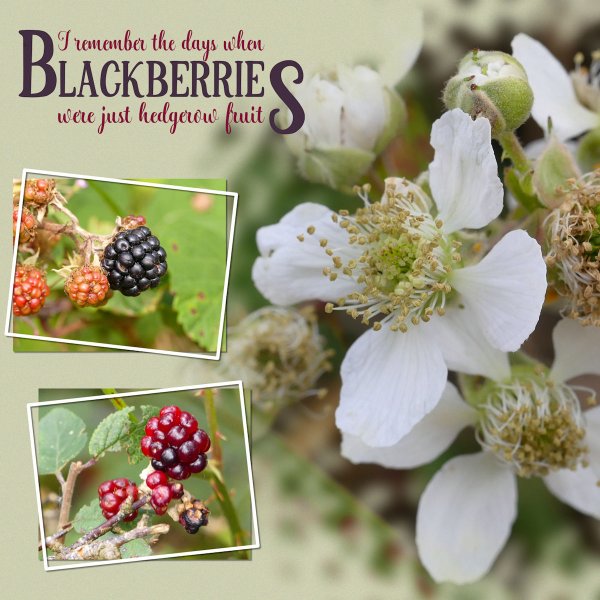
My first recollection of blackberry picking was when I was around 4 with my gran and mum. Then my mum and I. I continued blackberry picking after I got married, introducing my own children, as young as babies in arms. My grandfather and father wouldn't start hedge cutting until after we had finished harvesting the hedgerows. My husband wouldn't start either until I gave him the go ahead. Sloes, Damsons, Rosehips and Elderberries were also gathered for acholic beverages, such as Sloe Gin and tea. When I was home last year, I took my 2 granddaughters blackberry picking several times, what an absolute joy it was. We ate as much as we picked, which was always the norn. I can still smell the blackberry and apple tarts we made, and ate with piping hot custard. I don't half miss the fruit picking season.
1 point
-
The results from Lesson One. I already feel more accomplished. Why did I wait so long to learn this?
1 point
-
Here is the baby of the family, all grown up now. No matter how many times I do the steps to convert a PSD mask to a PSP mask, I always have to go back and redo it at least once. Eventually muscle memory will kick in.
1 point
-
normally when using templates I am mostly open my old CS2 because of the clipping mask feature. So now I learned it for PSP , thank you Carole for this workshop, here is my 5 year youmger Sister, she died suddenly in October 20221 point
-
I had already put my mind to using the background photo as the main photo for day 1 of the Mask challenge. We can have clear blue skies, but when the wind blows with such force, visibility is greatly diminished by blowing snow. I used the mask which came with Day 1 of the Love story challenge (Masks) back in 2017. I did have to edit it to accommodate the Blue Jay. The mask suited the layout I had in mind. I placed the blue frame, over and under the brown one. The page itself came together quickly, the word art took a little longer. I didn't use a 12x12 scrap page, I used the size of the photo.
1 point
-
It doesn't matter how many times I do the steps for converting to a mask, I still manage to mix it up and have to re-do and re-do! This one was fairly straightforward to do, but I had so many interruptions while I was trying to do it! But, done for Day 1. (It was, however, easier than the first time I did this workshop.)
1 point


Resized.thumb.jpg.d25811db03a63358cedab1e79f527635.jpg)