Leaderboard
Resized.thumb.jpg.d25811db03a63358cedab1e79f527635.jpg)


Popular Content
Showing content with the highest reputation on 01/16/2023 in all areas
-
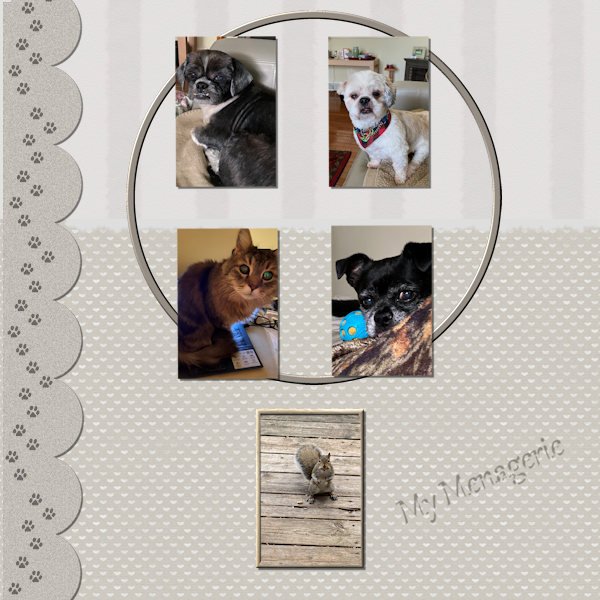
I wonder why it takes me SO-O-O long to do one of these. I dither and worry and then change things around and then don't feel really satisfied with the results. But then I just want it out of my sight and posted. Later, I will want to make even more changes, but can't (thank goodness). I am thankful to have those two Cass scripts (open as new layer and clip to it). These are my rescue animals who share the house with me. The one at the bottom is the one who lives outdoors with his/her tribe and gets chased all the time.
 6 points
 -
For today's daily theme I had these wonderful illustrations by Lorraine Dell Wood from her Flirty Hat series. I used a template from Corel and made it my own. In order to get the borders around the pics: 1) Merged each of the groups; 2) Selected the outside of each one with the magic wand; 3) Inverted the selection; 4) Select selection borders and flood filled. I followed the Lined Paper tutorial in the Campus for the background. The font is RiotSquad, free from DaFont. I actually had a tough time picking a font and settled on this one as my deadline was quickly approaching.6 points
-
6 points
-
The 4 of us went to iFLY...what a fun day...full of memories. Template from Kim's Creative World, ALFLT, August, 2022. Does Judy look like she is having fun?
5 points
-
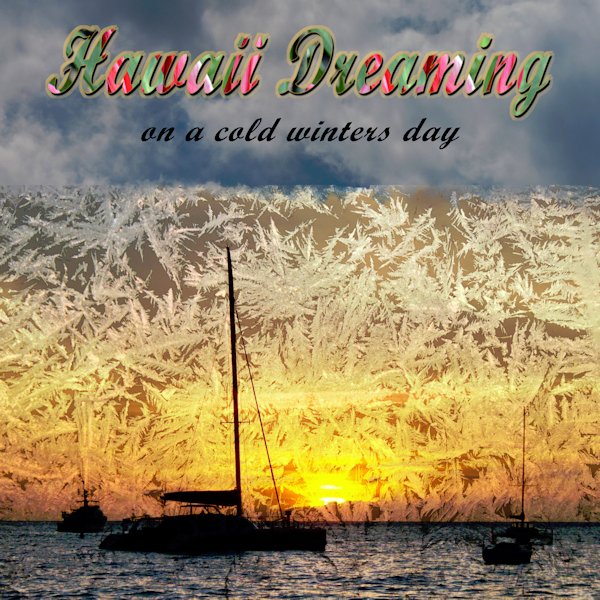
The topic on PSP Manics is frost but I thought I would post it here also. Hawaii Dreaming on a cold winter's day. All photos are mine, Maui Hawaii, my living room window and cloudy sky. The font is Script mt bold. The frost over the sunset was done with the overlay blend mode.
4 points
-
My friend, Michelle, at a professional pickleball tournament. Center court is behind her in the larger photo. She is posing with pro player, Lucy Kovalova, in the smaller photo. Template 94 by Lady 22, Bourico Casper. Word art from Creative Fabrica.
4 points
-
I extracted the buck head at the top. I'm pretty pleased with it. I think it is my best extraction to date. Interestingly, I had been thinking I would like to do a layout with deer heads and this template appeared. Perfect!
4 points
-
Hello. Looking forward to learning how to capture my memories in a different manner other than just photos. I mainly enjoy hiking and camping as a source for many of my photo inspirations.
3 points
-
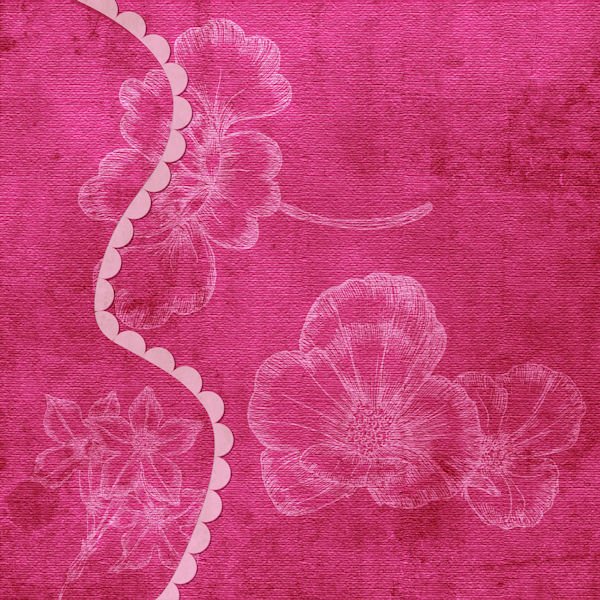
OK. I've been playing around ((SO OCD)). I couldn't make the curved papers with the pen tool UNTIL I made the path go around the sides of the layer to meet with the beginning of the curve. Then I could make the magic wand select the inside of the path in order to color the "curved paper". Then trouble with using the Vector paint script - maybe it had to do with F11 ???? I'm not sure at this point. I also used the Vector Tube script to make the chain edge and the rope edge. The scalloped edge was made with the Vector Paint script. So here are my results. The 2nd layout shows how I had to go around the edge of the paper in order to make the different colored pages (I pulled the edge made with the rope forward - that's why it is not actually on the edge of the page).
3 points
-
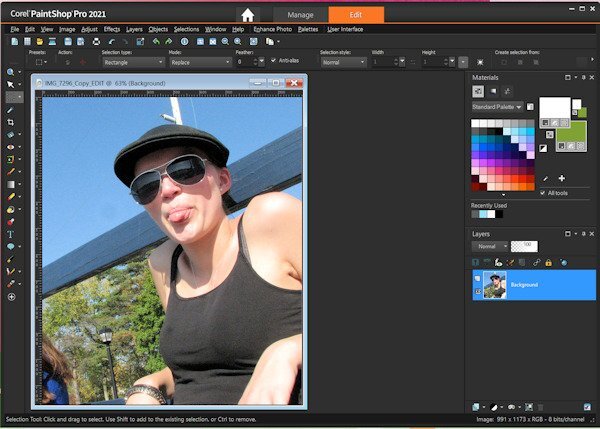
Joining Boot Camp was a last minute decision. I always enjoy going back to the basics where I always learn something new. Because of major life changes, I wasn't able to finish the workshops at the end of 2022. I went from helping out with my mom to being her full-time caregiver. The pace of Boot Camp fits perfectly as I learn to carve out time for little projects. My workspace is basic with some adjustments. I use larger icons and have a couple of Carole's scripts, Open as New Layer and Clip-to-It, bound to menus. As a recovering "Early Adopter," I use the latest version of PSP. However, I always keep the previous version in case there are bugs in the new version when it is released. The picture in the workspace is my niece and her daughter. The other picture is of her boys.
2 points
-
Julie, that's wonderful. Love the little guy at the bottom (okay, love them all). I know what you mean, I am in the throws of the DIY too. It was a real challenge to find the design I wanted. I moved stuff around for quite sometime. Then saved it and came back and looked and thought, nope, not there yet. Why is it that later in the evening I finally get an idea gelling....and it's bedtime? Might take me few days get mine done. At least I have a direction to go now. I like these DIYs because they are hard and they really challenge me in a design sense.2 points
-
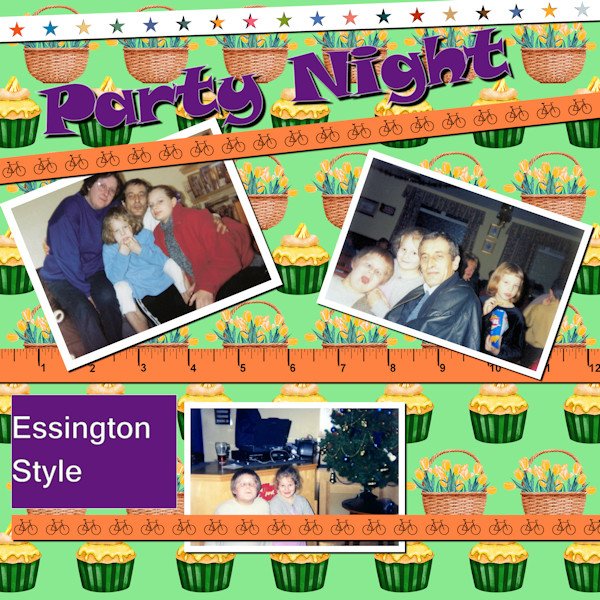
Hi, Have to take things easy so have time to work through some of the Lab exercises so her is the latest offering number 6 06. The background is a more a spring paper, I downloaded from somewhere, with the theme of cupcakes and baskets of daffodils. The ribbons are made following the instructions in Lab 6 06, using the Webdings text the bicycle is the letter "B" and the tape measure is also from the Lab 6 06. The photo's came from a night out over 20 years ago, so we all look a little different, my son is now 30, I won't tell him I used that photo of him.
2 points
-
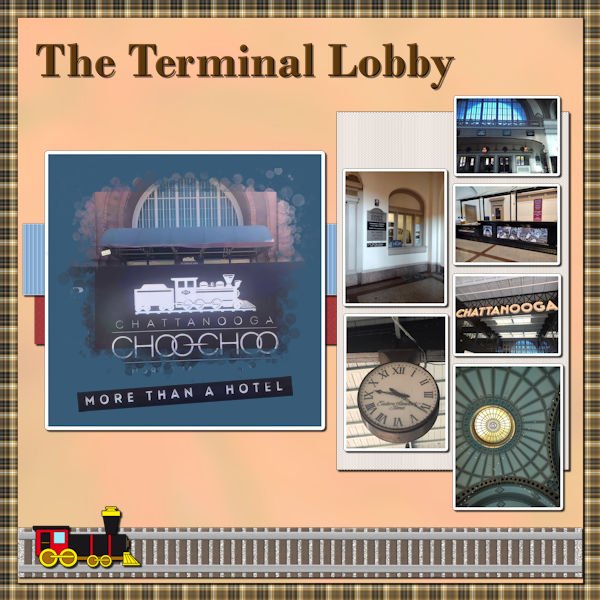
Next layout for the Chattanooga trip. Papers and elements are my own.
2 points
-
Lab 6-5 Cartoon Words Burst Shape Halftone Pattern Extra: Glitter frame is from the recent Master Class: Borders. I used two frames (on 2 separate layers) that I was deciding between and then when i had them both on, liked that version best (happy accident). Fonts are Grinched 2.0 from Creative Fabrica, fitting because the actual tree is very Dr. Seuss-like. Arial Narrow was used for the the date. Photo's are mine. The "fur" boss was lots of help today, knocking my pencil off the desk about 10 times before taking it in her mouth and running away. After a good chase I caught with her "stash" of her pencil and a pen I didnt know she had taken. it's really easy and quick to drag the photo's to here.
2 points
-
Ran across this layout that I played with when doing one of the recent labs. The window was "snowy window" and a freebie around Christmas 2021 and I removed the snow; the curtain top was something I was looking for to hide the top of the "netting" curtain I had used in that lab. I'm not sure where it came from but was probably originally from PS. All the rest is mine.
2 points
-
First of all, come and say HI once you register for this bootcamp. We want to know who else will be there, on our side to cheer everyone up. Everyone started as a beginner, so don't ever compare yourself to others. You will learn one tool at the time, one concept at the time and you will create one project at the time. Everyone will have different photos and possibly different supplies so every project will be different. Once the Bootcamp is started, on January 16th, 2023, you can post your projects in here. Remember to resize your images to about 600 pixels AND saving in jpg format, before uploading them to the gallery (check this tutorial to upload to the gallery) so it won't slow down the site when we have lots of your masterpieces. Try to follow the tutorials at least enough so that we can recognize what lesson you completed. Now, let's get ready ! If you missed the registration link or if you found this thread before I announce it (some people are very observant), HERE it is. Share it around if you want. Although this Bootcamp is mostly meant to help beginners, we won't exclude anyone for "excess experience". Some participants are back for a second (or third) round. You are always welcome. Remember that it will be the exact same tutorials so don't be surprised. I am sure you will now do something slightly different than the previous time. Since anyone can follow the whole Bootcamp using the trial version of PaintShop Pro, this is a perfect opportunity for anyone to give it a try and see how they like the program, so share with your friends who MIGHT consider using PaintShop Pro. The 7 tutorials will be spaced out over almost 2 weeks. This should make it easier for participants to follow without feeling stressed (it should never be stressful!).1 point
-
I have not changed my workspace since the first bootcamp I attended. I like the light grey background and the palette that Carole Cassel uses. However, I notice that Ann Seeber is adding the Organizer palette to hold the pictures etc. she will be using in the layout. Well, I had used it at first and then discarded the idea. But, I think I will use it again as Ann is.1 point
-
Ah, a nudge to my design sense. Thanks for that!1 point
-
One way to "play" with those is to see which shapes you can "line up" or which ones you can "overlap". Typically, those shapes come from an existing template that I just tweak around for you ?1 point
-
Susan, I think you nailed it: they are really challenging in a design sense. And I don't have much of that! But it's fun to try.1 point
-
I am going to use 2021 for this Bootcamp, because I am not very comfortable with it and I have it. I am most familiar with X9. This is my workspace. Not sure what photos I will be using, but I opened one of my middle daughter being a teen, about 12 years ago. She has grown up a bit since then ? We are both wiser now.
1 point
-
I've been a member of The Campus for over 2 years but I decided to try something new with my PSP setup. I activated the Navigation on the Manage tab in order to create thumbnails and then switched to the Edit tab and added the Organizer palette for the first time and voila, the thumbnails appeared as if by magic! It seems I'm forever hunting for the photos or elements I need so now I can gather them all in a Tray, which is also new to me. Here's my setup:
1 point
-
Yeah, it seems to be missing in the forum and gallery. It might be due to the different platform. I'll check if there is a way to get it back OR to get something comparable. Thanks for pointing it out.1 point
-
This is how I will be set up within the editing screen for working.
1 point
-
Hi Mary Solaas I see that you have correctly applied the instructions I gave you on January 5, January 6 and January 13/01 following your desire to know how to proceed to reproduce the side paper (section Forums The Lab Lab 13 - 01 Stencil design). You went through the point-by-point description that I’ve known for a long time as if it came from you. Thank you for quoting me.(that’s a bit of irony).
1 point
-
here is my screen, I use the dark grey mode, made toolbars and sometimes I use the ruler I want to use photos from Berlin , we visited 20101 point
-
Michele - I use point-to-point, connect segments, show nodes. I use a tablet and pen (getting used to that).1 point
-
Now that's the kind of residents I would love to have. Fabulous Bonnie!, I love the one of the tail. Great touch...and it's a the "end" of the layout. ?1 point
-
Hope this works!! My second post for 2023. Here are a few pictures my amigurumi crocheting characters that I made last summer. I did many more and did donate them. I also made some for the children in our area to give out at Halloween. If I am not in here, I am crocheting.
1 point
-
Thought I would introduce myself, it has been awhile since I have posted. I am from New Brunswick Canada. I am using PSP 2023 and have been a Diamond member for sometime. The campus is the best site in learning PSP, it has so many tutorials and videos .1 point
-
Never underestimate what you can do by combining several different pics to make one cohesive project. Removed a few backgrounds, recolored the abstract background, and the font is Airport. It actually took me a lot longer than I thought it would, mostly due to the different proportions of the originals and my OCD need for perfection. ?
1 point
-
The Picture Tube Fireworks from Carole has been useful for me to illustrate memories of a picnic concert we went to in the summer last year, in the grounds of Highclere castle, Newbury, Berkshire. The evening ended up with a fireworks display so I have used my photos of a firework and the picnic. The picture tube was easy to use around the edge and I also added one singly for a splash. To extend the main fireworks image and for a smokey effect I used Cassel's script cass-Dispersion. Thankfully the instructions for use appear in both the script description as well as during the various stages of application. Maybe I could have used a mask as an alternative? For the main picnic photo I used Cassel's cass-curved photo script. Here though I found I couldn't get it to work on the photo layer within my main canvas but it did work by treating it as a separate image and pasting it into the canvas.
1 point
-
I thought I would have a little fun with this theme. It started out as a black on white illustration by Henn Kim. The font is Sleepy Fat Cat. (It's a duo with one being dingbats of cats and I think I got it from DaFont.)1 point
-
Hands, then and now (song is Time in a bottle Jim Croce
1 point
-
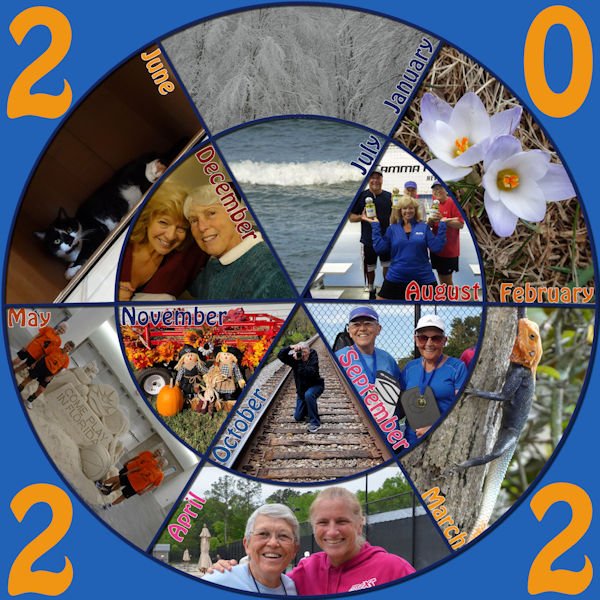
Hi everyone. Happy New Year! There are so many projects on display but I don't have a new one for January to show. Corrie in the Forum gave me the idea though so I am also using the freebie YearInReview to represent a sort of graphic annual expression of achievements last year from a couple of the Campus workshops that I attended: Masks, Templates. The actual month names are not particularly relevant to the projects but they still represent the year. Thank you Carole for your tuition and for the freebie/s.
1 point
-
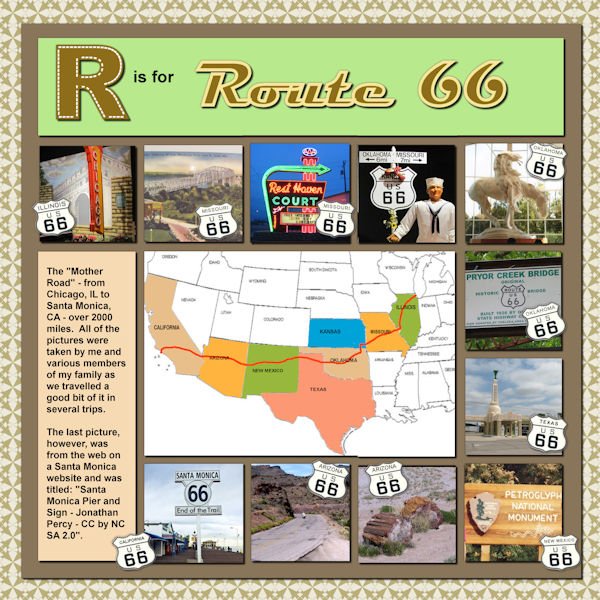
OK - still working on 2022's Alphabet Challenge. Finished R is for Route 66. Such a long road and so many interesting places to see and take pictures of. I tried to take representative pictures of the places within the states covered, but I didn't have pictures of Illinois (on Route 66) although I've been over that road many times, and I didn't have pictures of the road in California since I've never been to Santa Monica (although I've been to Barstow - but no pictures). Anyway - this is my take on the route.
1 point
-
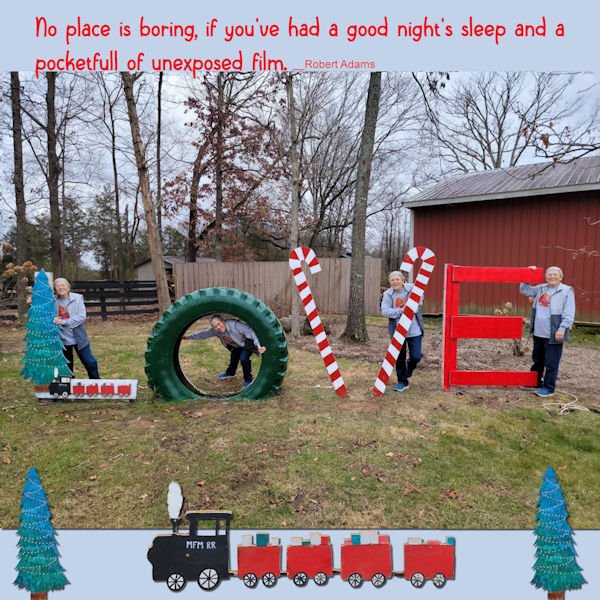
On the way home from The Ole Country Store we stopped at Messick's Farm Market. "Virginia is for lovers" is Virginia's slogan so you find these Love signs in lots of places. Messicks decorates theirs for the season. Of course, the quote at the top of the layout is a bit outdated but I like it and the sleep part fits me perfectly. I extracted the tree and train from the photo.
1 point
-
2022 Year In Review; template by Carole.
1 point
-
I have tried to make a side paper. Mireille showed to do that with the pen tool. I still find it a bit difficult to work with the nodes, but I am satisfied with the result. I also used the VectorTube script and Carole's TattingLace08 tube
1 point
-
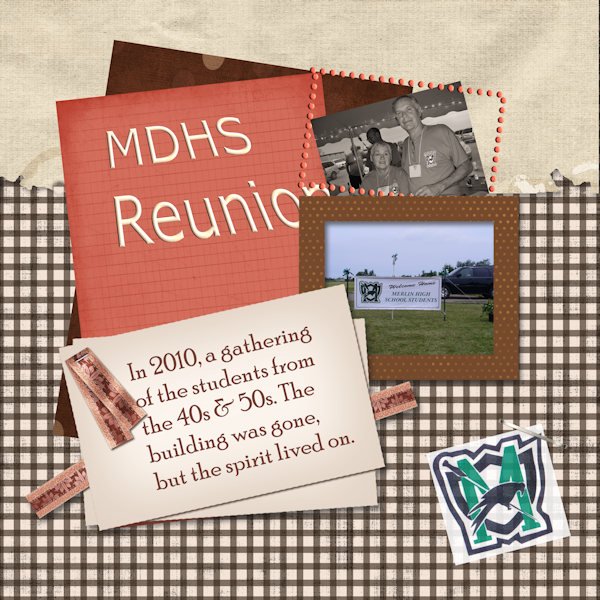
This is what I made for the January Challenge. Used photos from a high school reunion (my sister's) which I also went to. Most of the bits and pieces come from a freebie called "little moments". Can't recall where I got it, maybe Digital Scrapbooking.
1 point
-
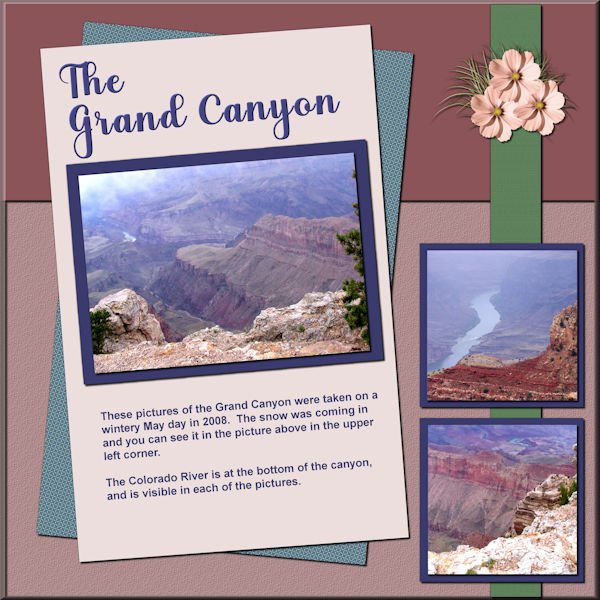
Here is my take on the Sketch. The pictures of the Grand Canyon were taken by me on a trip we took in 2008. Winter hung on a long time that year and though it was in the later part of May, snow was coming in as we drove through the South Rim road. I really wanted to take pictures of the Colorado River at the bottom of the canyon and it really showed up as we drove further down the road and stopped off at one of the areas where you could get close to the edge. The colors used were from the palette obtained with the 2nd Palette Script. I also used the ClipToIt script. I made a pspimage template of the sketch. All the elements and papers are mine. The title font is Aryaduta.
1 point