Leaderboard


Popular Content
Showing content with the highest reputation on 05/09/2025 in all areas
-
Day7 – Affinity I chose the Diamond template for this page. There are many ways to modify the number of photo placeholders. However, I took advantage of a technique I learned some time ago from Affinity Revolution titled "How to Make a Photo Collage in Affinity Photo," and practiced the method using the Transform Tool to tweak the photo placeholders. Papers and Elements are from Lynn Grieveson’s Taste Like Sumer kit. Cassel’s DateScript#12 done in PSP. Fonts: Canastra and Clarkson Script
 6 points
 -
I finally broke down and downloaded the trial version of Affinity. It is only the 7 day trial, but I am pretty sure that I will invest. The papers, hearts and scatters are all mine. I'm not really happy with the font which is from my Hallmark card program, but experimented with a bevel along with the shadow.
4 points
-
Jacques, I saw your question and looked into it. I found a site that shows where to locate the Auto-Save feature in Affinity Photo. 15 Tips for Getting Started With Affinity Photo
4 points
-
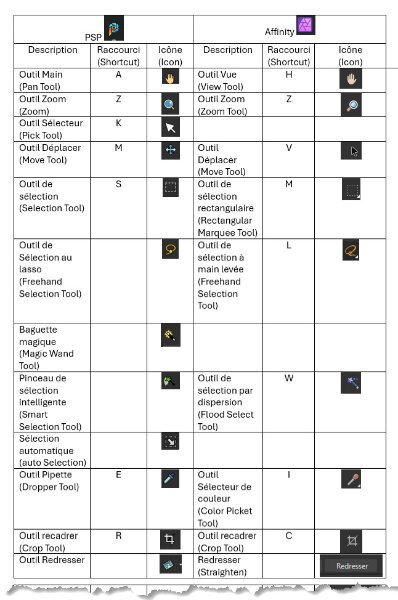
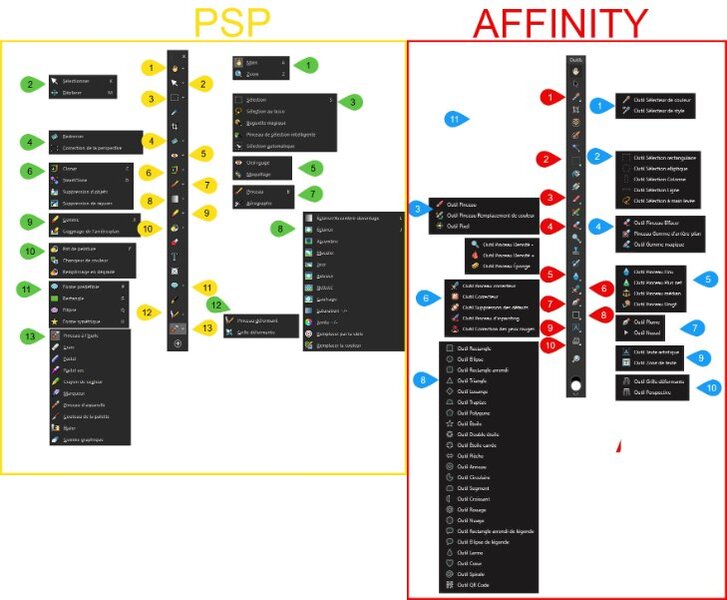
The more I watch Affinity tutorials, the more impressed I am. I'm going to make a comparison guide to help me:
4 points
-
I love your paintings. When I saw you had to quit using the oil paint because of being allergic, I wondered if there was an alternative to the regular thinners. I googled it and came up with this answer. It would be as shame to have to quit painting them as you create beautiful work. "Yes, there are alternative thinners available for oil paints for individuals with allergies to traditional solvents like turpentine or mineral spirits. These alternatives include low-odor solvents, natural alternatives like citrus-based turpentines, and even solvent-free painting techniques" I don't know if this will be helpful or not, but I figured it could not hurt to post it.4 points
-
Firstly would like to say Thank You to all who have left me Hearts for my projects they have been a great encouragement and appreciated very much. This is Lesson 6, the ribbon elements are freebies from Chantahlia Design, the floral elements are from a purchased Digi Kit that i got for Craft Artist software quite a few years ago. The Birds i painted in oils many years ago now from instructions in a book called SongBirds. The font is Brock Script. did not know what to use for this template but my hubby said to me, what about your painted birds and he was full of encouragement for me to use them.. so here it is. Still using Affinity Photo. Best wishes to everyone, Dawn
4 points
-
hello everyone, here is my Lesson 5... slowly but surely i am getting to the finish 2 more to go. the flower is a freebie from Chantahlia Design. Photos.. parrot with bottlebrush from pixabay by Buntysmum and the 2 pink bottlebrush from pixabay by Sandid. the top one have had a long time and can't remember where i got it from. Font is Broadway. leaves used from an abr brush set. Middle green paper i created in inkscape using a filter called cracked glass. Background paper created in Affinity Photo using Procedural Texture filter and a youtube tutorial by Graphicxtras.com by Andrew Buckle called Affinity Photo Eye Popping Diamond Pattern and i tried various layer modes to get this result that i really liked. I am enjoying using Affinity very much. thank you again Carole for this workshop. best wishes to all,
4 points
-
I finally finished this Template Workshop, and until the next one, the Affinity Vector Workshop on the 26th, I will be watching tutorials and practicing the Affinity and PSE programs. Here and there, I will also work on something in PSP. 😊3 points
-
Dawn, it’s wonderful to see your beautiful paintings again!3 points
-
That's really impressive Jacques3 points
-
I just love the colour combinations of your layout and the birds are just beautiful, actually I love it all.3 points
-
Let it Glow Again
3 points
-
Wow! April, your paintings are so beautiful. The detail in them is incredible.3 points
-
Thank you so much Jeni, yes my hubby of 53years has alway supported me in my craft endeavours he is a real blessing in my life. The papers are from the template itself just re-coloured. after i did paint those birds i became allergic to the thinners used for oils so had to stop using them. . have 2 bird paintings hanging on our wall and gave 1 as a gift to a friend . hubby took photos of them and we scanned them into my computer so could use them for card making etc. and for use in my campus projects. Best wishes to you Jeni, Dawn3 points
-
Lesson 5 Template I'm not sure if I should be posting here as the workshop is long over. All the papers are made by me with either PSP Textures or from my various Build A Kit papers, with the exception of the paper used in the background of the tea leaves, that was Riley B Graphics (Creative Fabrica). The ribbons are from my first build a kit called "F8 And Be There". I changed the size of the 4 papers to fit my elements. The cards are one of the elements from last years P52 Challenge. I pick all the things you'd need for a cup of tea. The doily is from a lab I did and magnet is an element from the P52 Challenge. The background started out as a paper from the "Time" Build A Kit last year; then I added about 3 or maybe 4 different PSP textures onto it. Photos are also mine. Fonts are Fugenta Script and Kingneverdie from Creative Fabrica.
3 points
-
I will post my results here too because I see the thread is still in use. I'm back from my trip, have overcome my jetlag and installed all the goodies from Carole's birthday sale. Now I can start with the workshop amongst a million of things that I have to do as well. This is a photo from the opossum that almost every night was sitting on the fence in my daughters garden. When they put the garden light on or use a torchlight it will freeze and stay put. This is a defense mechanism of opossums but alas it doesn't work in the modern world. Where I live there are no opossums, it was nice to see one. All the papers are from the Meadow bundle by Jessica Dunn, the font is Brellos and I gave the little balls a faint color and a little bit of noise with a very small shadow. At first I wanted to mirror my photo but that looked weird, so I mirrored the template.
2 points
-
I felt a weight lift off my shoulders, it was a great feeling. I learned a lot and like all things made for someone else I worried that she would be happy or not. I was happy with the result, the bride-to-be said she was too. There was a lot of steps in the build and I feel so much better that it's done. I'm getting back to the creative stuff I've been looking forward to.2 points
-
This topic is of an interest to me. What is the difference between auto action and auto preserve? is auto preserve an auto action? I have had to go into the auto preserve and recover a file, it was a from several step prior to losing what I was working on. I was grateful to have it as I didnt have to start all over again. I dont know if I ever enabled it from maybe instruction from Carole in tutorials or if it just came like that. A stupid thing I used to do (not knowing what that folder was), was delete the folder...until I looked into it one day. I dont do that anymore. When I use the save (not save as) button while working on a layout does it put that save into the Auto-Preserve folder and does it put the last final save (presumably when you are finished the file) into that folder. Could it almost be like a back up incase the main file gets deleted by accident? Should I put this into the Q & A?2 points
-
Well, after our cake discussion, I decided to go with Ice Cream Cake for my entry for the Letter I: The font is Bremen.
2 points
-
You probably relieved a heavy burden! It was a big responsibility, but knowing your work, I am confident that the outcome was excellent!2 points
-
Wow that must of taken some time and effort I agree with Susan it's very impressive.2 points
-
2 points
-
I have been getting to know my way around Affinity Photo by watching videos I came across a one to turn your image into a pencil sketch .I downloaded the wooden background with the note book on it copied the note book on a new layer and then placed my pencil sketch into it and resized it to fit the notebook page. I placed it on top of the notebook that was on the wooden background and this is my finished effort.
2 points
-
Oils? Good for you. These are beautiful, and the colours work beautifully with the ribbons and papers you have used. You are very fortunate to have a husband who must be very supportive of your art, too.2 points
-
JK's recent trip by bike, shots taken by JK, my work with the documentation of the trip /a bit long trip;)/
2 points
-
Thank you Jeni and Cristina for your words of encouragement i appreciate it very much. my 71year old brain is not as quick in the creative department as it was 9 years ago when i joined the campus. Lesson 4.... as i could not find a way to create a border with a repeated angle gradient that i was doing in PSP decided to create it in PSP as a png file and import it into Affinity Photo. Wattle Photos.. the bottom one is from Unsplash by Megan Clark the other i can't remember where i got it, so long ago now. The Australia map was created with Carole's Hammered Metal script in PSP. The font is Bodoni..... Now on to lesson 5 Best wishe to all, Dawn
2 points
-
I had a little fun with Affinity on this project. Do you have a "sharp" eye?
2 points
-
My second attempt: The papers are mine that I used for the 2025 Bootcamp. The dog silhouettes are from Adobe Express. I made the paw print frame from a CF paw print clip art and a frame from Procreate. The font is Majestic Inline Grunge, probably from CF. I played with Styles on the font, using bevel, color overlay, 3D and outline. I love playing with styles.
1 point
-
I havent been on the forum as much, thanks for the heads up about the Aff-Vector Workshop. I will watch it as well, and when i get the suite I can start learning. Jacques endorsement of Affinity has peaked my excitement at trying this progam.1 point
-
Although I registered for the PSP vector shape workshop, I won't be participating, as I was under the impression that Affinity was also included. My misunderstanding when I registered. Anyway, I have registered and I will participate on the 29th Affinity vector shape workshop.1 point
-
I do it the same way, Jenny, but I save it already under the new name (Template Workshop Day 1, 2, etc).1 point
-
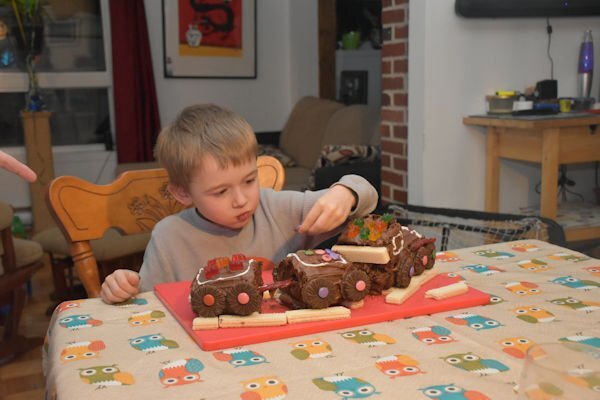
My wife and I made birthday cakes for our two oldest grandsons. I think it was a success, judging by their faces. Noah likes trains: While Ludovyk loves hockey: He had just woken up
1 point
-
Ann, I love your photo! Ah, I want so bad to drink coffee, but it bothers my stomach. I can have one a week but that's about it. Can you imagine that. I have to admit I like black teas like english breakfast, orange pekoe and earl grey. I"m not so much into the interesting teas, but they sure smell good.1 point
-
Still "playing" with Affinity and my Scotland photo's 🙂 : Found psd files at Chantalia design.
1 point
-
What I found closest: Filters | Colors | and the 4 Auto options
1 point
-
Yes, thank you, we have that in English, too, Jacques, I have yet to find the adjustment menu that does the one-step photo fix, and noise removal, although there is a tool for blur and sharpening, and some of those necessities.1 point
-
From what I have researched, there is a Red Eye Removal tool, but the other functions, I have not found. I am not sure if they exist and I didn't find them or if they don't exist. HOpefully, someone even more knowledgeable in Affinity could confirm (or infirm) this.1 point
-
It's just a shadow play with the flowers
1 point
-
I hadn't considered that. I did notice that like all pngs it flattened, and I really needed to keep the layers. I will remember that for next time. Thanks!1 point
-
Remember that PNG will flatten to one layer. If you want to reopen with layers in PSP, you should choose the PSD option.1 point
-
My F is for flour. We do have gluten free people in our house so we usually have gluten free flour available. The baking equipment items are from Pixel Scrapper.
1 point
-
Yes, but since .psd format is not native to Affinity or PSP, you might be losing some features. But if you use basic types of layers, it should work.1 point
-
the format "afphoto" is similar to ".pspimage" with layers and everything right?1 point
-
I'm currently on a train, when I arrive at my daughter's I will check. I don't recall seeing such an extensive drop down list.1 point
-
I can open SVG files in affinity. After editing the layers, I wanted to save it as a png, in order for me to open it in psp.1 point
-
I don't get the option.1 point
-
Affinity works with .psd just like PSP works with .pspimage files. In other words; it displays all layers. The only hitch is that Affinity can't "see" .pspimage files whereas PSP can see both .psd and .pspimage. I do recall that there are some features of .psd files that PSP can't parse, so it ignores them. I've run into problems with bounded text since .psd can't see that.1 point
-
@Cassel Question about Affinity: After opening a "template (psd file), do we get the same effect if we do a "File|Save As..." as the steps you take to get our copy?1 point
-
Your approach works well too and makes your elements not so shiny and when I need something to look goldy I often use the color gold that I have in my materials palette together with noise. However this time I wanted to follow the TUT and see what that brings, but I'm not sure that I want to use this technique very often.1 point
-
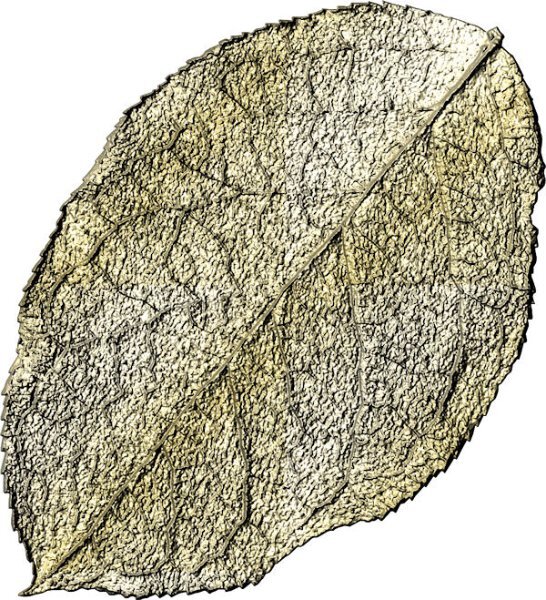
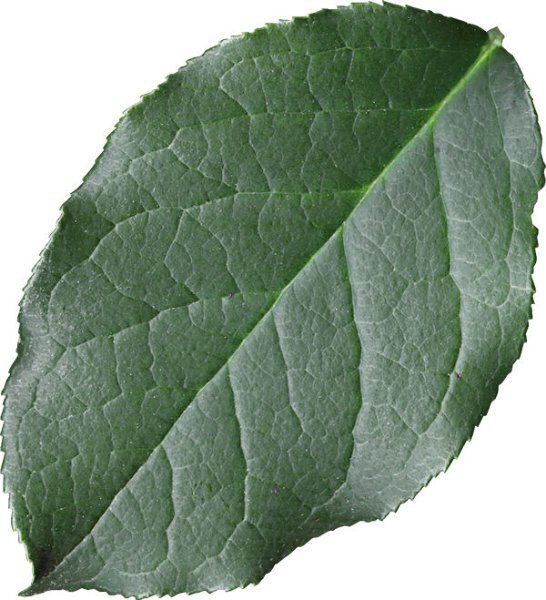
I finally figured out I had to add a gold texture file to the Corel documents folder. Then I called up a leaf from my stash and made it gold. Somehow, it looks more like the underside of the leaf compared to the original. Which setting needs adjustment? I just added the original leaf element so you can see it is smooth and not as veined as the gold variation looks. Don't know how that happened!
1 point


.afphotocorgipencilcleanedup20258thMay.jpg2x.jpg.440831b86305a104aac778a0cd635c9c.jpg)