Leaderboard


Popular Content
Showing content with the highest reputation on 08/27/2024 in all areas
-
Final day of individual feedback. @Carolyn Rye Good cast shadow. And yes, with practice, it will become easier. @EukaGreat result. In the future, when you want to apply these techniques, even if they are not perfect to start, at least, it will make you "think" about the effects. @MicheleThat is a very clever way to address the issue of the light on the head of the pin. See how knowing the program led you to a creative solution! And 14 out of 15 is not bad at all! @Sheila Hogg Adding text to the paper just gives it more realism! And the shadow is good too. And yay on the quiz! @Daniel Hess 13 out of 15 is still over 85% so that is good. If you remember 85% of the whole workshop, I would say you learned quite a bit, don't you think? @Anja Pelzer Sorry about the translation for the quiz. As good as translators can be, with technical terms, it can sometimes be off. @MoniqueN. Make sure you take notes because the videos will only be available until the end of the week (except for DIAMOND members) @Rene Marker I am glad to hear that you learned something from this workshop. Since you are a seasoned scrapbooker, I am sure some of the tips were already familiar. Good on your mark. 🏆 @Gerry Landreth Although I didn't expect participants to use a cast shadow in a photo composition, the same approach would work and the shadows would be similarly "blurred". That is a good exercise. @Mary Solaas You can take all the time you want to "think" about those shadows. Post your projects when you want. And this time, I admit that I made the quiz a bit more "challenging". The goal was not to stump you, but just to make you think. Sorry for the #15 that might have been less "obvious" but as long as it makes you think about the direction, blur, size, opacity, and shape of the shadows, I would say that this workshop was a success. I know some lessons have been challenging, and I hope it won't scare you from using different shadows. Come back to your exercise files (you keep a layered version, right?) and of course, I will always be there to answer your questions if you have some.7 points
-
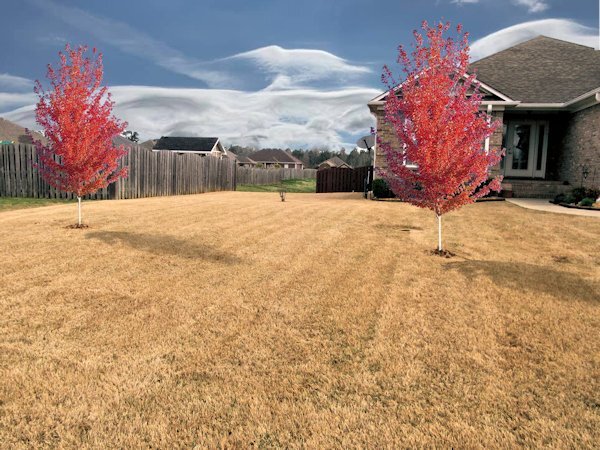
Day 7. Shadowing the pin was quite a challenge. When I got to the second project, I better understood the process. The second picture is our front yard. I was trying to visualize planting a couple of trees. The trees are lifted from a website. The picture was taken on a dreary day, so I replaced the sky to make it more believable.
 5 points
 -
Lesson 2
3 points
-
I've been behind in this workshop - WAY BEHIND! I've been getting myself, the car, etc. ready for the trip I will be taking with my daughter next week. I've kept all the stuff for this workshop in a folder that I'll be taking on the trip, but probably won't post anything until I get back in September. This workshop will take going over many times, I think. I've even thought of using a lamp to check out how the real shadows show on a flat surface. Well, might post results in September. Thank you, Carole. Really have enjoyed looking at the videos and everyone's take on the projects. All of you have given each of us much to think about. Love you all!3 points
-
15/15 for me. Did have to think a little more on 2 of them. Glad I signed up for it, learned a few tricks. Who says you can't teach an old dog new tricks? LOL3 points
-
THNX I saved this. Works great.3 points
-
My Number 7. Used a cork texture for the background and some text, 2Peas Champagne on the paper.
3 points
-
Day 7 Thank goodness for an easier lesson than the last two. 😄 I didn't realize the highlight on the head of the pin was backward until I was done. Instead of starting over, I selected and promoted just the head of the pin and then flipped the image on the promoted layer. Thanks for a wonderful workshop, Carole. I'll be going through it again in the future so the techniques stick.3 points
-
Thanks for a very interesting workshop Carole - a lot more practice is required to master some of these shadows but hopefully in time and maybe with a new mouse I will get there.
3 points
-
Leçon 4
2 points
-
Lesson 3
2 points
-
The texture looks great, it's neat to see the texture in the shadow too.2 points
-
Michele I do more or less the same but not so methodical as you do, a bit more haphazard depending on having time available.2 points
-
Good observation. In the blog post, it was done before I experimented further. I agree that it should be edited in the blog post 🙂2 points
-
13/15 with only watching the video's 🙂2 points
-
14/15 Not bad for an old broad! 🤣2 points
-
Watched all the video's, clear explanation, thank you again 🙂 Will practice later on 🙂2 points
-
Wahay...I got 15/15. Well done everybody, awesome work for quite a challenging workshop. Thanks to the wondrous Carole for all her teaching, generosity and dedication to keeping PSP alive.2 points
-
I got 14 , my translation was not good so I clicked the wrong on 112 points
-
I got 13 out of 15 on the quiz. Mehhhh...LOL. Need to go back and "study".2 points
-
Lesson 7. This one was almost as hard as the last one. Have be able to lean a lot. Now all I have to do is remember it all.
2 points
-
14/15 I got #15 wrong too. I just remember we reduced the opacity but there was no answer like that. So I just guessed.1 point
-
I've been going through the Creative Scrap Tutorials and trying to do some new ones (new for me). I just had so much fun with this one. Don't know if you can see it in the downsized image, but I used the fine leather effect for my belt.1 point
-
V = Vacation, especially with (young)kids can be an adventure too!1 point
-
Mary have a nice trip with your daughter and maybe there will be photos of it in some project to come as well. See you when you are back!1 point
-
@Cassel Carole I have a question about Lesson 3 - the lifted corners of a photo or other element. The TUT/TECH challenge of July 2024 was also about a lifted corner and there you directed us to the blogpost with an explanation of that technique and it had no mention of feathering the corner which you had in this lesson. Now I'm confused: why not in the blogpost? I admit with feathering it looks nicer. In Sue's comment on my assignment in the workshop she was surprised I didn't know about the feathering so I thought it was my mistake or that I missed something. It bothered me and therefore I checked the blogpost. Maybe somebody else noticed this as well and otherwise I'm just a pain in the ass😉1 point
-
Julian I had the same problem with that answer and I didn't quite understood that question.1 point
-
I think you did a nice job shadowing the pin!1 point
-
I got 14 out of 15. The only one I got wrong was # 15. The answer I was looking for was to decrease the opacity of the shadow since Carole said in the workshop Greenery often lets light through and should be less opaque, but I didn't see that answer!1 point
-
here is mine1 point
-
Using BFCoffee by JBS, font Aesthetica Vintage, my own photo,1 point
-
That's exactly right. I'll be doing the Labs at some point, but I only have the time for the tutorials right now.1 point
-
Exactly. The Creative Scrap started with the beginning of the Campus, in 2011, but TheLab format only started in 2015. I still wanted all the tutorials listed in one place.1 point
-
Yes, all the tutorials in The Lab SHOULD be listed also in the Creative Scrap. Otherwise, there would be no way to know where to look when you want to create a particular element/effect.1 point
-
Many of the labs are in the creative scrap tutorials. So you can find them referenced in both places! I actually have a spreadsheet that I have them cross-referenced but need to get it current... I'm a few months behind.1 point
-
It's like a kid in a candy store! I look through the previews when I'm looking for something specific because we don't always call things the same. When I'm simply teaching myself, I go through it alphabetically which I'm doing right now. I'm skipping the ones from the Labs because I want to do those in full.1 point
-
This came out great, Michele. Isn't it amazing what we can create with Carole's tutorials? I remember looking for the first time at the Creative Scrap Tutorial Preview Photos, and it was like Christmas for me. The Tutorial Preview with the photo is still my go-to when I want to create something more than the Tutorial Alphabetical, which can be very useful sometimes.1 point