Leaderboard


Popular Content
Showing content with the highest reputation on 02/21/2024 in all areas
-
Yippee Lesson 5 is finished.
 10 points
 -
Lesson 6 has been completed. I used a mask called ps_marisa-lerin_328956_blend-it-7-photo-mask_pu from https://www.digitalscrapbook.com/ This was such an fun lesson learning how to make the magic background paper.
9 points
-
Mwuah........Maybe the photo doesn't fit the background, the linoleum maybe better for mats, or there's something else, but I don't know what I don't like much. Datestamp script from Cassel, font is bree serif Photo is my own.
8 points
-
@Cassel: Thanks again for hosting this great workshop!!! 💓 Masks usually do have some sort of presence in the layouts I make but painted masks were never a real focus. I see changes a comin'... how perfect they are on smaller pages, like my 6x6 album or even 7x7 or 8x8 , as sole features really. I made a repeat pattern, it is rather transparent. Graphics Marisa Lerin, Jessica Dunn, myself. Times New Roman, Baskerville Old Style, Myriad, Headline, Dancing Script. Spread 12x68 points
-
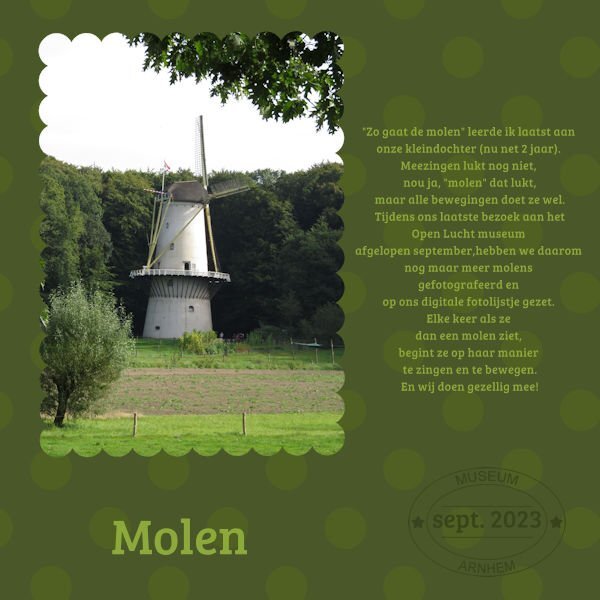
Lesson 7 Bree serif is the font Datestamp from Cassel Text translation: I have learned "Zo gaat de molen"(A oldfashioned Dutch song for young children) to my granddaughter (just 2 years now) Singing aong is still a bit difficult, but the movements with the song, she can do.During our last visit to the Open lucht museum in sept. 2023, we took more mill photo's and put them on our digital photo frame. Every time she sees a mill, she starts to sing and move. And we sing along with her!" It was fun to do this course again (Except the linoleum) , it reminds me to paint shop more often, because you forget some techniques or handy short cuts 🙂
7 points
-
This is a beautiful illustration by Maja Lindberg that I found years ago. I used Suz Shook's script, ss-BrushstrokesFrame2 script (the Creation Cassel store has several of her scripts for free). The font is Bradley Gratis.7 points
-
AnnieC, one of my favorite designers, had some freebies on her page which were perfect for this theme. The couple is from VectorStock and I changed the colors. The font is Parallove.6 points
-
I had no idea what to do with this. While playing around with borders and shadows, I ended up making "stickers". At least I hope that's what they look like. I added the same texture to everything and added a drop shadow around the bottom layers only. The font for the text is Priscilla Script (from Deal Jumbo) and the font for the hearts is Beauty And Love (from Creative Fabrica).5 points
-
DAY 7 - a bit late but I wanted to finish it For the background, I did the dots at 100%. Then I decided it might be interesting to do another layer, in a different colour, with dots at 50%. I like them both so used them in the background. My image was just something that I liked that I created using the Kaleidoscope tool. Then, I thought it might be interesting to remove the image and have just a paper at 3600 x 3600. I am including the picture of that as well. Thanks everyone for the great work you have done. Thank you, Carole, for hosting this. It has been fun.
4 points
-
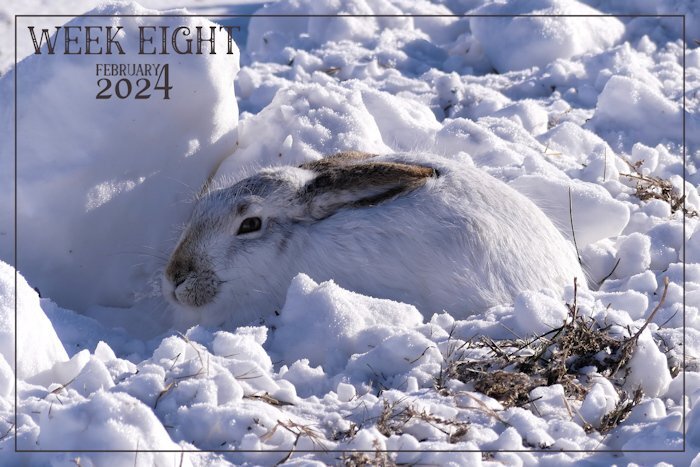
I know I'm a litte early, as it's anyones guess what I will find to photograph in the next few days. There isn't any doubt in my mind that this photo is going to be weeks 8. White-tailed Hare. North Americans call hares Jackrabbits. They are not rabbits. They belong to the same family, different species. They are are extrememy difficult to find, as they blend in well with their habbitat. From dawn til dusk they sit motionless, regardless of what mother nature throws at them. (-24c this morning) Like many animals they are capable of sleeping with their eyes open. Of course they are nocturnal. I will be able to observe this one from the kitchen window, using bincoulars, as it is cwtch down, out in the stubble, where we have moved snow from the yard. I stumbled across it whilst out tracking their movements last night in the snow.
4 points
-
I followed the lessons a tiny bit 🙂 Last week I had a very small operation. They placed a voice prosthesis after I had a laryngectomy in june last year. And after that I catched a nasty cold. So in very nearby future I start with making masks learned in this workshop. I looked now at the most beautiful works from you all.4 points
-
Michele, this is really clever. Is it for the Divas?3 points
-
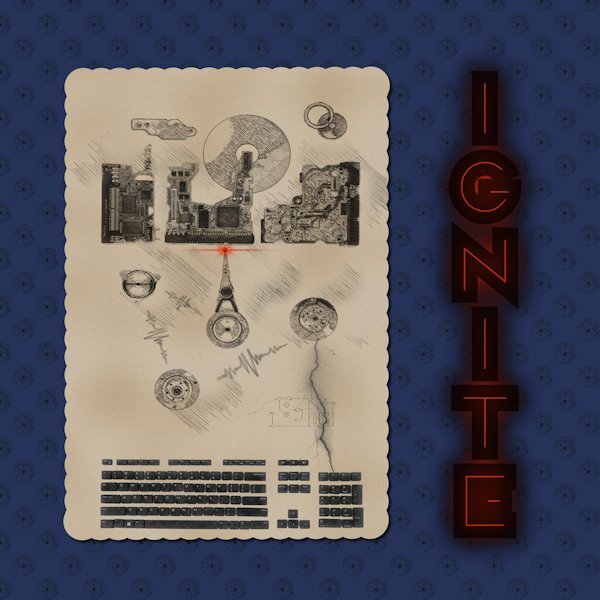
Day 7 here's a diff version I was in the shower, just about to go to work when it hit me to color the blurred raster layer. I used the Ctr A, Ctr F , then flood filled like we learned in the last Q&A. I'm not sure if I did it right as I'm doing it from memory and it merged with the layer below it (the one I selected). I'll have to go re-watch that. I used that because it was blurry so it would use all the pixels. since I wanted a copy of the orig. blurred layer, I undid it, then made a copy and hid it. then did the select all, float, flood fill. then i turned the black layer back on and really cool was the black kinda of stuck out past, and I lowered the reds opacity so more black could come through. Supposed to be like glowing embers about to ignite. What looks better? I did get a color showing through the G but it looks interesting to me so i didnt try to take it out.
3 points
-
I can see why you stumbled across it! It is so well hidden in the surrounding snow heap with some traces of darker straw/old grass that have the same color of it ears and nose.2 points
-
Chris all the best and I hope you will feel better soon!2 points
-
They sure do look like stickers to me. Very cool effect.2 points
-
I love everything about this!2 points
-
They are well adapted to their environment.1 point
-
Looking through them, I tried the one called Flag and was surprised to get a wavy rectangle which did look like a flag. Also, the Grayscale Border gave me a wide grayscale border around my image, similar to what was on my wedding layout for the Masks Workshop. You'd have to add a frame, also. There's really a lot there that I haven't tried yet.1 point
-
the magic wand and how to select from the layer (in a template for example) and going to the paper above and click delete. then you can tell them about scripts that do that as well. Also using the magic wand to make frames around the photo; the two ways, one for the frame (inside or inside/outside) on a separate layer, then they learn how to flood fill and perhaps bevel and shadow that frame, then the other way on the outside where it makes a mat(again, on a separate layer). then the user has a choice of merging the two and leaving it like a framed photo or they can shadow the photo, like it's paper on top of another photo. I've seen Rene do this and it's so pretty, then they can shadow the mat too for that dimensional look that makes scrapbook pages stand out. Also, remember the lessons in the bootcamp. we got lots of cool tool use in bootcamp and it's aimed at beginners. Like using the eraser tool to make the pinking shear edges also for making cut outs (not the "cut out tool") in the paper with the eraser brush which uses all the fun brushes they may have to add a punched out effect on their papers. Or the selection tool; pointing out the different shapes (rectangle, circle, rounded square etc) to make smaller papers or elements. You may already have this covered in the main body of the book.1 point
-
Beautiful shot. Me and my co-worker get so excited to see them at work, in the bush right outside the door we go in. my co-worker is the expert spotter. otherwise I'd walk right by even though I am looking for them. the very small empty lot across the street from work in the spring/summer has 7-8 that I can actually see (probably more hiding). I wish they wouldn't cut the wild grasses/weeds, so they could hide better from the coyotes. I still cant help wanting to smoosh my face right up in it's fur. (side note: I don't, and when we spot one we are quiet and do not disturb them, poor things have a hard enough life being at the bottom of the food chain).1 point
-
I love this. I am a fan of dark dark dark backgrounds, this is a nice lino background. Beautiful picture and perfect use of the font as part of the mask.1 point
-
I hope you are feeling better soon Chris. Let the works of everyone hear inspire you while you are recovering.1 point
-
Hope you will be well soon!1 point
-
Beautiful layout, Bina. I do wish I could read that language...1 point
-
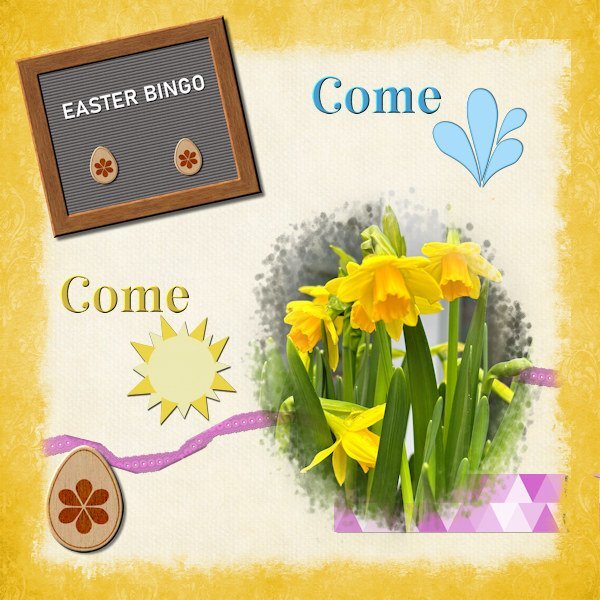
When I had some time left during the Mask Workshop I made all the elements for this challenge and have now figured out how to combine them to a more or less coherent layout. After I got the idea I could color the triangle pattern and the lacy ribbon. The black and white ones go in my stash for future use. The background is part of a template by Lady 22.
1 point
-
Thanks Gerry that is a very useful tip and like Ann I'm going to install it on my pc.1 point
-
Slippers is MY cat, but Teddy is the cat in the picture!1 point
-
Day 7 I made it! This too me a long time to futz around with. The keyboard keys was a separate photo that I merged in, the zigzag and lightning bolt are brushes (the zigzag might be from Corel?). And guess what I found out....the diagrams from the pencilsketch2 are also brushes I have. that way I could add them where I wanted. I ran the script several times, changing the edit of the photo each time. that gave me lots of hatch to choose from and I used a mask to get the best of the city buildings (computer circuit boards). The "moon" is the disc from inside a hard drive as are the other elements, except the upper left "cloud". the red flare is a brush too. the font is Avalors (CF) and I duplicated it, turned the bottom version to a raster and blurred it. the font itself had a humongous stroke, by accident of clumsy fingers, and left the tiniest space for fill so I went with it. the keys were taken off the keyboard (that my work was recycling) and lined up as it was, I didnt leave enough space between. I took forever (and the cats got banished because they'd undo my work as fast as I was doing it). tonight I'll get started on the Build a Kit. I see everyone has started off with a creative bang! Thank you for the workshop Carole. I pushed myself more in this one.
1 point
-
I do love this poem: Trees BY JOYCE KILMER I think that I shall never see A poem lovely as a tree. A tree whose hungry mouth is prest Against the earth’s sweet flowing breast; A tree that looks at God all day, And lifts her leafy arms to pray; A tree that may in Summer wear A nest of robins in her hair; Upon whose bosom snow has lain; Who intimately lives with rain. Poems are made by fools like me, But only God can make a tree.1 point
-
Day 3 Plugging along at a snails pace. Had fun with this one. I wanted one object in color but still with the Pencilsketch2 effects. I believe I used hard light blend mode with an extracted version of the pipe wrench (is that what it is?). The two little box wrenches(?) in the corners were originally photographed (along with a third ugly one that I didnt include in the layout) with the main group of tools. So I extracted them, inner bevel added. I used the Letter press script again with Gill Sans Ultra Bold font (formerly from MSWindows). This time I added the spaces you get when you add a space (I think) when entering the text. And this is a one row box you have the option of making. I did desaturate it to make it look like metal and I had to resize it because it was wooden and the box bottom shows through. The Letterpress script is quite customizable with the each element on a separate layer (when you choose adding the box for it it all goes into layers and I recomend using this because you can choose to use or not use the box and you can also group it all for easy resizing all at once for for copying and pasting into a layout as a group. It's much easier than handling each element separately. And like everyone else, I went down the rabbit hole for a good hour playing with the kaleidoscope effect. One to Day 4 now.
1 point
-
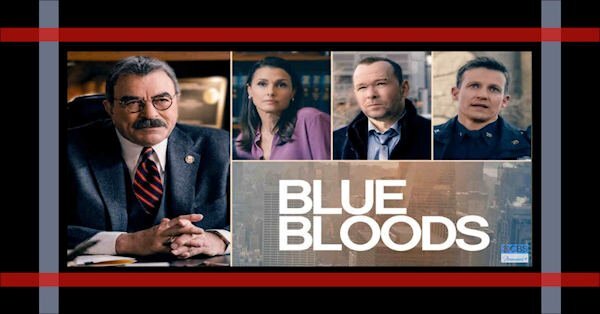
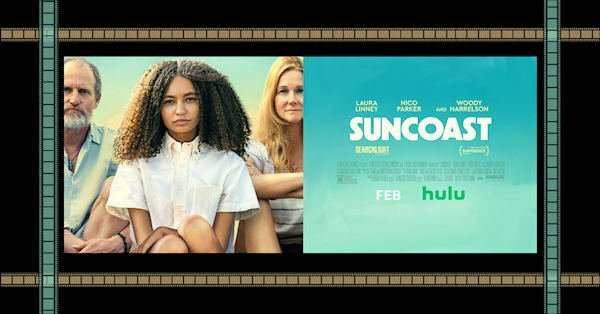
A small project I've been working on to populate my new 32" monitor. I'm using the cass-painted-frames and I've made one for Cable or Streaming TV shows and a separate one for Streaming Movies. For the Movie one I went and found a film strip and duplicated it all over the place on top of the color painted frame strips. Here is one I did for my Friday Blue Bloods TV show and another for the film, Suncoast, which I will watch tonight on Hulu.
1 point
-
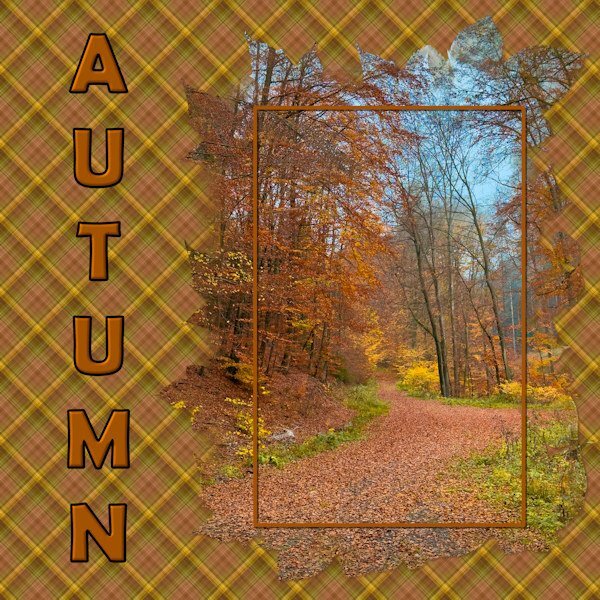
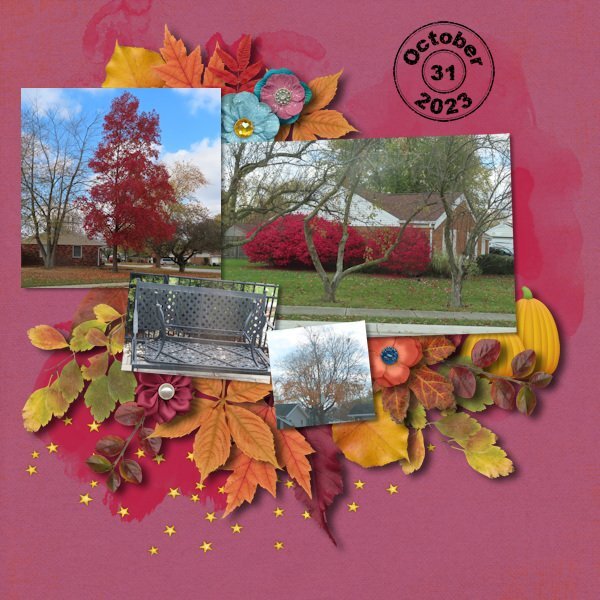
For the last 2 years (2022 and 2023), I have done a project in October of taking photos of the fall foliage every day of the month. In 2022, I was able to scrap the layout within a day or two. But with surgery the beginning of the month in 2023 and then getting the flu at the end of the month, I only got a couple of pages done. Then with another surgery the week before Christmas and a 3rd surgery Jan 18th, I never got the project finished. I made it a goal to get it done by the end of February. I'm happy to say that I got it done today! I used templates from Fiddle-Dee-Dee at The Lily Pad. She has 3 sets that are autumn themed so I selected from them according to the number of photos I had for the day. I also have a lot of kits of the autumn theme (I love the colors) so tried to use the ones I had never used. And, Days 1 and 2 were made using the kit I made from the 2023 Build-A-Kit workshop along with the title page. I used the same kit for the 2 pages that will be next to each other in my album (for example, days 1/2, days 5/6 etc). Day 31 was on its own. I also used Cassel's Date Stamp on every page to show the date. Here is the Day 31 layout: Kit is Evening Autumn by Kristin Aagard with some additional foliage from her CU Fall Foliage kits #2, #4 and #5. All available at The Lily Pad.
1 point
-
Amazing what a difference when you mirrored the portrait. Love it!1 point
-
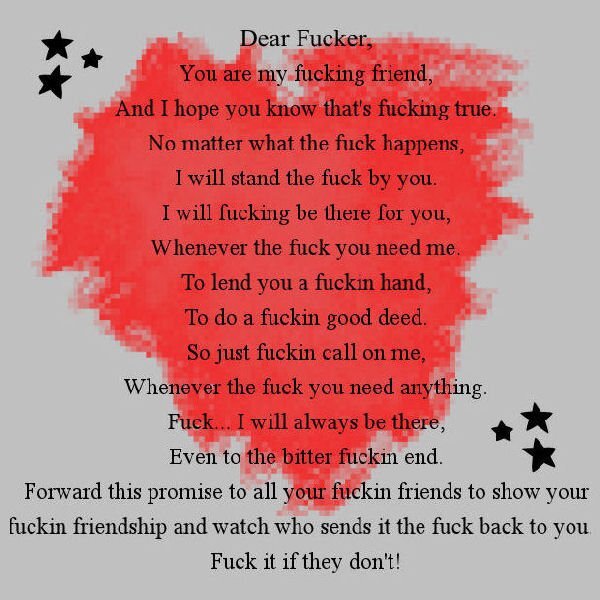
FEBRUARY14. Funny and sweet text /IMHO/ found in the net. Red heart-a waterculor shape, stars-Astronomy font.
1 point