Mary Solaas
-
Posts
1,639 -
Joined
-
Last visited
-
Days Won
70
Content Type
Profiles
Gallery
Forums
Everything posted by Mary Solaas
-
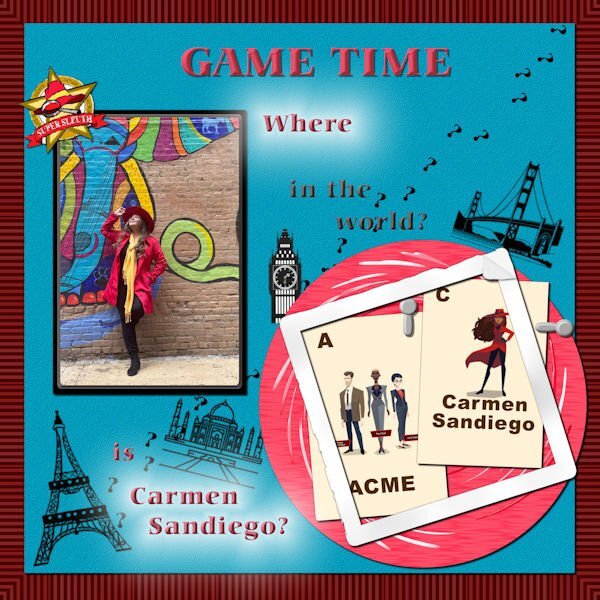
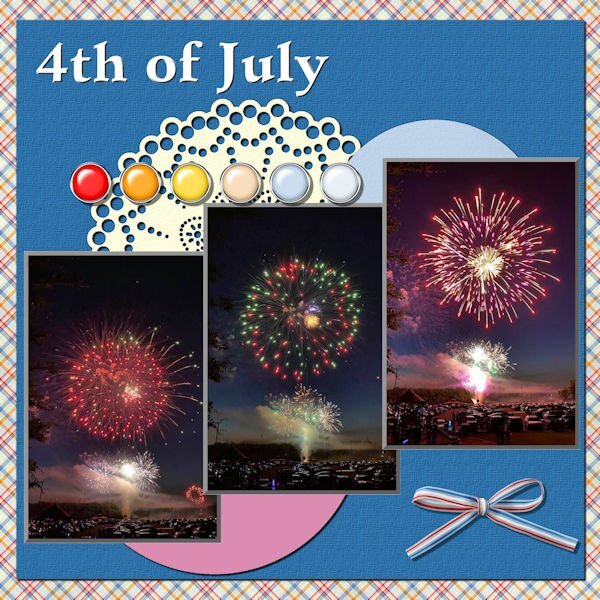
Lab 12 Mod 2. Requirements: Flash cards; I made several and decided that this would be about the Carmen Sandiego game I used to play on my Windows 98 computer many moons ago. The gal in the photo is her older sister who likes to play games and she is Carmen Sandiego in that mystery game played by grownups in Memphis, TN. My granddaughter and I used to try to discover where Carmen was by following the clues. Was it Paris?, India?, London? Or maybe in the USA in San Francisco? Another requirement was photo clips – I did make 4 so that you can use them in any orientation for holding down photos or whatever – here are 2. And the last requirement was a distressed frame – I did follow directions for this one and it covers the 2 game cards. The red circle I made some time ago when I was just playing around. The place stamps are from Nice Png. I made the question mark and employed the Cass-CustomDirectionalTube script. In one of the recent tutorials, the “layer Styles” tool was discussed. I employed it on the text and how I like it. I believe I like that bevel a whole lot! And of course the Emboss is really great too – And I used the Outer Glow on the bottom text and the “Where”! What fun this was! The background paper is a bulls eye paper I made last year or the year before when we were discussing making bullseye papers and I changed the colors on it with one of the tools but I can’t remember what it was now. The font is Carmina Blk BT (Can you guess why I chose that one?) The blue paper is texturized with a texture I got from Pixel Scrapper – Marissa Lerin. Of course I used the Clip-To-It script from Cassel – it is on my top list of tools – for the photograph. I did use the template that was given with the lab module, but it was customized by me!

-
It ended up being the naming convention. I deleted everything connected with the name of that curved arrow. The problem was I didn't change the name of the shape from the preset shape I had used to start with and change it to the name I decided to call the finished project. How dumb!. Maybe I need that vector workshop again. I had previously downloaded that tutorial, but didn't look at it since it seemed to be so straight forward. The other preset shape that wasn't showing up also had a problem with the naming convention. So, back to studying vector shapes. Thank you, Carole for your help. And you too, Rene.
-
As a matter of fact, not all of my exported preset shapes shows up in the list of preset shapes. They are listed in the place I have listed as file preferences, but they do not show up in the list. Now why????
-
There must be some folder where the names are kept. There is a curved arrow which is simply nam ied Corel-018. It doesn't have a name in the showing of preset shapes except Arrow 18. and it is curved (but not as I made one). I made a curved arrow (vector pspimage) in one of Lab 11 modules. I saved it as MLS Curved Arrow.pspimage and tried to export it into preset shapes. I get the message that it is named the same as Corel-018 (which in any of the file folders is only labeled Corel-018). So even if I change the name of my pspimage, it still gives me the same message and won't show up in my preset shapes. Now the funny thing is, mine is listed in my preset shapes, but doesn't appear in my preset shapes when I look for it. Now explain that. I am so frustrated. Incidently, the 2 shapes are curved, but Corel's is filled and curves in the opposite direction, mine is only outlined and curves in a different direction.
-
I've run into a problem in exporting a curved arrow created as a vector in one of Lab 11's modules. I keep getting the message that that name exists in one of the libraries for preset shapes. I cannot for the life of me find where there is a duplicate. How many places does a preset shape appear? Is there more than one place? If I look at the folder for preset shapes, I only find one place where the shapes exist - preset shapes folder! Is there another folder where they are located? I know that there are 2 places for brushes - the brush folder and one in program data.
-
Welcome back!
-
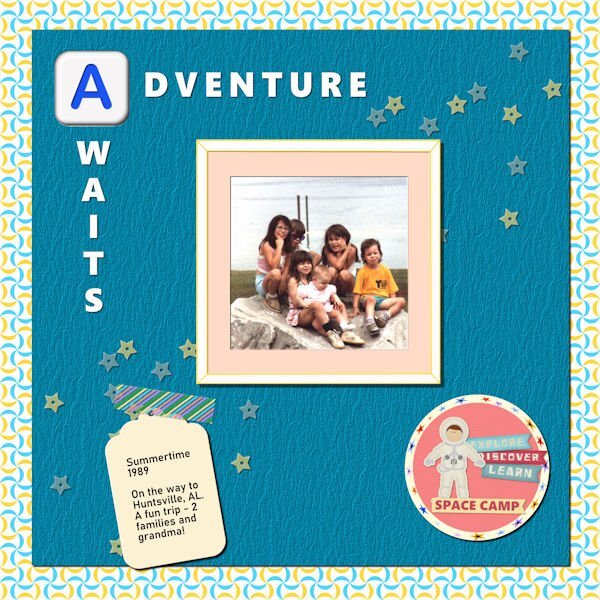
Lab 12 Mod 1. Requirements: Scallops 2: saved it as a pspimage for the pattern and then made the background paper from it. Colored Tape: it’s holding down the tape I created sometime ago; Hand drawn frame: Well I did make it but did not distress it; I made it as if it was a regular photo frame and even shadowed it on the inside as if it was thick and made a mat for the photo. I made the little circle paper in the bottom right corner and placed the spaceman sticker and the 3 journal stickers on the side and made the Space Camp sticker at the bottom. I used “Polar Cordinates” Distortion Effects on my star ribbon to outline the paper. The spaceman and the 3 journal stickers are from Pixel Scrapper – Sheila Reid. The Alphabet is one of a set I made in a Lab. The font used in the title is Segoe UI Black. The star scatter is also from Sheila Reid.
-
I don't know either. But thanks for answering.
-
@Cassel Why can't I download the mp4 Lab Modules? I could before, but the last couple of days I can't. I went up to the Lab and looked at the mp4 for the Paper Clip 3, and the scallops in Lab 12 Mod 1 as the handouts were not as clear as I would like. 2
-
Last module for Lab 11. Lab 11 Mod 12. Requirements: Knit pattern and strip (the snowman knit strip at the bottom); glitter tree (I made a silver one, a gold one and a green one – also made a glitter star which I put on the top of each tree but they are separate); party hat – I put a gold tassel on the hat also. The plaid paper background I had made probably 2 years ago and the holly wreath on the light green circle paper I had made probably 1 year ago. I always have fun! The font for the title is CandyLandSwirls 1 from CF. I think it is fussier than I usually do, but it is what it is.
-
@Michele Help each other. That's what we do!!😊
-
@Susan Ewart - BEAUTIFUL. MY FOLKS HAD A BLUE AND GOLD SET LIKE THAT WITH THE RAISED TEXTURE. Only one of my grandchildren loves to set a beautiful table so she was given all of my beautiful china things and my silver, as I don't do that any more.
-
Almost the end of January. This is Lab 11 Mod 11. Requirements: cross pattern - the background paper; cutout edge - I made a strip which I am not showing in this layout, but I made the shape as a paint brush and used the Vector Shape script around a round colored paper in white; paper clip 3 - one of those thick ones that is hard to open - I used the Change to Target tool to make it a copper color. The font is Arial Black. I see that we are going to have the Built-A-Kit Workshop again. YAY!!
-
@Julie Yes the dog is a doodle, She's our sweet Lucy.
-
@Cassel I just want to say "Thank you!" for the 2024 Template Workshop. It proved to be a wonderful refresher course since I took the 2022 Challenge. I did learn some new things, used kits from other designers where I have been prone to use my own things lately (which isn't so bad I guess); that neat tool of using blend modes and opacity to produce new takes for backgrounds; also learned new things to think about from the other participants in this workshop. Thanks again.
-
Last - Template 7 Diamond. All the papers and the brad group are from Cassel's Fire and Ice kit. The bow at the bottom is also from Cassel. The font is Violenty Script.
- 426 replies
-
- 11
-

-

-
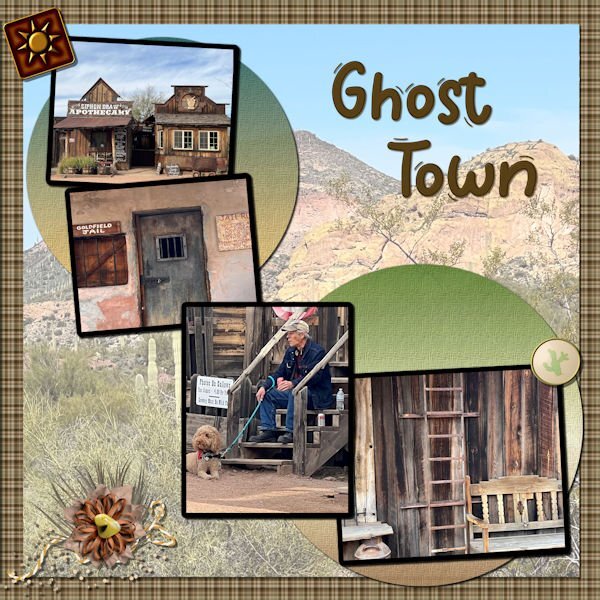
Template 7. The background paper, the 2 round papers, and the elements are all from my desert kit we did last year. The font is Wigglye from CF. The paper on top of the background paper is a picture from the same group as the 4 pictures that are dominant; however the opacity has been reduced, the underlying paper is white, and the blend mode is Multiply. The font was innerbevelled and shadowed.
- 426 replies
-
- 11
-
-
-
Template 6 Diamond. Because one of the pictures was horizontal, I had to change the layout somewhat. I colored and textured the 3 ribbons; that Winter Vibes font that was talked about and several of us downloaded it, the sticker and the mitten banner are mine as is the background paper. The Hot Chocolate card in the center is from Pixel Scrapper – Jessica Dunn (one of my favorite developers). The 2 hot chocolate buttons holding the mitten banner are from Pixel Scrapper – Brooke Gazarek. The 3 generations are from different families of mine.
- 426 replies
-
- 12
-
-
-
To quote the captain in "Galaxy Quest" - "Never give up! Never surrender!" Galaxy Quest is one of my favorite movies!
-
Template 6. Changed the layout by moving the title to the bottom, moving the pictures up, adding a journal sheet, and removing some of the elements replacing them with my own elements. I had fun – and learned something new – to put a paper on top of the textured layer and working with the blend mode and the opacity of the paper layer. Great stuff!! The title is Annie Tobin’s font (she was such a wonderful lady) which I glittered and innerbevelled. The heart in the top left corner is from CF and I innerbevelled it. The bow I made with Cassel’s Bow 2 script. The Santa sign is from my stash as is the poinsettia cluster in the bottom left corner. The star tube is from Cassel. The pictures are from scanning 1991 35m prints. They were in bad shape and I used every trick that PSP has (well almost). I had forgotten about fade correction, but Cassel reminded us of that tool and I used it and de-noised it to the max and sharpening it to the max. The difference is amazing. That trip was special and finding it was such a gift. You can't imagine - as we went down the road into the town, it was dark - everything was closed up tight - no lights - off to the left at a distance was an oil drum that seemed to have a fire in it - something that the people on the road in the depression might have used to keep warm or cook food - the scene was really eerie. Dolores really wanted to turn back, but I just felt we had to go further. And then, when we turned that corner it was like Judy Garland opening the door into Oz - from blah to radiant color. I will never forget it.
- 426 replies
-
- 13
-
-
-
Workshop Template 5 Diamond. I think I am tired out and there is still 2 more project day templates to go. Thinking about the theme (pictures, etc.) is now the hardest part. I texturized and colored the 3 small papers (that was fun) - I used "tiling" under effects>texture effects for the first time and I like it - gives me some ideas for making ribbons. I played with the Change to Target tool on the flower element in the lower right corner. Interesting that this time there was no TITLE layer. I guess the journaling tells all.
- 426 replies
-
- 16
-
-
-
I'm not happy (again) with this layout, but it is what it is! I haven't kept all the different techniques I used on each of the elements, pictures, font, papers; but, I did use different blend modes, and I began to take off when I changed the hue>saturation>lightness on the background paper (which was from a marisa lerin kit) and then played with the blend modes and opacity - which worked with what I was trying to do. I played and played and played around with trying to figure out what to do with the elements in the lower left corner and ended up with a doily since it is round to balance the round paper in the top right corner. Of course, you can see that I also played with the placement of the picture layers and placed the title at the top.
- 426 replies
-
- 15
-
-
-
I don't sell mine, but since the Scrapbook Kit Workshop in the beginning of last year, I have decided that that is the best way to keep the many elements and papers I have made.
-
Day 4 Diamond template. The pictures are from Creative Fabrica – Freebie from a day or two ago of watercolor winter scenes. The 3 smaller pictures are from 3 different scenes in the group. I textured and used brightness and contrast on the white layer background; the font is Winter Vibes (sorry, I couldn’t get the one which I downloaded that had snow on it to come up in my font list, so I just went with this one as I like it too. I innerbevelled the font twice and then gave it a slight shadow – I picked the color from one of the pictures. The 3 small pictures I chiseled so that they would stand out since the background large picture is very busy.
- 426 replies
-
- 16
-
-
-
@Lynda DiGregor Thank you for the link.