-
Posts
5,507 -
Joined
-
Last visited
-
Days Won
17
Content Type
Profiles
Gallery
Forums
Everything posted by Cassel
-
The links to the tutorials (along with a password) is sent by email. The videos are on the site itself (not the forum). Then, participants will post in the Bootcamp thread here: https://scrapbookcampus.com/invision/forums/topic/1548-scrapbook-bootcamp-october-2023/ You can already browse it.
-
Every forum works slightly differently. Don't worry. Even in the Campus, I changed the forum platform in January and the regulars had to get used to something new. You should be getting the other emails within an hour or so.
-
The Bootcamp started yesterday. It starts with the program installation, and explaining "Layers" (with my famous sandwich exercise) so even if you just go quickly over them, you would be fine. The Basic Scrap Course is "one step above", and usually the step after the bootcamp. Did you get the emails for the Bootcamp? If not, check your spam. There should have been one email sent on Sunday with the Subject "Are you ready?", then the first lesson yesterday and the second one a couple of hours ago. Looking further, I see you registered, but it is possible that the emails were never sent to you (no idea why). Let me get this going for you. Did you happen to use a different email maybe?
-
@Angelo Cacciari I will move your post into the Bootcamp thread.
-
Yes Doska, that is correct. You can post your results here, but you can also post your questions. So you are doing the Basic Course at the same time as the Bootcamp??
-
Welcome to the October Bootcamp! I am glad to see some new names in the thread. For those newcomers, keep an eye on this thread as there will be one post of mine every evening to review your posts. @Doska St. Take a deep breath, and you will see how PSP is not that scary, and the people in this forum are all here to cheer you up. Changing program is always a bit "scary". @Jannette Nieuwboer Hopefully, it won't take you too long to get "back on track". @Bonnie Ballentine Will we have pickleball projects or another topic? @Emerald Jay Welcome to the Campus. If you have already worked with PSP, it won't be too hard to get back into it, although some things have changed. What version are you using? Tomorrow, you will have fun with the exercise (it is my favorite). I hope you are hungry ? @Richard Skelt Welcome to the Campus. Although the practice projects are not specifically for creating artwork, the tools are likely similar. Maybe you can start a whole scrapbook about your music and your events! @Ann Seeber This is a fantastic photo for the season! Lucky for you, there are lots of fall-themed supplies you can use to showcase this cutie! @Melanie Mitchell Welcome to the Campus. We have several other members who are nature photo enthusiasts and everyone will love seeing bird photos! Looking forward to your projects. @Carolyn Rye Welcome to the Bootcamp. I guess you are going to bring us along during that trip? This is the beauty of these threads: we are visiting so many wonderful places and discovering countries and people without moving off our chairs! If you have questions, don't hesitate to ask in this thread. I read EVERY SINGLE post, and other members might be there sooner than me to help you. I would suggest you do NOT ask our chatbot, Markus, as he is still in training (and not doing too well so far!).
-
Maybe they will direct people to this article: https://scrapbookcampus.com/2016/11/how-to-install-brushes-in-paintshop-pro/? However, I think I should have one article ESPECIALLY for .abr and .jbr files!
-
Glad to hear that they got the message I sent!!! ?
-
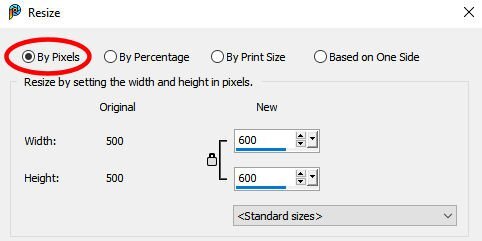
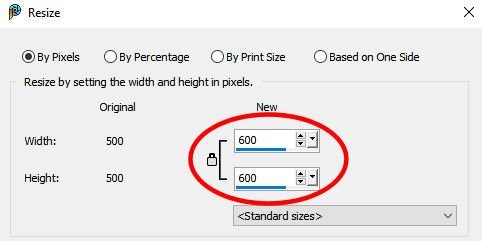
Step 1. In your PaintShop Pro, open the photo you want to resize. Make sure the image is open in the Complete workspace (not the Photography workspace) Step 2. Go to Image > Resize (or Ctrl-S) and choose the Resize by pixels Step 3. Choose a size of 600. if the image is square, it will automatically adjust the height and the width to 600. If you have a double-page, you can choose a 1000 pixels width. Step 4. Save your file on your computer as a jpg file, and make sure to add -600 to the filename, so it won't overwrite your full-size file. Step 5. Now, you can insert your resized file to your forum post.
-
Yes, I could see that Markus gave you incorrect information. Where do you want to clear the recent files from?
-
1- You can download ABRMate here: https://abrmate.software.informer.com/1.1/ 2- ABRMate is a standalone program so it won't be installed or associated with PSP itself. Once you create the PNG files, you will need to open them in PSP and export them. If you have many, you can use Suz' script Making Custom Brushes from PNG
-
I think it just went off-topic as an answer/comment to something else. ?
-
When you go the ABRMate route, that will create PNG files. Then, you don't IMPORT them, but instead, you need to EXPORT as a Custom Brush.
-
ABRMate will convert the abr files to png files. Then, you would need to export them into a brush.
-
Let's make things a little fun for you. Are you looking for ways to spark your creativity and still create something meaningful? This will be a new monthly challenge for you. Every month, you will be given instructions to use 1, 2, and 3 of something. Would that be more than you usually use? or less? Let's see. Create a layout using : 1 sequin element 2 Polaroid frames 3 paperclips You can create those elements or use what you currently have in your stash. Showcase any photo, use any template (if you want). Just make sure you include the required elements.
-
What version of PSP are you trying to use? Can you email me the abr files you are trying to convert?
-
Strangely, I was able to convert them. I wonder where the issue is.
-
Hum... this is strange because although PSP cannot USE abr files directly, PSP can IMPORT them. @Jannette Nieuwboer would you mind forwarding me the response you got? I could try to follow up with the team as it is possible that one "support person" might have incomplete information about this.
-
Maybe it was a demonstration during a Q&A?
-
Have a look at this option: https://www.loom.com/share/0e3e60c90d10437eb9fc64a725b370ac?sid=d6851f82-510e-4d81-833c-26574ca887aa and then, you can rotate it back 45 degrees when you are done.
-
Check this video: https://www.loom.com/share/71900dea8d7d4433befde95118e64a42?sid=4abf5c5a-061e-438c-a6dd-1c94c1d87347
-
-
You can actually do that using the Symmetric Shape tool, set to 4 sides. then, you can move inward, the node that will appear on the side and all four sides will follow. That is a really cool tool to use! Try it.


