

Susan Ewart
-
Posts
3,995 -
Joined
-
Last visited
-
Days Won
128
Content Type
Profiles
Gallery
Forums
Posts posted by Susan Ewart
-
-
10 minutes ago, Mary Solaas said:
I went back to the cup and added a saucer today using the cup shape. (I did not save the cup and saucer as a shape). I added the artistic bubble effect on the cup to give it dimension. Again used Particle Shop Smoke for the steam, added shadows. I'm not moving forward yet, even though I'm just on 4. The fish looks good as an element - the shape will turn out as a silhouette, but I like it as an element. May have a go at the dinosaurs later today and then move on to Project 5. I'm slow - but there is so much to learn! Oh, the saucer I made using 3 ellipse shapes one for the top, one for the recess where the cup sits (just an outline here) and one for the bottom part.

That's really cool. I like the shadowing on the cup/saucer too. I think I need to schedule in time regularly for Vector practice/play. This will also help me going forward with the LABS because they have Vector Tuts in them too.
-
 2
2
-
 1
1
-
 2
2
-
-
38 minutes ago, libera said:
I'm unfortunately more than a little bit behind. I was sure at the beginning I could participate more regularly but as always the job comes first. I decided to continue anyway. I flew over the pages and just thought WOW again. So many great works, a lot of very interested participants and many new among all.
Now Lesson 2 and 3.
I know what you mean about the job. Sometimes I wish i was retired, but then that means I'll be that much older. I still maintain to my friends I'm going to win the lottery...WITHOUT buying a lottery ticket (I dont buy them), then i'll have all the time in the world...I hope. ? Glad to see you carved out some PSP time. I took the day off today and finally going to choose the RAW editing software I will go with (Looks like ON1is in the lead - it's the most like Lightroom...but a standalone..and on sale!).
-
4
-
1
-
-
11 minutes ago, Cassel said:
I am glad that I was able to scare your PSP into obedience! That is my super-power.
Hahahaha, that is hilarious!
-
 6
6
-
-
18 minutes ago, Anne Lamp said:
I watched the first three lessons and played with them a bit. I have downloaded the links to the others and hope to be able to watch and do them soon. I have had to much going on to keep up. Helping my Sister move to a different city about an hour away, and more importantly dealing with my husband getting a pacemaker . (he is doing fine), I am grateful for this workshop and know I will be going back to it often. Thanks Cassel and others that have added some tips in this forum.
Good to hear your husband is doing fine. That must be a relief. Hope you enjoy the Vector workshop. It was a real eye opener for me. I loved it...even the hard parts.
-
2
-
-
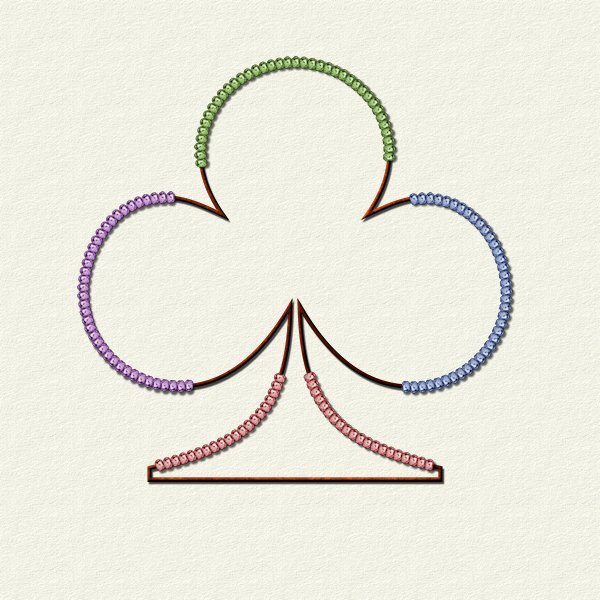
Lesson 7 Extra
I used a preset shape and the Hue Map to change the colors of the beads. Added bevel on the wire part and shadows and placed on lightly textured background. Thunder and lightning, it's 1am and I cant sleep. gotta get up at 5am. I'm going to tired tomorrow.
Thank you Carole, this was a great eye-opening workshop. I never thought I would understand Vectors and managed to bumble through them in the few labs I've done. This workshop has given me more confidence in using them.

-
6
-
12
-
-
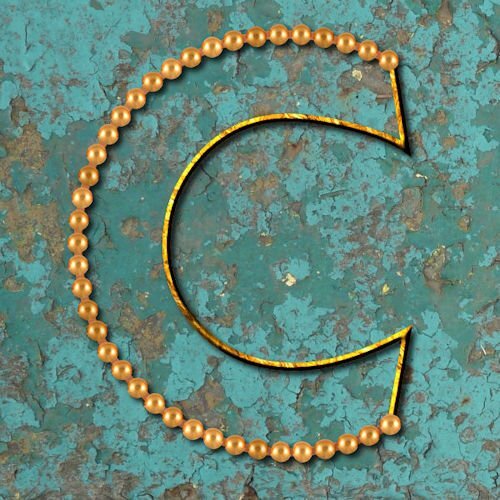
Lesson 7
This is cool. I had only used the knife once before for a lab. I did have to duplicate the 'S' vector layer twice for each side of the 2. It is hard to grab the right nodes to peel back. I had less than 50% average for grabbing the right one. And sometimes had to make the only one I could grab (the wrong ones) shorter so I could see the other node. Is there another way to do it? I need to still make the multi colored beads. Might get it done tonight. I loved this class. I sure was clueless about Vectors before, now I'm a little more informed. One key thing I learned...when I want to "convert to path" I need to switch to the pen tool. I kept forgetting it and that option would be greyed out.
Questions: in case they are burried in my text above and you miss them.
- Is there an easy way to select the right node after using the knife tool. what if the wrong one (the one you want to keep) is ontop? can I shorten it a bit so I can grab the node I want?
- Is this correct? when I want to convert to a path I ALWAYS need to switch to the pen tool?
-
4
-
8
-
10 hours ago, Cristina said:
Here is Lesson 7, and it went smoothly. This time I used Cassel's ChainBead-08 picture tube.
No problems with the arms or else... I wonder if the issue I had in Lesson 5 had anything to do with the image size or the number of nodes... Although I had clicked then numerous times on the center of the nodes, the icon (two curved arrows with plus sign in the middle) would not appear... That's why I had to move the nodes.
Still working on the extra practice of lesson 3... I am slow!
I love the textures in this and how the wire for the beads is oxidized. Great background.
-
2
-
1
-
-
1 hour ago, Cassel said:
The zippers also come with a single "closed" version.
I bought some so I will look and see if I have a closed version. I did like what I made, even for an odd shape. I thought I could use it as a hanging piece and put screws where the loops are. There is an infinite amount of unique designs one can make with Vectors. And even what I thought was "ugly" turned out to be pretty cool looking.
-
3
-
-
23 minutes ago, Michele said:
I was just playing with the nodes on the first one and, boy, was it fun; I used one of Cassel's chain tubes. For my initials, I used one of her gimp trim tubes (I found it interesting that the tube was applied differently on the S, almost like it was reversed). Then I thought I would have some fun with the lips I made for Lesson 2 and used a sequin tube I made a while ago from one of the tutorials. For the last one I used a star cutout shape I made several years ago and a star tube I also made.
I wonder what is in store for us in Lesson 7!
The gimp trim is really interesting. I wanted to try a zipper but didnt because it's two parts. I should have tried anyway, but it was late at night and things were getting blurry. I can see I need more tubes, you can never have enough, right?
-
4
-
1
-
-
Lesson 6
This is a fun script to play with. And a nice low pressure lesson.
-
6
-
13
-
-
Lesson 5 Part 2
I liked learning how to do this. And I liked Deana's (Davis) post with the instructions, it helped me remember it. I am a serial flower decapitator, for the sake of art of course. It's the first time trying to grow flowers of any sort. I am very abusive and neglectful so I'm surprised to have any photograph. I used the same font as the Part 1 project. Not sure if I made mention of it in that post. It's called Mouse Memoirs and I think it's from Google Fonts that came with my font viewer. Photo is mine as mentioned, on grey so I can play with some textures and blend modes....when I get around to it.
-
5
-
8
-
5
-
-
Part One of Lesson 5
I caught the PSP possession bug that others had. Twice shut down unexpectedly -that's what it said anyway....if it's telling me that it's not unexpected then is it??
this image was from hubby and my walk Friday morning where we ran into a little friendly furry neighbour. I took my camera for photo friday and got some textures I've been eyeing up on the walks. The font is Mouse Memoirs, which I thought was funny.
The shut down: it happened when I was typing my text on the path. my text did not fit and would have extended past (which I would have selected all and reduced the size). Soon as it came to the end of the path line PSP popped up with the "PSP has unexpectedly stopped working" notice. It happened twice. I have used text on a path before and extended past without issues. This is PSP 2022 Ult. I think it might have been my temp files, so I've deleted the temp files and did a disk clean up. I have 64 GB of ram, SSD drives, i5-6 core, 12 thread processor (all gobbily gook to me) but not a great video card at the moment. should be getting an i7 with more cores and threads this week hopefully. I'm chalking it up to the system working too hard (images open, video on the other screen etc) and not to PSP at this point.
this is a fun lesson to learn. And a very useful one for layouts. On to part two after I do some adulting (read: housework).
-
6
-
5
-
6
-
-
3 hours ago, Ann Seeber said:
Anita, I am in the exact same boat as you. Still stuck on Lesson 2. I gave up several days ago and focused on other things. I think my brain needs a reset. I started out by going back to PSP2022 because '23 was very buggy with layers. I never had software problems with '22 so my vector woes must be me, not Corel, though this is the first workout it's getting with vectors, so we'll see. I intend to try a leaf or two and see what happens....
Skip to lesson 5, it's Text on a Path. I think you've done that before. that might get you in win-win state of mind.
-
3
-
1
-
-
19 minutes ago, Corrie Kinkel said:
Text on a curve is something I use often, so no problems here besides selecting which photo to use. To make it more like a card I added a frame from my stash and I think that came from Creative Fabrica but quite some time ago. Font is Dreamy Snowland and I like this font for winter pages.
I was glad with the second assignment because I once made stamps that way but I forgot how to do the text in the other direction and I couldn't find in all my paperwork, if I had the instructions somewhere. What I did wrong when I tried to do this earlier, well simply the first step: convert to path. I'll probably never forget this anymore and now I have the guidebook where I underlined those steps in red. The font here is Chalk and Friends Four. The photo in the ellips is from a plaquette at the visitors center in that area.
Beautiful Corrie, that wil make a nice card.
-
1
-
1
-
-
1 hour ago, Rene Marker said:
I will say that my Scrapbook Campus spreadsheets is one of the smallest ones I have! I'm working on a project of extracting membership information from the official book for my church. Just for the baptisms I'm up to 1792 lines of baptisms and am only up to the year 1958! The Marriage spreadsheet has 1220 lines of info but the biggie will be the actual membership rolls.
As for the text size, I do change my spreadsheet fonts to a larger size when I'm working on them. Yeah, I may have to scroll to the right if I have a lot of columns with some fields needing to be longer but it is much easier on the eyes! And, the filter option... best thing I ever learned!
That project is why I haven't been scrapping much lately and since May I've had multiple doctor appointments to figure out what I am coughing all the time. And, now I'm facing surgery sometime in the next 2 months so my time with working in PSP is on the back burner. I do enjoy looking at the forum and seeing what everyone is up to so keep up the good work!
I hope you find out why you are coughing. It's exhausting to cough a lot. I hope your surgery goes well and wish you a speedy recovery (when it happens). You are very busy. My husband deals with those types of spreadsheets daily, 1000's of lines and various long macros and scripts and whatever else he needs for ways of sorting. I can do a very basic spreadsheet.
-
46 minutes ago, Cassel said:
I doubt the team has time to bother reading a forum from a "scrapbooking" site! ?
The best is that they hear me when I complain! ?
A girl can dream, right?
-
1
-
2
-
-
53 minutes ago, Anita Wyatt said:
I am still having problems with Lesson 2. I follow all the steps from the video, get the rounded corners on the rectangle, click on apply, then activate the pen tool. make sure I am in edit mode, if not I click on it, and make sure I have both of my object layers selected then right click - convert to path. Still in edit mode I add a new node, but then I cannot see where I can extend that node. It does not give me that small icon that looks like the move tool. It shows up on the other nodes where I rounded the corners. Now sometimes I get a new layer titled New Path. Somehow I must be missing something.
Adding to above message on 7-21-23:
I am thinking of giving up on the vectors. After several days and many hours re-watching the video and re-reading the Guide Book, I still cannot manage to extend that node on the side of the rectangle to create a new shape. I must be doing something wrong. When I add a new node I do not get the arms to extend it. I can think of several nice shapes I could make, but I guess if I cannot finish Lesson 2, I probably will have a hard time with the other lessons. Also, every time I open a new rectangle I have to set the horizontal and vertical to 0.00. it has been frustrating. Carole you mentioned you set those to default as there is a glitch in PSP 23. How would I set these to default? It sure would save time so that I do not have to do it manually each time after I rounded the corners of the rectangle.
I hope you pull through Anita. We are all cheering you on. Once I got past the first 3 lessons it feels much better, and a bit less scary. Take a breather and do something unrelated to reset your brain and Carole will get you on the right path (no Vector pun intended). That is why I called them Vexing Vectors. I had to revert to 2022 because I had other buggy issues with 2023. Like I've said, if you are fighting your PSP while trying to learn it's only a lesson in frustration and futility. I have confidence 2024 version will be bug free (I hope some Corel programmers are reading this...BIG hint hint on that hope).
-
4
-
1
-
-
7 minutes ago, Gerry Landreth said:
We had more storms this morning with another power outage. The loud booms and rumbles scare the cats, who may need therapy if there isn't a break soon.
Here are the Day 3 exercises.
Poor kitties! I hope it lets up soon. Hope the kitties (no matter the age, I call them all "kitties") find a nice dark snuggly hiding spot. Mine are good with thunder, even the loud cracks. but soon as one hears fireworks, she's gone to ground (in the house, they are house cats). For that reason I am not fond of firework holidays, it's very stressful for her. My other one runs to the window to look for the noise. She's a weirdo.
-
1
-
-
1 hour ago, Jnet Allard said:
I started yesterday and finished today. I won't be able to go through all the posts, too dizzying for me and for that reason, I didn't create anything, just followed the tutorial.
They are really nice and symetrical. I am doing the same. Only doing the shapes and learning how to tame the nodes...a steep curve for me.
-
5
-
1
-
-
1 hour ago, Donna Sillia said:
I forgot to make the hole for the coffee or tea, but it is getting easier. I had the nodes set to medium and changed them to small, and a lot of problems vanished. I also changed the DPI on my mouse and lowered the speed. The mouse is no longer jumping around so much that the symbols changed so fast that I couldn't grab them. I forgot the second hole, and there are a few things I could change. Since I saved the original vector, I will be able to do that. I am not happy with the jagged edges on the saucer.
This is very pretty. Love that pattern.
-
2
-
1
-
1
-
-
1 hour ago, Donna Sillia said:
I should have made separate vectors, too. That is probably why my saucer has jagged edges. Thanks for the tip!
The idea is all Carole, from one of the Vector masterclasses. I never would have thought of it on my own. ?
-
1
-
-
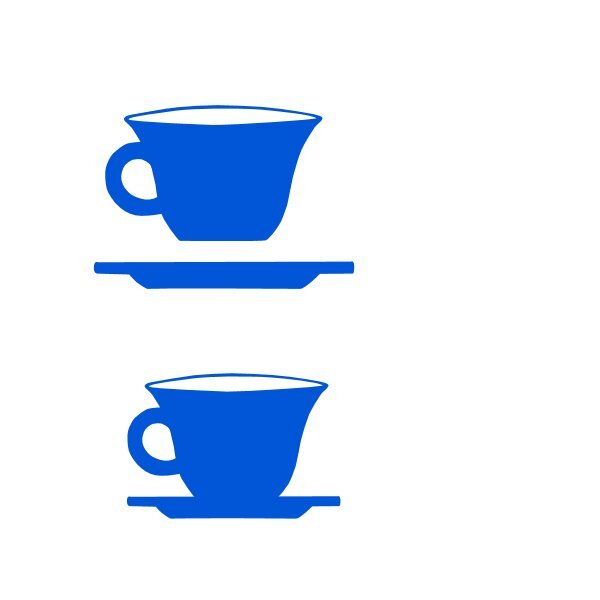
5 minutes ago, Cassel said:
Practice, practice, and more practice. You are doing well so far. Maybe I should make a frame for the CRAC-Paste mnemonic! (or maybe a t-Shirt?)
I'd buy the T-shirt for sure...or a framed print I can put right up on the wall beside the computer. Here is another one from Lesson 4. I made separate vectors for the cup and the saucer, then when all the cut outs were done I put the saucer layer in with the cup layer so i could export them as one file. When working on the liquid cut out at the top of the cup I thought when will I make it look even and smooth and then when I tested the preset shape it doesnt look as bad when it's much smaller. I put a little more nodes on the cup to see if it made smoother curves and it did in some instances and not in others. So I got some practice at merging today, I kept hovering over delete and remembered that's not the one. Much practice is still needed but I see an improvement since lesson one.
-
9
-
5
-
-
54 minutes ago, Deana Davis said:
I am doing the coffee cup and saucer. I have tried 3 times to get the cut out to work and I'm not able to do it. I go step by step with you but it's not removing the handle space.
I'm not sure what I'm doing wrong. I'm trying to stick with it but these are times I get frustrated and drop out. I'm really wanting to stick with it and conquer my lack of sticktuitiveness.... is that a word? lol HELP
Stick with it, I had the exact same problem. For me it was the edit mode wasnt toggled on. I get the frustration, especially when you dont know where it went south. I had many do overs, and didnt want to end on a bad note. Having said that, sometimes you need to walk away for a bit and come back later. that works too.
-
5
-
-
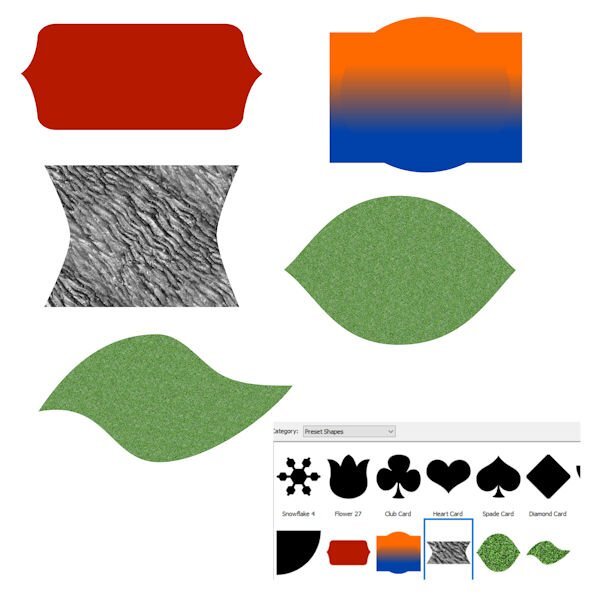
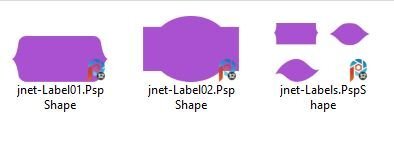
29 minutes ago, Cassel said:
Yes, you should have the Edit mode set as soon as you are finished drawing. I find that occasionally if I miss clicking on a node, it seems like PSP thinks that I want to draw some more, and the mode changes to the Drawing line.
If you want to delete a file, yes, you can just go and delete the .pspshape file. However, be careful if one shape that you want to delete is part of a multi-shape file. In that case, there is no way to delete just the shape without deleting the others in the same file.
Good question. The answer is no. In fact, if you ever need to edit one shape that you created, you will want to open the .pspshape file, which will behave just like a .pspimage, and then, you will re-export it.
And to everyone: keep those questions coming. For ONE person who posts a question, FIFTY more wondered the same thing (but didn't dare ask) and they all thank you for asking in the first place.
Thank you Carole. RE: Queston 1, I was getting a start node if I clicked anywhere on the canvas. This clears up why. Good to know about multiple shapes in one file (if I want to delete). I would not have thought of that. Keeping the shapes I make in the workshop might be good (based on Question 3), because it's the .pspimage file. I didnt know I could re-edit it. I might clean them up once I am more proficient, saves time from having to start again.
-
2
-


What are you working on (in July 2023)?
in Showroom
Posted
I remember you telling about your digi scrap spreadsheets. How cool to have all the info at a glance. I always think I will remember, or I write info on a piece of paper when I'm doing a layout. then of course I lose it, or recycle it. and it takes me right back to thinking, why didnt I set up one like you did. Originally I thought it would be an onerous task to go back and figure out what I used/did. But now I realize I should start from now and go on and not worry about what I did before. If at all possible, would I be able to see a little snip of part of a spreadsheet to get an idea of what info I want to collect and how to set it up. but not when you are so busy right now, when you are back to scrapping again. thanks