Corrie Kinkel
-
Posts
3,091 -
Joined
-
Last visited
-
Days Won
44
Content Type
Profiles
Gallery
Forums
Everything posted by Corrie Kinkel
-
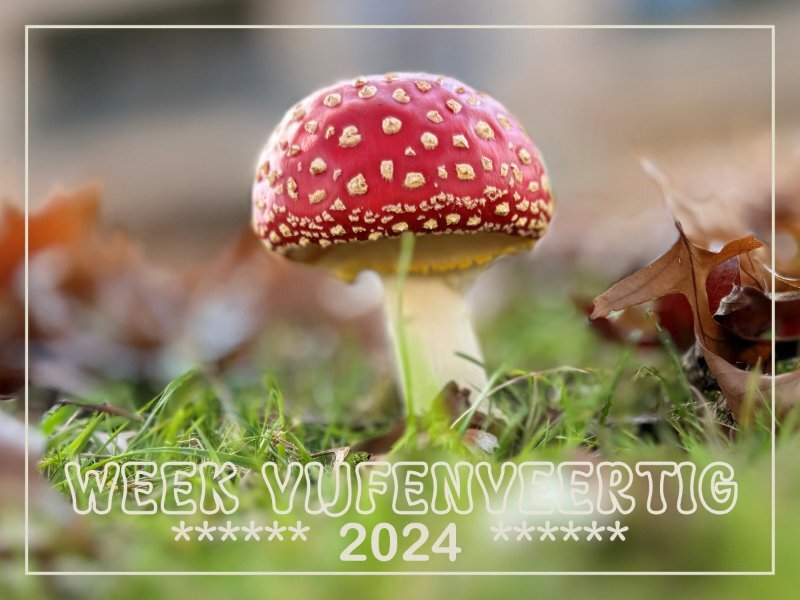
This week we have fog or low clouds, it is grey! Monday we had just a small glimpse of sun for a couple of minutes only, when I passed the stretch of grass in front of a building bloc. I have taken some mushroom photos there lately and just noticed some fly agaric (amanita muscaria). Btw is there another common name for this mushrooms? I have the new iPhone 16 which has gotten a great camera update which allows you to select the f value and exposure time by hand. I'm experimenting with it and here it worked great; foreground and background are blurred. When the weather improves..... I want to do more experimenting, however the grass has been cut and all mushrooms are gone for now.

-
Sue I love that frost, we almost never have that over here any more because the temperatures don't drop that low any longer; climate change.......
-
Art when I'm visiting my daughter and when we are going on a short roadtrip I love to visit museums or sites about the indigenous people and learn more about the different tribes and how they lived.
-
And here is my translation. No. 9577 Deposit no. .../... Ziekenhuis aan den Coolsingel Deposited for the later settlement of the nursing costs for the benefit of L.P. Nielsen the amount of 28 guilders for 14 days in the 3rd class ward. Rotterdam, 19 October 1916 for the administrator Deposits are made in advance of 14 days instalments at the office of "Het Ziekenhuis aan den Coolsingel" on every working day from 9 to 12 am and 2 to 4 pm. After the treatment, a receipt for the total costs will be provided. Sue I did some calculations and the total costs of f 52,05 in 1916 are the equivalent of CA$ 835 in today's money. I'm not sure if it was common practice to pay in advance for hospitals, but I think it might be because mr. Nielsen hadn't a Dutch address. Do you know why he was in the Netherlands at that time during WWI? In those days Rotterdam was a very busy port, the Netherlands were neutral, and in a port are a lot of merchants or sailors............ If your friend has more documents/letters that need translation, please let me know, Corrie
-
I'll make a translation somewhat later this evening. At the moment I have to cook dinner, but at first glance it is only about how and where to pay the bill and nothing else. See you later with a full translation.
-
I learned about the Elf on a Shelf when my family moved to the States 5 years ago but I have seen it pop up now in the shops as well.
-
I love this layout but on the other hand it makes me feel sad and lonely. The old typewriter letters are so fitting here. I hope you don't mind if I use this on my part as a scraplift too, not immediately but I can see use for it some day.
-
You are welcome, it is a pleasure to help and no trouble at all. I'm very glad your friend is happy with my translation!
-
Bonnie congrats and well done, not only the pickleball championship but all the layouts I just admired! I have only one complaint: I want some of that delicious looking ice cream 🍦
-
Well our Santa lives on the North Pole too, but in our case that is in Lapland a geographic area in the utmost northern part of the European countries Norway, Sweden and Finnland through which the Polar circle runs. His official address is in Rovaniemi in Finnland and the postal services even deliver letters from kids addressed to Santa there.🎅
-
F = Family grave
-
Sue sorry I just see your question now, but of course I can translate this for your friend. You will probably have guessed this is an invoice for 26 days of nursing costs in a hospital in Rotterdam called "Ziekenhuis aan den Coolsingel", which translate to Hospital at the Coolsingel and the Coolsingel was a street with a canal in the center of Rotterdam. It goes on with received from mister L.P. Nielsen the amount of 52 gulden (guilders) and 5 cents for 26 days of nursing costs etc in the 3rd class ward a f 2,-- a day in hospital from October 19 till November 13 1916. Nursing costs.............f 52,-- For the treasurer On the seal is the signature of the administrator and the date 13-11-1916 Charges.............seal f 0,05 the administrator ___________________________ f 52,05 However there is no mention what the treatment or illness may have been. That might mean 2 things: if he was employed somewhere (soldier, government) his employer paid the medical part of the bill or he had some kind of insurance for medical care and had only to pay for the nursing costs. But of course this is an educated guess. Hopefully this helps your friend. If there are more questions I'm most happy to help.
-
In this case the "trick" with those 2 trees works fantastic and I had to look very close to notice it. Nice subdued colors that match the colors in the owl's face, I love it.
-
I suddenly realized that when visiting the States in 2022 we went on a daytrip from Seattle with the ferry to Bainbridge Island and visited the museum there about the Suquamish people. Next to the museum was their burial ground where still burials take place. There are a couple of totem poles and a lot of American flags. It also is the burial place of Chief Sealth who died in 1866. He traded lands for perpetual fishing rights in the Puget Sound because the Suquamish where fishermen. On those lands is now the city of Seattle, which is named in his honor. Although not a Dutch cemetery I have visited an interesting one. We were there on a rather humid day with low visibility, which made for a gloomy atmosphere. My youngest granddaughter didn't liked it all which provoked her older sister to tell stories over bodies rising from their graves😕.
-
Y = Yearning
-
Julie I wonder: are there local lads from your town that are buried in the Netherlands as well? We have some very big cemeteries of Canadian and American soldiers.
-
Ann again 2 beautiful animals for those months. If it is of any comfort I'm not finished either. Because I have to print in A-4 format I have some adjustments to do before I even can run a test print. I always make my pages in the size they are offered. I calculated a couple of calendars ago that the difference in width is only 90 pixels but the height has + 360 pixels more. After finishing my month I upsize the background + texture when there is one to A-4 and that gives me a nice extra space on the top of the calendar for punching holes or another kind of binding without it going inside the actual pages. At the moment I have almost done every page; only the coverpage isn't ready because I have on the backside of it an index with the names in Dutch of the mushrooms/fungi. Now I have to find the common German names to make a German index and I do that by using the Latin name and then ask google for the German one and maybe I do that for English as well if time allows.
-
M = Mourning
-
Monique you are not the only one! I'm doing 3 languages for 3 calendars; Dutch, German and English and I had some mixed up as well, luckily I noticed posting 😕
-
What a lovely photo of Judy, something to cherish for a long time!
-
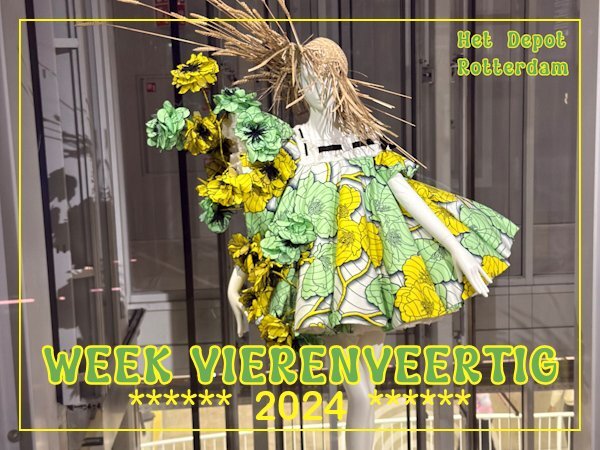
This week I went to visit "Het Depot" of Museum Boymans van Beuningen in Rotterdam. It is a building special build for storage of all the artefacts a museum has and a place where they research and restore old paintings etc. I have been there before and used the photos from that visit in the Magazine Challenge. There are display cases with some objects from the collection and this one is a dress made out of paper.
-
In the Netherlands there are now a lot more cremations than burials! That is the case in my family and my husband's. Of course I have to attend burials from friends or people I know and go out of compassion with them. When that is the case I do not take photos and I never go back to do so, it doesn't appeal to me. Over here after a cremation you can have the urn put in an urn wall at a cemetery or crematorium or put it in an already existing grave; you can scatter the ashes at a special field next to the crematorium or at sea; you can take the urn home with you. My mom and dad choose the scattering field and as a family you can witness it if you wish to. The children of my sister in law scattered their mother's ashes over a lake where she lived nearby her whole life and another sister in law's ash was sprinkled over the sea from a ship. I always loved the little cemeteries in the Alpes in the tiny villages full with flowers and well tended to, but you can't take photos when you pass by and a burial is taking place.
-
Wow, what a fantastic sight of so many birds! I love and admire the place where you live and the harshness of it too.
-
When we just had an air fryer, we had my sister in law staying with us for the weekend. On sunday morning I wanted to warm the croissants I bought for breakfast and I had read that you could do so in an air fryer instead of the oven. Yes you can but you have to reduce the heat which I didn't. It should take just a couple of minutes, but in no time at all the kitchen was full of smoke and the croissants turned totally black. It is already many years ago but my dear husband reminds me of it every time we have croissants by asking if I have set the right temperature. I don't know why, I just did it once..........🤣
-
That texture works fine as far as I'm concerned and it gets so nice with different blendmodes and opacity depending on the background color I used. Thanks again and now I have discovered how well it works I'll probably use it more often.