

Sue Thomas
-
Posts
2,652 -
Joined
-
Last visited
-
Days Won
80
Content Type
Profiles
Gallery
Forums
Everything posted by Sue Thomas
-
I'll have to post it on facebook for better viewing. Thank you.
-
I have just read the link you posted, after I posted my own comment above. I took references from my books, and what I remembered. The link you posted, has endorsed a lot of what I have posted.
-
Halloween stems way back to the Celtic, Gaelic pagan festival of Samhain, 2,500 yrs ago. Which is a pagan religious festival originating from an ancient Celtic spiritual tradition. The winter half of the year began with the feast of Samhain, (pronounced sow-win) which was on the 1st November, and marked the end of harvest. Celts believed that on the night before the new year (1st November) the boundary between the worlds of the living and the dead became blurred. So on the 31st October they celebrated it. It was believed that the ghosts of the dead returned to earth on the 31st Oct. The entrance passage to the Mound of the Hostages on the hill of Tara is aligned with the rising sun. The Mound of Hostages dates back 4,500 -5,000 yrs old. Which may suggest that Samhain was celebrated long before the Celts arrived in Ireland 2,500 yrs ago. Samhain, is the forerunner of Halloween. Back in the eight century Pope Gregory the third, designated 1st Nov as a time to honour saints. Soon after called All Saints Day. Which incorporated some of the traditions of Samhain. The evening before all Saints Day was known as All Hallows Eve, and then later known as Halloween.. Traditionally Halloween can not fall on the same day each year, because of the equinox and solstice fall on different days each year. By the time of the first written references to Samhain came into being in the middle ages, it was already being celebrated on 31st Oct or 1st Nov. It was in the late 18th century America made the move to change Halloween into a holiday, more a bout community and neighbourly get togethers than about harvest, witchcraft and ghosts. They changed Halloween to parties for adults and children to celebrate the day. Of course in my opinion it has been commercialized to the hilt. I wonder how many children, and adults would actually know the history or origins of why they celebrate Halloween if they were to be asked. Don’t get me started on Christmas, which dates back to pre Christianity. A pagan festival, once again associated with the winter solstice in the Northern Hemisphere, which falls on the 21-22 December. I Have books on such topics, which I have picked up over the years, after visiting ancient burial sights, castles etc. Even Stonehenge, which is familiar to almost everyone around the world.
-
A most appealing layout. I thought it was your work, even before I saw who posted it.
-
At least you get to see some up close, which is nice, plus they crop the grass, and fertilize it.
-
The colours of green, gives a refreshing, calming feel to the layout. By looking at a green colour it will help levitate a headache. A green room is even better. Your bee is defiantly a bumble, possibly a consobrinus.
-
They are soft and gentle, which is quite surprising, when you see how powerful their teeth and claws are. Unlike cats they aren't able to contract their claws. I've had them run over my bare legs, and one took a nibble at my toe, which gave quite a pinch, made me jump, which in turn scared the squirrel, making it scarper, fortunately no blood was drawn.
-
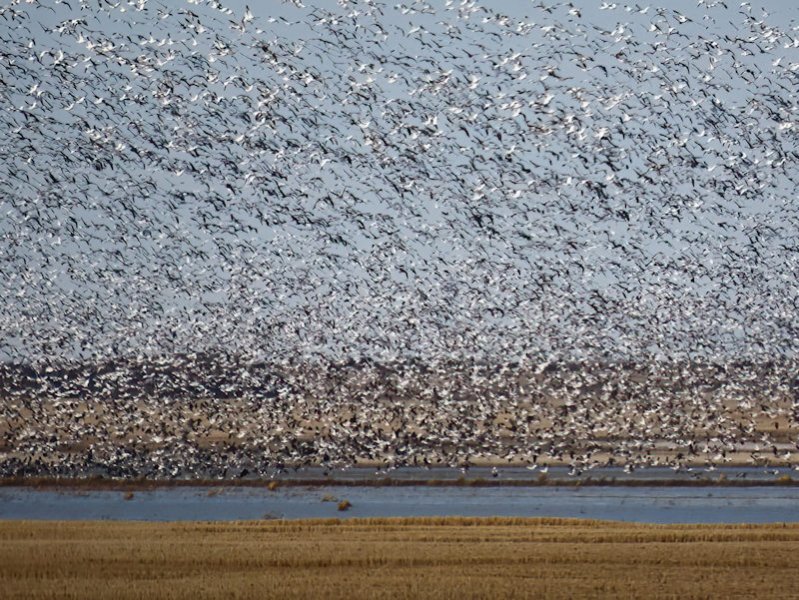
This is a shot I took on the 20th September this year. I live on their flight path, between Luck Lake and Lake Diefenbaker. Morning and evening, they will descend onto the vast stubble fields, to clean up what the combines have left behind. Over 6 million water birds will congregate on Luck Luck, stopping off for a while before continuing their migratory journey. As they fly over on mass they blacken the sky, and the sound is deafening. Sights like this isn't isolated either. At this time of year, where ever you travel, the fields are full of them. Sandhill cranes also flock in their thousands, soaring high in the sky. You'll have to pardon me if I don't get excited over the 20 you have on your patio.

-
I have a few ground squirrels that will come and take food out of my hand. It's a wonderful feeling, when they trust you enough to do so.
-
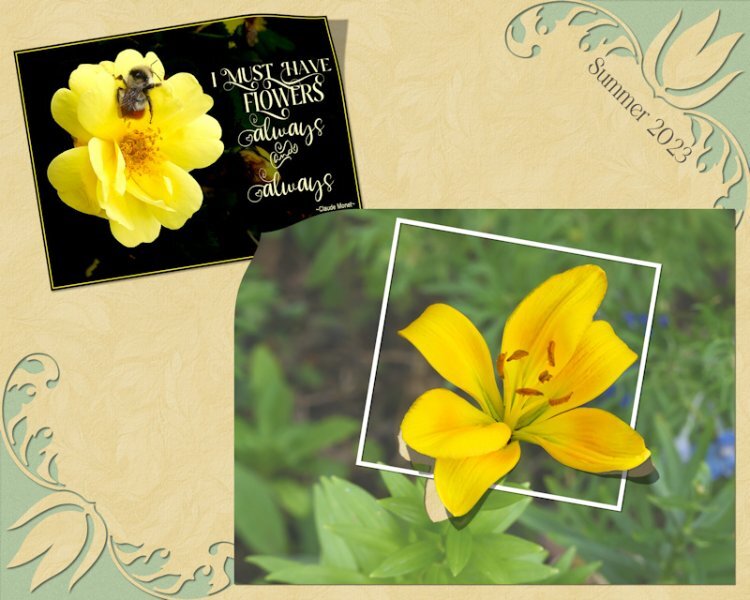
That is so kind of you Jannette, many thanks. Yes, the tri coloured bumble wasn't intended to be the star of the photo, but the flower. It just happened that the bumble came along in the Knick of time to be showcased too. That's the problem with sizing down from a very large file to 600 pixels. The image becomes very degraded. In 6 weeks I will be going home to fog, cold and rain. I really don't miss the British weather. Summer has gone, it has been replaced by Winter, with a week or so of Autumnal weather. Hard to believe a week last Thursday I was in shorts and T shirt cycling trails, and then kayaked last Sunday in glorious weather. The snow arrived on Wednesday. Woke to -10c this morning and more snow. I wish I could grow a nice thick winter coat like my horses do.
-
Using the selection tool to create journaling, is a quick and easy way, for a basic presentation on a layout. I would strongly recommend doing any journaling, using the selection tool or not on a separate page, using the size of page that you want to add to the layout. (Larger is better, as you can always size down). Using guides or the grid. I gave up a long time ago using the selection tool for any text work. It has far to many limitations for my liking. Making editing the text almost impossible on occasions. Don't get frustrated with yourself, as it's not you that is the problem, but the selection tool.
-
It's snowing here, once I did what I needed to do outside, I decided to participate in this challenge. I have included lifting all four corners in this layout. I lifted the lily out of the photo in order to frame it. I then lifted the top left corner of that photo, and the top right corner of the rose photo. Carole's corner punch, overlay of leaves on the punched out layer. I also made sure I had some shadow on the lily frame, of the lifted petal. My own wordart quote.
-
Corrie, there are also two very good masterclasses on perspective. ' A question of Perspective 1' and ' A question of perspective 2'
-
I'm having a similar conversation in the String of words, where I referred to a masterclass called Pop Up, on perspective and shadowing. Which covers how Anja, created a very realistic shadow on the stork. There are other masterclasses covering perspective and shadowing, in varying degrees of advancement, to cater for everyone, from newbies to seasoned PSPers.
-
To satisfy my own curiosity, I looked up which masterclass I was referring to. It's called Pop up. I thought it was a Christmas one, but it isn't, Carole uses a Christmas tree, to demonstrate perspective and shadowing.
-
I guessed that is how you created the multiple umbrellas. Carole, uses that technique in many of her tutorials. (eg flower petals) There is also a Xmas masterclass on creating a 3D effect, in it there is mat in the centre of the room demonstrated, similar to your puddle.
-
I would say it does. It's an awesome page, I love the rain effect, and what looks to me like a giant puddle.
-
We have had our first snowfall, and yes, I have been out shooting snow scenes. I totally agree, it does capture the winter vibe. I have to adjust my camera settings to accommodate the stark contrast of summer colours, to the brilliant white of the snow and browns of winter.
-
Something a little different, subway art, Autumnal equinox
- 30 replies
-
- 12
-

-

-
Firstly, are we allowed to participate more than once? If so: I take Autumn and the next word is RAIN
-
Once you see the marching ants of your frame, open a new layer, or not, it's up to you. By creating the frame on a new layer, it gives you more flexibility in editing the frame to your liking, such as shadowing, inner bevel. Select the flood fill tool, which you have circled on the left tool bar, choose the colour you want, and flood fill inside the marching ants.
-
Should you ever get the opportunity, take it. For more detailed info on shooting, use the widest lens you have.(for better colour) For crisper shots of the sky, focus on something in the foreground, in manual. I have trees, or buildings around the yard. Use the lowest aperture number you have. For more crisp shots use 3-15 seconds shutter speed. It's important to remember that the night sky is moving at a fast rate, which the naked eye can not see. Keep your ISO as low as possible, by adjusting it. Adjust the settings to suit your camera. At this time of year, and on into winter, the sky has less debris, producing sharper images. I also recommend you wrap up warm, take extra batteries, as the cold weather drains batteries quickly, especially when it's 20 or 30 below. PS. Woke to a blanket of snow this morning. -8c Winter has arrived!
-
I have been to Rotterdam, only the once, over 40 yrs ago. I suspect it has change a lot since then. From what I can remember it's a beautiful city. I have also flown over the Netherlands countless times, at various times of year, to land at Schiphol airport, to catch the sky hopper for Caerdydd airport. My favourite time of year is when the rows and rows of every colour imaginable of Tulips are in flower, waiting to be harvested. It's certainly a spectacular splash of colour, looking down from above. I think I may be just a little to far north for you to pop in for a cuppa, when you are over next. We shall never say never will we meet in person one day.
-
You create delicate, fine pages, they are simply quite exquisite. You have rather a unique creative style.
-
Did someone mention Northern Lights!!!!!!! September and October is the best time of year to see the Northern lights, although they dance throughout the year. At this time of year they are overhead in my area. Only last night, I was out watching the lights. They weren't green, but white, still a mesmerizing sight to behold. Prior to moving here, I had only ever seen them on the telly. Photo taken 20th September , looking north, out back amongst the trees. It's a good idea to take shots with something in the foreground. Manual, F2.8, aperture mode, shutter speed varies, 1000 plus. It is imperative that you use a sturdy tripod, with weights, to maintain absolute stillness. Taking loads of shots, to get one half tidy one. Sounds like you live in a lovely area Michele, and happy where you are.


.jpg.f517b8bd38b42f294d9cb5b36f265557.jpg)