Cassel
-
Posts
5,871 -
Joined
-
Last visited
-
Days Won
17
Everything posted by Cassel
-
You don't know how true that statement is! 🙂
-
Do you have pets? Do they get themselves in funny situations? Do you have pictures? If not, can you share the stories? Let's chat and share funny photos.
-
There was a blog article about using EPS files HERE. It is not a direct way to open the files in PSP but it works. However, it will NOT allow text to stay in text format, so it won't be editable like text, just editable as a path/shape.
-
Where did you click? Maybe there is one link that is not updated to the new forum?
-
@Mary Solaas That life preserver was a perfect shape to do a cutout! For the text, I see that one is a Text object and the other is a Path object. What did you do between the two? @Daniel Hess When you say that you pasted a second time and it didn't do anything, could it have been "invisible" because it would land outside of a current vector? Just guessing here. @Donna Pearson I am always trying to help when someone is stuck. You are doing great now! @Trevor Andrew I am glad to see how you are now able to troubleshoot your own process! That is good as it will help in the future. @Bonnie BorntragerIf you need more hair, there is a set of free hair picture tubes you can get in this blog post. 🙂 But now that you know how to do all those projects, you shouldn't lose anymore! @Anne Lamp You can change the size of the nodes if you go to the User Interface menu on the right of the menus. Donna and Trevor already mentioned it so you might have already changed it. @middie I have a Picture Tubes Workshop on my to-do list, but I have others too so I am not sure it will come this year. But stay tuned! I see you were playing with the buttons script. I suspect (and it is not wrong) that you changed the Selection mode to Angular for the blue buttons. That is why all the buttons on the horizontal line are the same then the vertical line too, etc. Depending on the angle of the path, a specific button is selected and once the angle changes, the button changes. For the pink buttons, you probably had the Selection mode set to Random (which is the default). See how you can play with the settings and get very different results! @Randy I can see a lot more play in your future. Vectors might be intimidating at first, but like any other tool, once you understand the basics, the rest just falls in place. @Susan EwartDo you know that the VectorTube script is the very first script I used? I managed to "open it up" and wanted to know the steps to follow a path with a picture tube; I wanted to write a tutorial on how to do it manually. Well, I never found out because I could not understand what all that "gibberish" was, but it got be curious about scripts, and once I found Suz' scripting course, I was hooked! Have you figured out something about your greyscale flowers? For the Stroke width, one thing to note: in 2023, with SOME fonts, if you have two matching texts and one has 0 for stroke and another one has a thicker font, they might not line up. It seems to be a bug and it affects only SOME fonts, so if you ever notice that, you didn't do anything wrong, and you can then set a stroke of 0.1 in the same color as the fill and it will look "invisible". For the Pressure setting, it is used when you have a graphic tablet set to apply pressure (I never use that with mine) so that you get a different tube based on the amount of pressure. It is really weird and I have never made much sense of it, so I don't use it! @Corrie KinkelWow! That was and advanced project! You get bonus points for those cut paths! @Gerry LandrethI agree with you that it is not always easy to grab the correct node after cutting a path. Zooming in helps but they still look like one larger node. The best trick is to click a little off the center of that big node, in the direction where you expect the side node to be. USUALLY it works. @Donna Sillia Yes, VectorPaint has also a lot of potential. VectorStroke is another one in the series but it is a little less intuitive to use. I might play with it in the next Q&A session following Ann's question. @Jeni Simpson Personally, I would have wanted more jellybeans!!! If you want more, you can change the Placement mode to Continuous instead of Random. That will make the spacing more regular and then the Step value will determine the real spacing. Just another setting to play with. @Alicia GarbelmanGlad you managed to deal with life on time to join in the workshop. I love that photo!!!!! @Anja PelzerWhat a way to practice and combine lessons. Don't tell me that vectors intimidate you anymore. I would not believe you! You still have a few more days to continue your lessons if you are behind. The videos will stay up until next Sunday. Remember to fill out the survey to share your opinion on this workshop (a link will come in an email). I am particularly happy to see some new "faces" in this workshop!
-
The copy I have kind of stays open (not really flat) but I personally hate to "crack" my books open. My guess is that if you do, then it should stay fairly flat. The binding is glued. If you have my previous book, it would be similar.
-
When you say there was nothing, do you mean in the thumbnail or the text on the right of the thumbnail? Or could the Stroke be set to 0? In that case, it does not show, even though it is there.
-
First, change the Selection Mode from Pressure to something else. It does not explain the greyscale image though. How is it when you use it manually and not in a script? Still greyscale? That is very odd. You might want to open the actual picture tube file for that flower and see if the image is still in colors or not. If it is in colors, re-export it to see if it solves the problem.
-
I got my proof copy!!! Anyone plans to get it?
-
@Mary SolaasGreat watermelon. A bit more elaborate than a single leaf silhouette, right? @Anja Pelzer You didn't seem to have any problem with lesson 5. Good work. @Jeni Simpson Whenever you need help, I am here! OK I think you are officially addicted to the VectorTube script now! LOL For the last one, sometimes, the Line Style changes to this while you THINK it is solid. Just open the Vector properties by double-clicking on the Object, and change the Line Style to solid. @Ann Seeber I am not sure why the anti-alias would toggle from checked to unchecked either. At least, if you see some jaggied edges, that is the first thing to check. @Randy To make a symmetrical shape with points, you can use the Symmetrical shape tool. That would be even faster than a script, and allows you to choose however many "points" you want, and tweak them all at once if you want. Select the Draw Stellated and play with the settings. We even had one class using it HERE. For Inner and Outer glow, you can use Layer Styles, as mentioned by Mary. As for OneDrive, a few people have reported issues with that. I don't have it myself so I cannot investigate. @Minka Glasier Tubes along a path can be so much fun! @Daniel Hess One thing that came to mind is whether you tried to paste using Ctrl-V. I found out that it does NOT work and you have to do it the long way, with right-clicking > Edit > Paste. I don't know why but could that be what you were doing to paste the cut shape? I don't see any reason not to have multiple shape on a single image. I have done that myself. Good work on the text on path. That didn't cause issues, right? @Jen Brown That was a lot of nodes for that leaf. Good work. @Bonnie Borntrager Those outlines look great. I think you might get addicted! @Susan Ewart Yes, you just activate the object and Recover anti-alias. I have imported some EPS files as WMH files that PSP can read, and I had noticed those jaggied paths. I even had to write a script to go through all the objects as sometimes, I would have over 100 tiny shapes to "recover". It looks like you did a good job on the rocket. I'll wait for the specific questions. (maybe it could go to the Q&A if necessary). Once you are in the Edit mode, try clicking anywhere outside the box, while the Object is active. It should get rid of the box. As for your version, you got the correct one (I always check, just in case). @Gerry Landreth The tool you are looking for is the Symmetric shape, and the Stellated mode. The class I showed it in is Vectors in Action. @Emerald Jay It looks like you did that effortlessly! @Corrie Kinkel That was easy (especially since you are already very familiar with the script). @Anja Pelzer You are definitely having fun. I recognize those picture tubes! @Donna Sillia It looks like you had no problem with that text on path, even counterclockwise! @middieThe small "dot" you see is just the last picture tube applied. Unfortunately, there is always a sort of "overlap" to close the path with the picture tube. It will be more or less noticeable depending on the picture tube you choose. If you thought that today's lesson was fun, you will get a nice surprise tomorrow! Stay tuned!
-
A few things to check. If it is the first export you make (I doubt but just in case, for others), check that the File Location is correct for where they are saved, and also for the folders it is pointing to. If you have previously exported without issues, it might be a problem with the name of the shape. Did you rename the object/group? If not, it might be using "New rectangle" or "New path" as a name. Check in the drop-down list if it might be under a different name.
-
No. That is due to the nature of fonts: they have outlines and you can't change that. I think there MIGHT be a way to convert the image to vector as a single path. I think I have seen that option somewhere in a different program (CorelDRAW maybe?). But definitely not possible in PSP directly. But now that you know how to handle vectors, maybe you can do it.
-
Just to troubleshoot something, what is the EXACT version number of your PSP?
-
What you have on that last cup looks correct. What do you have in the Vector layer? Can you take a screenshot of the two objects? If needed, you can record your process using Loom, and post a link. I could take a look and maybe find out where our process differ (if they do). Loom is free.
-
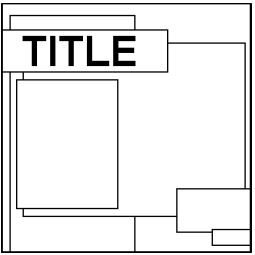
Learning scrapbooking is often done with practice, looking around for inspiration, and trying to recreate projects we admire. Sometimes, we can be inspired by finished projects, but sometimes, we also have to use our imagination to interpret something. This challenge will allow you to envision something from a “boring” base, and you will have to imagine the end result differently. The sketch is only a written idea, and you can fly with it, modify it, and customize it to fit your vision, your photos, and your supplies. And if you want more information on using sketches, check out this article. Post your project in the gallery.

-
@Jeni Simpson I am glad for you that you had the time to follow the workshop this year! Where were the settings in the end? Were they collapse on the side? I am glad you have all the settings now to complete the projects and the results are worth it! @Emerald Jay The reversing of the path for a cutout might not make sense at first, but if you think about it, the inside of the shape can be FILLED, but thinking in the "reverse" of it, it would be EMPTY. So, associating the REVERSE behavior then makes more sense 🙂 Sometimes, you just have to find some ways to remember steps. Yoru sun and text on path look great. @Daniel Hess I don't understand why your PSP would freeze when exporting a preset shape, wherever the folder is. That is a strange behavior. However, I remember that if I point my PSP to different folders, especially after I added some, it tends to check them all in case of duplicates, and that takes a long time (really long time). Could that have been the issue? And since you removed a folder and it stopped, ... You are doing great so far! @Jnet Allard Nice cup with those diamonds. @MoniqueN. Of course there will be more workshops. Sometimes, life happens and PSP just waits. @Corrie Kinkel In Canada, weather is so often the topic of the day. You might have noticed it in the Campus newsletter too! 😉 You have learned (and remembered) so much in those years since you started. @Susan Ewart I don't know why the Anti-Alias gets unchecked either, but I notice it too. But if you have a path that is jaggied, do you know that you can recover the Anti-alias without having to redraw the lines? Activate the object in question and go to Selection > Modify > Recover Anti-Alias. @Bonnie Borntrager I love that little girl with the text around her. You did a good job! @Gerry Landreth Your projects for Lesson 5 are delightful! @middie I sense that you are having fun with those vectors now! I LOVE that vintage quote! @Donna Sillia Getting ready for the Holidays already? Why not! Fun mug! @Mary Solaas Mickey is a great character to practice! Tomorrow, we will go through a totally new way to use vectors and that will open up so many options for you. Stay tuned!
-
In X8, the settings are not grouped in the "More options", but they are in plain sight in the toolbar. And if you don't see them, check if there might be an arrow on the far right or faint vertical lines that might indicate that those settings are "collapsed".
-
As I said, some links might need to be fixed on my end, so can you tell me which download links you were trying to use? I can check them.
-
@Jeni Simpson Glad that you are learning. Vectors will be less intimidating with practice. @Michele Take care of yourself. The lessons will wait! @Cristina Those multiple checks will become second nature. How are you getting an outline through both sides of the mug? If you make a cutout, it should not show a line through the handle. @Trevor Andrew Yes, it requires practice to switch like that quickly. Over time, you will do it automatically, without getting frustrated. And yes, the forum only takes jpg images 🙂 @Jnet Allard That is a good start! you are really doing good. @Ann Seeber You are catching up well! @Gerry Landreth Great practice. I like that leave that you outlined from a photo! @Cindy Sheets You will get there. It will get easier and easier with practice. @Louyse Toupin Great work. Was it getting easier? @Bonnie Borntrager You are getting the hang of it! @Donna Sillia Yes!! It looks great for that re-try! @Jen Brown There are all kinds of "wonky hearts" and many of them are available as fonts. Why not as preset shapes? @Alicia Garbelman It is great that you are persevering! @Corrie Kinkel Great work. Those little holes on the eggs are fine the way they are! As you say, you can always tweak them if needed. @Anja Pelzer That is a really cool composition! @middie Your shape did survive the kiln here! 🙂 Do you know that there is a way to "simulate" some of the layer styles? Using the Sculpture effect (yeah, not the most obvious). @Emerald Jay That is good. Do you still have to read the steps one by one to do the cutout? Keep it up. You are all doing great. I hope you are getting more comfortable with the vectors and the nodes now.
-
What are you trying to download? I might need to fix some links.
-
@Mary Solaas Good work. Yes, the Layer Styles are the way to go if you want to add glow or shadows to a vector. I am not covering it in the lessons as people already have enough with the nodes! @Jeni Simpson I hope you are feeling more comfortable after all those labels! @Emerald Jay Great assignments. Simple but you did what was asked. You worked hard on that maple leaf! And you now have a great preset shape to reuse endlessly! @Cristina Yes, I agree that if you don't click on the right place, you "lose" it and have to click again. It is annoying but with practice, it becomes just part of working with them. That flower is great! @Anja Pelzer Great work on both assignments! Is it getting easier? @Ron Yarborough Yes, vectors are often feared by many PSP users. Hopefully, you will also feel more confident once you go through the lessons. Looking forward to seeing your assignments too. @Trevor Andrew Yes there is a lot of switching node type. I am not sure why one cannot start with a cusp. Maybe there is a reason, but I just don't know it. As for a shortcut, Ctrl-S is supposed to be for Save as... not changing to Cusp. I don't think there is any shortcut for those nodes. @Donna Sillia I would rather you don't use that script to create vectors as the workshop is to help you edit them. Once you are comfortable editing the nodes, then you can take shortcuts to start the initial path and edit it later. @Alicia Garbelman Yes, using food items is a good way to play with those nodes and paths. Those leaves are great! @Jnet Allard Welcome back. You started very well with this lesson. Keep it up! @Susan Ewart Yes, sometimes, the arms are very short. That is one situation where changing them to symmetric might make both ends the length of the longest one, which then allows you to grab them correctly. You are moving along quite well! @Julie MagerkaDon't dispair. The "holes" in the middle will come in a different lesson as a cutout. It requires extra steps otherwise, every path wants to be filled the same way. Keep that image, and you will see, tomorrow. @Louyse Toupin Great labels. Maybe you can use them in a project soon. @Corrie Kinkel Great flowers! See, with practice, you will get to aim on the right place on the nodes and get going smoothly. @Gerry Landreth Too bad the cats are so demanding!!! 🙂 @middie That is a great question about managing all those preset shapes. See, when you export the preset shapes, they are likely saved in the folder in My Documents > Corel PaintShop Pro > [version number] > Preset shapes. Simply go to that folder and delete the ones you don't want to keep. They should be .pspshape files. As for Photoshop, if you have access to it, it is fine. Each program has its strengths and each one has features the other doesn't have (Photoshop does not have scripts or picture tubes!) We have over 150 people who signed up for this workshop. If you are registered and following the tutorials, don't be shy. We have all been beginners, and we know how it is. Show us your assignments, and over time, we will cheer your progress too!
-
@middie I can't seem to be able to move this post, but it should be in the Vector Workshop thread, here: https://scrapbookcampus.com/invision/forums/topic/1821-vector-workshop-2024/ Can you repost it there?
-
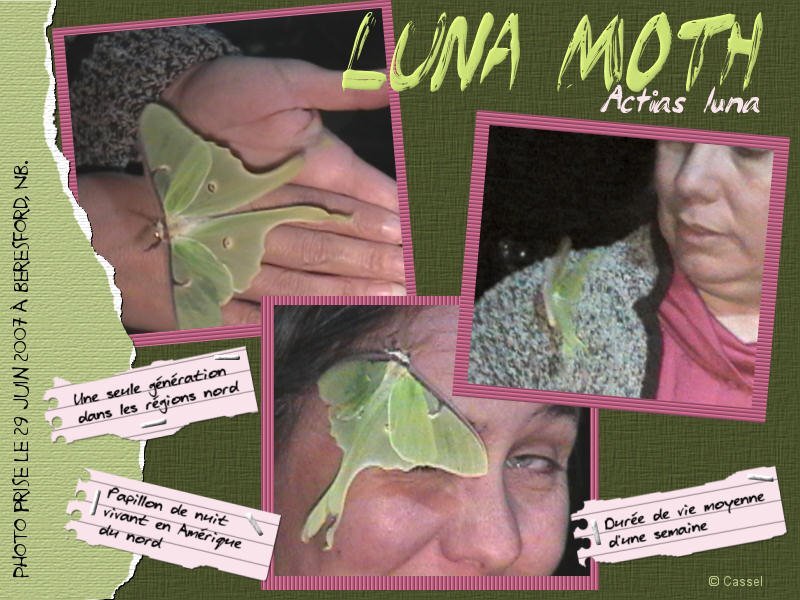
Here is my first encounter with a Luna Moth. That is quite pretty for a moth!
-
The link above is for registering. The links to the individual lessons are in the emails you will receive. However, as a DIAMOND member, you can also go directly to the lesson by going to the DIAMOND > Workshops page where the Vector Workshop is listed with all the lesson links. Can you access them that way?
-
@Trevor Andrew I guess the simplest explanation why we need to activate the Pen tool is that with the Pen, you will edit at the LINE level, which has the nodes, while the others offer different settings, but on the overall shape. So, if you remember that the Pen, will let you edit the nodes, it will be helpful. And the reason why PNG are not allowed in the forum is due to the file size, which uses a lot more bandwidth and storage. If you want to create shapes, you don't have to have a transparent background. For me, it is just a habit. @Daniel Hess Don't worry about symmetry. Not all shapes are symmetric and you will often use nodes in asymmetric design. You will see tomorrow! @Doska St. To change the colors, you usually will get better results and more control if you open the Vector Properties dialog window. Is that how you tried to change them? @Jen Brown Great start. How did it go? Was it easy or challenging? @Cristina I am glad you remembered an old "trick" with the corner nodes. And yes, it is all about practice, which is the whole purpose of this workshop. @Anja Pelzer Glad you are still following with the lessons. @Susan Ewart Yes, keep it simple and manage the nodes. It is all about becoming comfortable with them. @Alice Daniel Yes, nodes might be a little finicky and hard to "catch", so if you click a tiny bit off, it will activate some other layers. Have you considered using larger nodes? It might help? You are definitely getting some practice with that character! @middie We have a very supportive community here. Although I saw your request for help, someone was faster than me in answering you 🙂 @Donna Sillia Simple shapes are great. For those who might wonder, we will look at adding picture tubes in a future lesson. @Corrie Kinkel That is an interesting idea to choose a different color for this workshop. Since the colors used in making the shapes will display in the drop-down list, you can also choose a specific color for your own shapes. I tend to have blue shapes when I create scripts, or preset shapes that I need to share. They end up associated with me 🙂 @Julie Magerka You are doing good. You will get the hang of those nodes. @Gerry Landreth Aren't the cats your supervisors?? 😉 If you need more practice, try to turn a rectangle into a single letter. That is another project you can try. Don't create letters with "holes" yet. That will come later in the workshop.