
When Corel developed the version 2018 of PaintShop Pro, in 2017, one of their goals was to make the program and its interface easier for the users. Newcomers would have a simpler workspace with fewer tools so they would not be overwhelmed. Did that work? To some extent it did, but at the same time, it surprised many regular users who upgraded to that version. Even newcomers might be a bit lost if they try to follow some tutorials that use commands or tools that they can't seem to find.
The first look
When someone launches PaintShop Pro 2018 for the first time, this is what they will see.
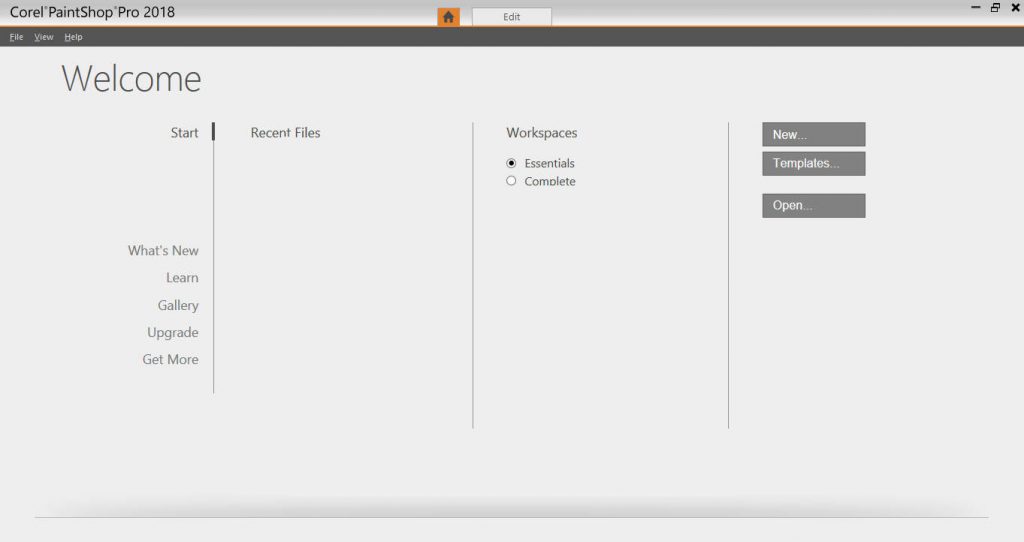
Although it is not obvious to the unsuspecting user, both workspaces are listed there, and by default, the Essentials one is selected. From this point, one could either click on the New button to create a new project or click on the Edit tab if they want to start editing images.
The Essential workspace
If you don't notice that the Essentials option is selected and you go ahead and start to work, this is the workspace you will see appear.
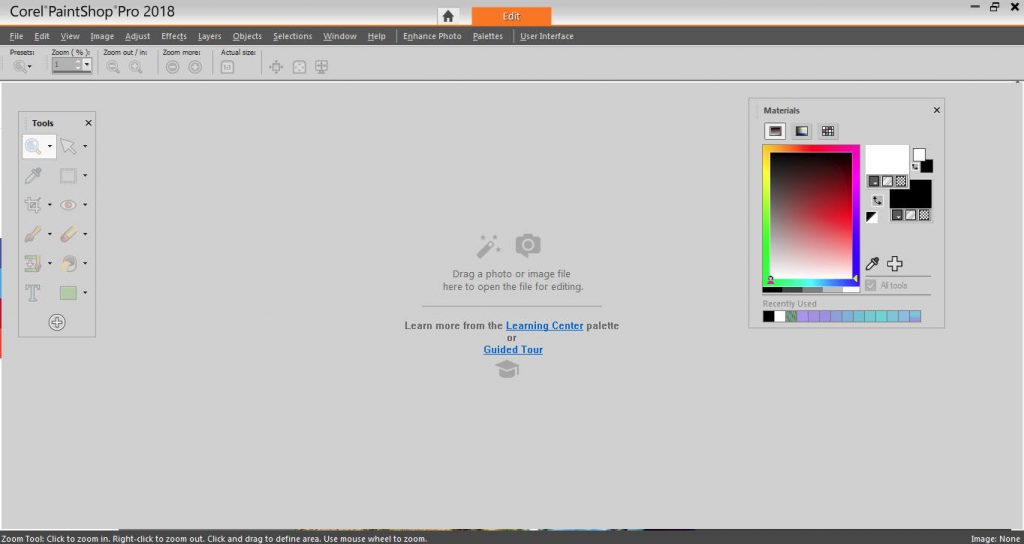
This workspace is clean, uncluttered and has lots of space to work. That is great if you are new to PaintShop Pro, but if you are already used to an older version of the program, you will immediately find that some sections, tools or commands are "missing", which might be quite frustrating.
The Complete workspace
If you noticed the two options on the Welcome page and you choose the Complete workspace, this is what you will get:
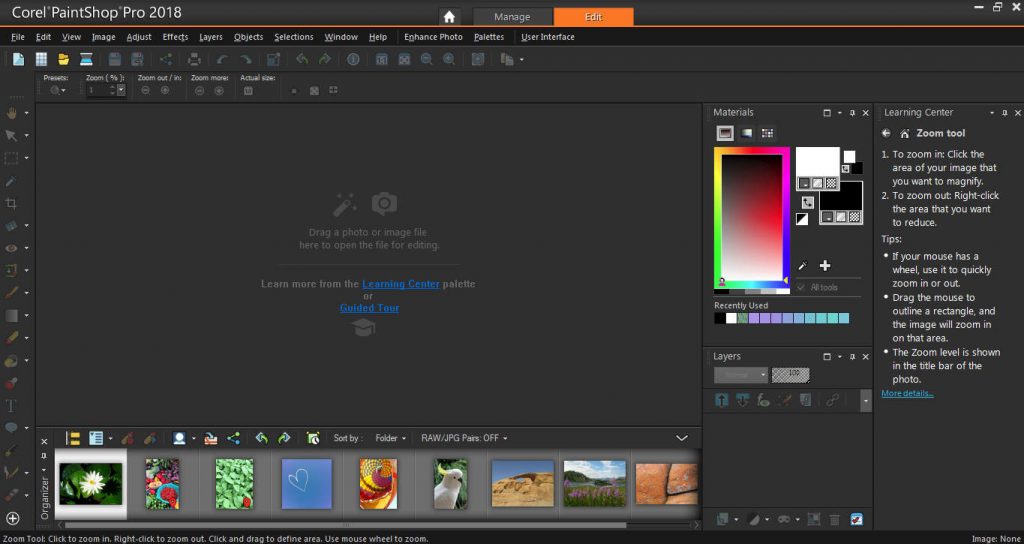
Notice how this workspace is more crowded as it has several palettes and toolbars that are "missing" in the Essentials workspace. If you are new to the program, this could be overwhelming. However, if you are already familiar with the program, this will be a comfortable environment for you.
Customizing the workspaces
Whether you are using the Essentials or the Complete workspace, you can always customize it. You can remove unwanted palettes from the Complete workspace. You can add tools to the Essentials workspace. And you can change the colors and text size for both workspaces. You can use either workspace that suits you.
Some things are really missing in the Essentials workspace
Although most commands are still accessible in the Essentials workspace, a handful of them are really missing. This is where frustration can arise because the unsuspecting user will think they are removed from their PaintShop Pro, which is not exactly the case since they are all included in the Complete workspace. The "issue" is that the users don't know.
- File location
Many PaintShop Pro users have previously set the program to use resources outside of the default folders. They have brushes, picture tubes, presets, patterns, etc. in other folders and they can point PSP to those folders with the File Location command, which is normally found under File > Preferences > File location. However, this is missing from the Essential workspace. If you want to use the Essentials workspace for your projects, you would need to change to the Complete one to set those File locations. You can come back to the Essentials workspace after and the resources will be available.
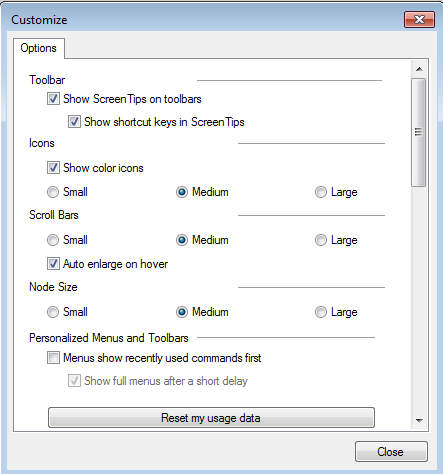
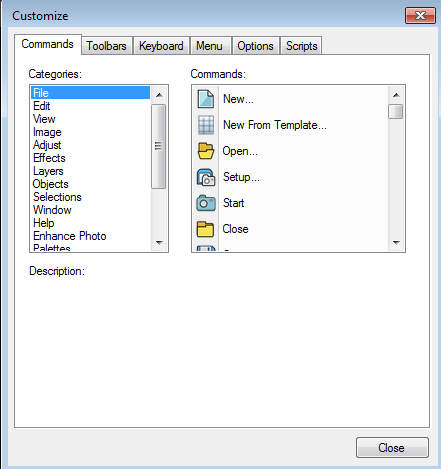
- Customize
There is a big difference between the options available in the Essentials workspace and the Complete one. Typically, you can use the View > Customize to add icons to your toolbars. You can add commands to your menus. You can bind scripts. However, in the Essentials workspace, you have only one tab, which allows you to customize the display on your workspace. That's all. Here is a comparison of the Customize dialog window in the Essentials and the Complete workspaces:
Have you upgraded to PaintShop Pro 2018 or 2019? If you have been wondering what happened to the interface, or where are those tools or commands, don't worry, they have not been removed from Corel. Just select the Complete workspace, and you will be back into familiar territory. Check this article for more details about workspaces in more recent versions.


2 thoughts on “Workspaces in PaintShop Pro”
Thank you. I wondered why it was different on my laptop than on my PC. Can I ask-how do I keep the photo viewing pane at the bottom. It isn’t showing, I’ve tried everything to get it to show my image cd’s so I can just drag them onto the workspace. ? I’m using W10 64bit. Kind regards. x
That would be the organizer. You can access it with View > Palette > Organizer. Once it is open, it should stay open.