

Mary Solaas
-
Posts
1,389 -
Joined
-
Last visited
-
Days Won
68
Content Type
Profiles
Gallery
Forums
Posts posted by Mary Solaas
-
-
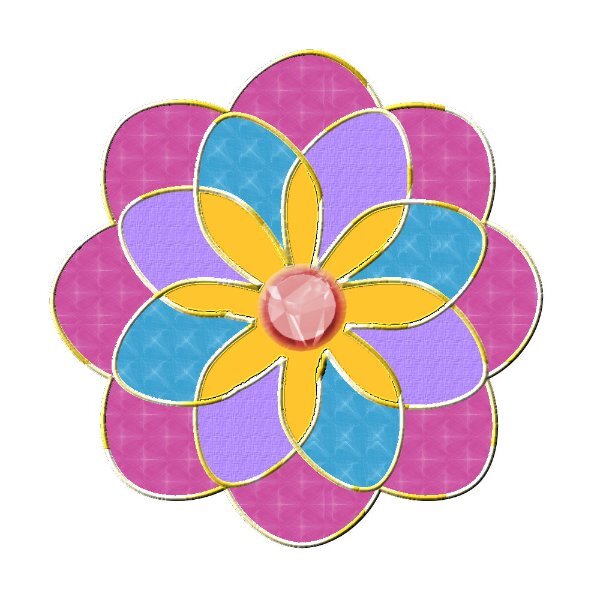
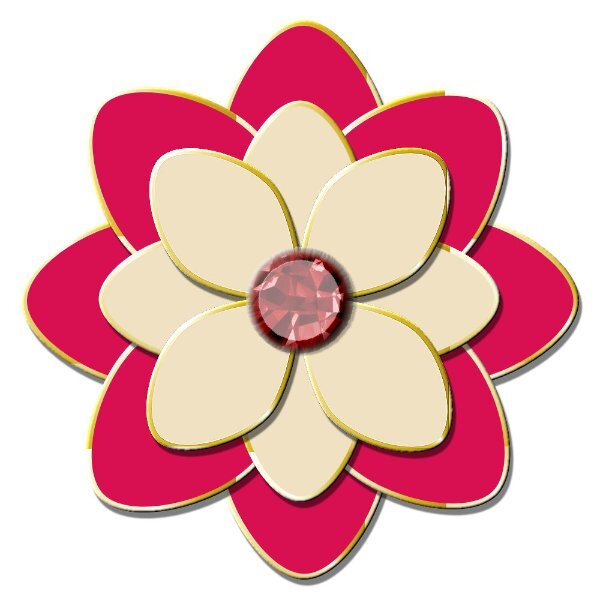
Dorothy Donn's posting of her lab 6 layouts inspired me to try to make that flower (?) element in the middle. I couldn't quite get it to work, but the multicolored element is my attempt at it. I also tried doing another 4-petal flower multiplied and these are my results.

-
 3
3
-
 6
6
-
-
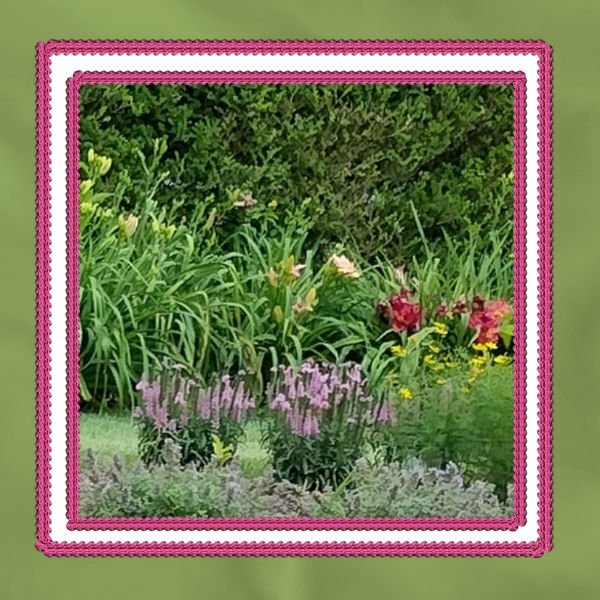
Back to the Labs. Lab 11 Mod 3. Make a banner, 4-petal flower, Sun element. All 3. Doubled up the 4-petal flower to make one with 8 petals. I needed practice to make that delightful border, 2 words, paper above (and below if you want otherwise you can have a different pattern/color below), and middle to display what the layout is about. Although I had written the instructions to make that, I found that I had to add some instructions for how to select with the magic wand. More practice needed, so I may use this again. All elements and papers are mine; the picture is one I took at the Botanic Gardens and the tag is one from the brochure. The font is Better Caramel.
-
10
-
-
I have worked most of the day on this shape. I just couldn't get it to save as a preset shape. I was practicing the CRAC Paste for the open eye, and the cut and remove part for the closed eye. All were on separate layers. Then trying to export as a shape. At first all it did was export the individual layer shapes but call it the name of the shape in the shape folder. Then I went back and looked at the instructions in project 2 for saving a 2 layer label and found that you had to group the layers and name the group the name you want. Did that. No luck. It wasn't until I had deleted the brush name from the shape file, and then went back to my pspimage on the group layer and then export it that it finally worked.
-
5
-
3
-
-
I've had trouble with the pen tool before. So I'm working on using it again. Made a heart paper clip and used it on Winnie.
-
2
-
11
-
-
Well, I finally did an M.
-
2
-
9
-
-
27 minutes ago, Susan Ewart said:
Mary, I just noticed your saucer is different brightness. How did you do that? Are your cut and saucer two separate objects. Same with the lip of the saucer, it's lighter. It's very cool.
When I drew my cup, on another layer I used the elipse to draw the saucer and another layer with another elipse to make the underside of the saucer. The colors of each (no stroke) were different shades of the same color. Of course the underside needed to be shaped and placed so that it really looked like the underside.
-
3
-
-
Monique - I gave up on using the M, but I like what you did with it. So, I guess I'll have to practice one more time!
-
 1
1
-
-
I'm still practicing. Liked the teapot tube used by Monique (Monique, you found several tubes I had missed); and so, I took just the teapot from that tube and used it with the customDirectional Script from Cassel and made a new tube out of just the teapot; recolored a copy of my background paper, made just the teacup and saucer into a new png and used it, recolored it, made it hold tea this time, used that smoke brush in Particle shop and Aryaduta font to finish the title.
-
2
-
11
-
-
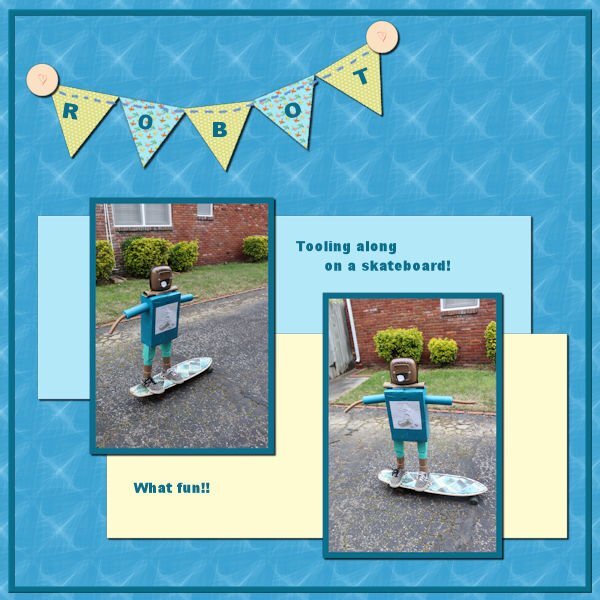
5 hours ago, Susan Ewart said:
Wowzers! that background is a beauty! Love the robot, how did they manage to keep it standing?
The background paper is one I made from a pattern in that AC program we were talking about a couple of months ago. I'm not sure how they nailed that robot down on the skateboard - but we made a couple of videos of it rolling down the driveway all the way to the street. It was fun!
-
1
-
1
-
-
Here is my take. The papers and elements are all ones I made at different times. The pictures were taken by Laurie of David's creation for school several years ago.
-
 1
1
-
4
-
-
All our talk about how to keep information on all the information we need to find, or go back to. One of the nice things Carole did for us was to arrange the labs and master classes in alpha order and to (in the case of the labs) tell what each module in the lab had instructions for creating. I have found that most helpful. I plan on keeping a folder in my special stash (K drive on my computer) for Workshops (the name of the workshop tells what it is instructing), and this may be instead of the database I would have to really study to complete (as well as the time to fill the different tables with items typewritten). I will keep the guidebooks and mp4's for each workshop there.
-
1
-
-
8 minutes ago, Susan Ewart said:
This is great Mary. I was also toying with a spreadsheet for the labs. It started from the Vector workshop. I had printed (in booklet form) the lessons (and coil bound them) and it occured to me there is really good lessons with Vectors in the Labs so I want to keep track of ones that have tutorials using Vectors. One detail I'm wondering. Do I include text in this, as text is a vector but it's almost a subject unto itself.
Also, I want to follow a similar thing to what Rene does with her scrap layout spreadsheets.
And then I want to do........(insert the zillion other things I want to do - I need a 42 hour day!)
ME TOO!!!
-
1
-
1
-
-
Thanks, Carole. You rock!!!
-
2
-
12
-
-
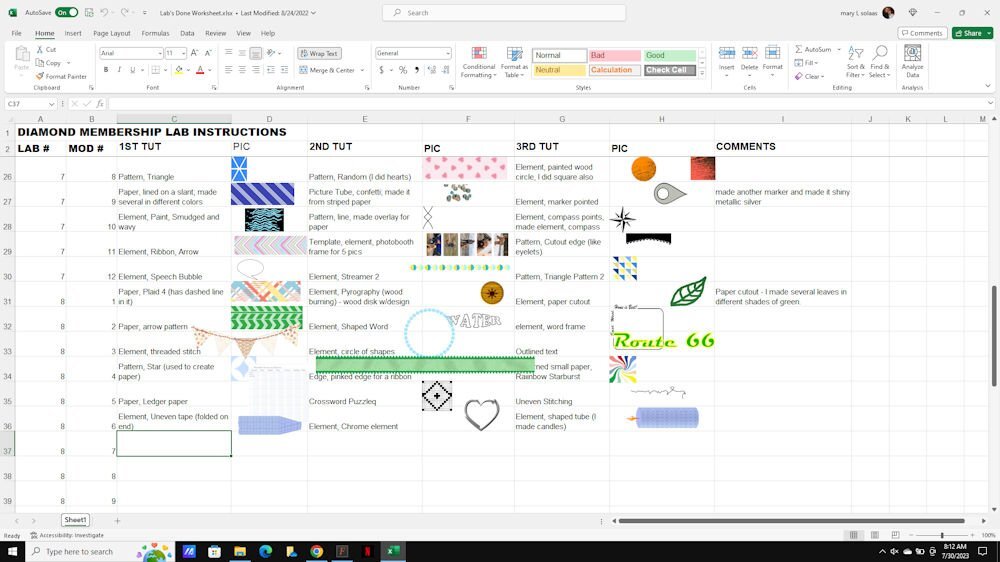
8 minutes ago, Suzy said:
Mary, that is awesome! I’m so jealous because it looks so pretty!
I keep forgetting about Access, it’s always Excel I reach for. Are the two programs different for this type of application? It seems as if I am the only person here who didn’t work with little boxes, so I don’t know this stuff! (I was in Industrial sales…I sold steel, aluminum and high temperature alloys.)
Is this showing your lab work? Or is it showing the pictures from lessons? I don’t recognize the pictures at all. Where did they come from? I would totally buy this from you when you finish! ?
That was my excel spreadsheet. The pictures were what I had done in working the labs. It was so cumbersome because I couldn't save the actual item I had created because it would take too much resource to bring it up and so I had to create a sample in order to put it in the spreadsheet. I am just starting on the database and I don't want it to take up too much of my time in learning it. I've been away from database programming for many years and so this may happen and then again it may not. In the meantime, the masterclass names tell a lot about what action is contained in it. Carole has a neat way of displaying the labs on her site - shows what is contained in each module of the lab. That is where I will go when I am looking for a tool, creating an element, pattern, etc. until (and if) I make a database. Also, she is pretty explicit in listing her other tutorials. Thank God for Carole!!!!!
-
1
-
1
-
-
Posting - Did rework the S and this is the result. Playing with that knife has been my bane in the past. I'll have to do some more work with it until I get it down pat.
-
2
-
8
-
-
Before the close of July, I'll post what I had started sometime ago as a spreadsheet of the things I had done in the labs. I abandoned this because of having to reduce the pictures of what I had done. I am now working on a database to show where articles about tools or actions (such as shadowing, creating masks, etc.) are located so I can bring them up and peruse them. I was a database programmer in my late adult years (that's what I earned my bread from), however, it is taking me to task and a new learning curve since Access 2016 is the new game in town and somewhat different and more sophisticated than my old Access database.
-
3
-
2
-
-
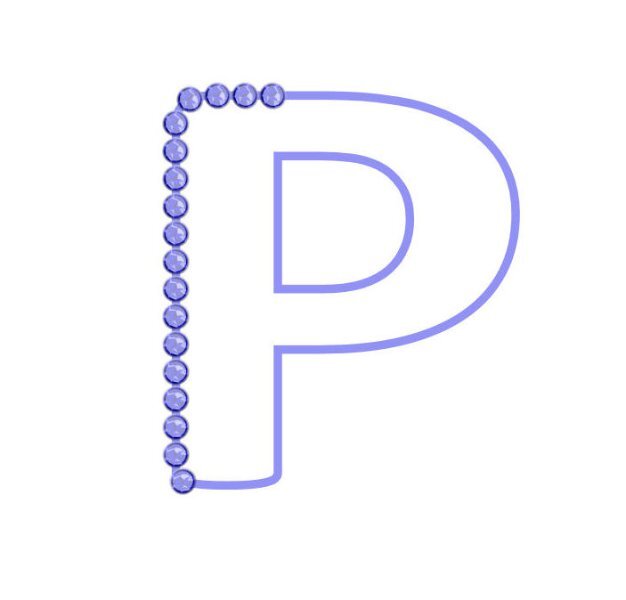
I've had a hard time with the letter and placing a tube around part of it. For some reason, the first letter I used was an S and then I had trouble deleting part of it (had to watch the video several times to get the fact that you select the part you want to remove and then hit the delete key - I kept wanting to select the part I wanted to remove with the selection tool- instead of just drawing around the part to be removed. Then I had a problem with how PSP was scripting the gems around the path - it kept limiting the size to the actual width of the letter. I scrapped the S and began again and chose P this time. Well this time the gems were the correct size. And, all's well that end's well!
-
8
-
6
-
-
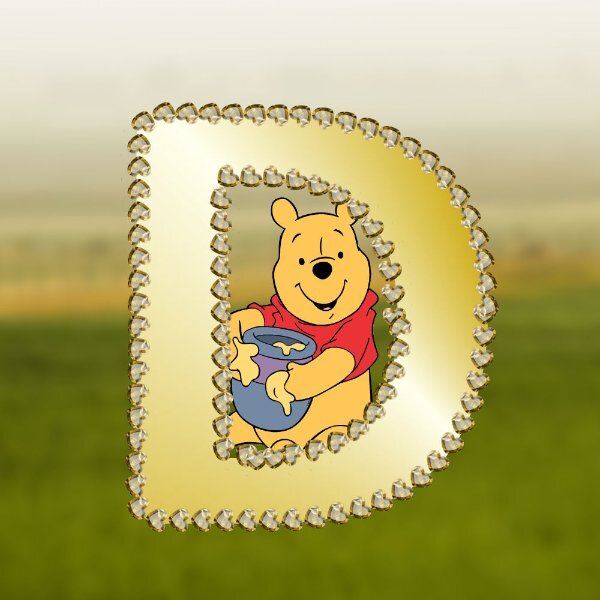
OK - I'm just playing now. I bought that custom directional script - couldn't resist. Used the topaz heart gems I created with a script from Cassel some time ago. Had seen someone putting a picture inside of a letter and thought that's a great idea. Love that old Pooh bear and so put him and his honey pot inside of my D which I had made golden. Of course the background is the 100 acre wood.
-
5
-
8
-
-
Project 7a. Cass pink bead picture tube; treated the circle as a silver bracelet. Using the knife tool was interesting. I never really understood how to use it. But it is the edit mode that breaks the circle where the knife cut and moves the part of the vector you want moved. You use the knife tool when making a paper clip also.

-
2
-
9
-
-
Still playing with the Vector Tube script. Cass Pink Braid used this time and the background paper is the one I did earlier.
-
4
-
8
-
-
And now to 6a. Tried (with Artistic Effects>Balls and Bubbles) to make the original tweaked shape into a plumped pillow (I know - it needs work). Before I did that, I used the shape and Cass Blue Braid to do what the project is about. Then (since it was a pillow) I added the font (Aryaduta) and the corduroy heart I made earlier in this workshop. Anyway, this is the result. Oh - I forgot - I also used the warp mesh to give the pillow more depth and played with the words because they had to mold with the plump pillow!
-
8
-
4
-
-
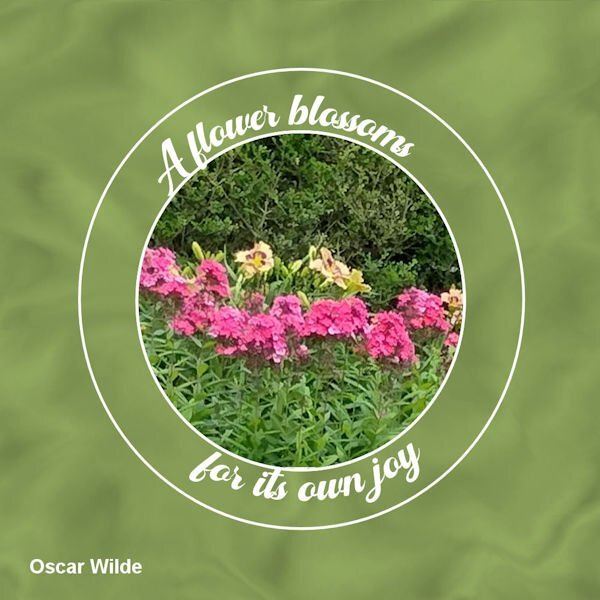
Okay - project 5b. Really had fun with this. Made the background paper using a portion of the greenery in the picture and smudging it, blurring it, lightening it - and then saving it for use later; used a copy of the original vector circle to crop the picture to fit the vector; used a copy of the original vector enlarged to make the top circle; and then relearned how to make the text go the correct way at the bottom (at first it went in reverse - why???) but I did get it to go the correct way when I followed Cassel's instructions by just typing it after reversing the path and then offsetting it. Whew! Fun learning. Need to practice that again.
-
3
-
9
-
-
This is my project 5a - text on a path on a picture. I had a time with this - I used Baby Lovely font at first and my computer really locked up - couldn't understand it. tried it several times and every time it locked up. I finally just used task manager and closed PSP. Then I opened it up and looked at one of my other pspimage files and they all worked fine and the PSP didn't lock up. So I just deleted the one with the Baby Lovely font and started from scratch. This time I used Ambrogio font and it worked just fine. I'm not sure if I have used Baby Lovely font before, but it sure didn't like me this time. Anyway. The pic is by my son Chris at the Gulf of Mexico.
-
9
-
11
-
-
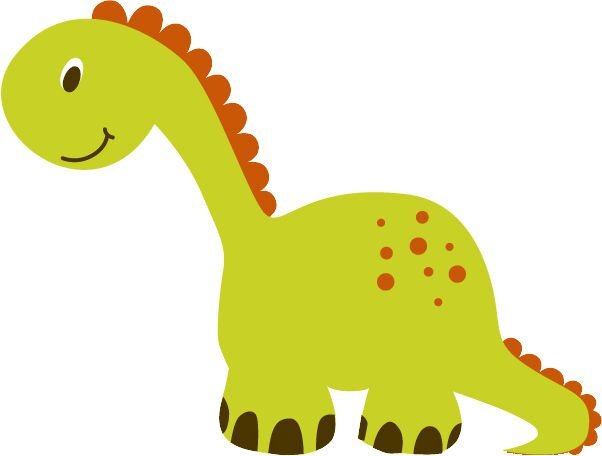
I did do a dino; however I didn't do it with vectors etc., but with the magic wand. One has to practice with it too. I copied the dino from the group with it; pasted it in a new image and began working on it to separate all the different colors on separate layers, creating a pspimage. Now, please don't ask me why. I never know exactly WHY I do anything. Anyway, I have it saved as a pspimage, a png (so it is an element I can use later on in a layout), and a jpg so I can post it here. This is the result after I hide the original and put together all the pieces!. I really have to move on to Project 5.
-
4
-
10
-


What are you working on in August (2023)?
in Showroom
Posted
So I had to try out that special border in another way. It seems that you can use anything that will go from border to border and have no gaps. So I tried with a banner that I had created in one of the labs and it works. All of the elements and papers are mine as well as the pictures (which I've used many times). The font is Nandola (probably from CF).