Leaderboard


Popular Content
Showing content with the highest reputation on 08/06/2023 in all areas
-
Ik heb deze tutorial gemaakt voor de vectorworkshop. Het was de tut met de geschulpte hoeken. Ik heb er snel iets in gemaakt , ik houd niet zo van een "leeg" kader.
 4 points
 -
Still playing with vectors. The basic train shape was a preset shape from WmTransport font. I changed it quite a bit. I made Santa several years ago from a PSD tutorial before I really knew how to use the pen tool. The wheels are from Harold's pips font imported as preset shapes. The train tracks are from a vector dash line. I just noticed a few things that I have to tweak.
3 points
-
It's quite the beast to tame. The mirrorless is so different, I think I was scared of it and didnt touch it for two months after I bought it. Then i just started using it and fumbling (still fumbling) through using it. The worst is no longer does Canon give you an indepth manual in physical form. I dont have data on my phone so cant download the e-manual onto it. Nor would I want to try reading pages of instruction on a tiny screen. Here was me, running outside to shoot the moon, ugh, I hate this setting, running back into the house to the computer and then looking up/changing the setting and going back outside. Good thing I was only in my back yard. And thankfully John Greego (a photographer/educator) does in depth instructions on certain cameras so without him I'd still be staring at the camera inside the box. And I've been shooting since highschool! I dont know why I had such a block with the mirrorless. it's much smaller thant he robust 7D so buttons and dials arent in the same places or non-existent, found only through the menu system and 13 ways to to get to each one...yeesh, all we need is two ways, the long one and shortcut. Sadly, neither cameras will fit in my purse. Would love to have it with me at all times. Good luck taming your beast.1 point
-
Good investment! OK, we wait for this miracle, winning without buying lottery tickets ?. When I'm on my way to daily tasks, I still take with me an older little Canon Ixus, I love to shoot spontaneously, place enough in my bag and not heavy. I have also a Lumix G7 but still can't manage to deal with it in more detail, just learning in stages. Have fun taming the beast ?.1 point
-
Okay, I'm not getting this. Where is this "fill bucket" and what is the "paint bucket" . I just know about the "flood fill" tool, I cant find any buckets. Is there a "money bucket"? I could really use one of those.1 point
-
Cristina I have a lot of Corel scripts too; most come with the program and I downloaded a couple that looked nice to me. Most of the time I forget that there might be one that I can use for a project.1 point
-
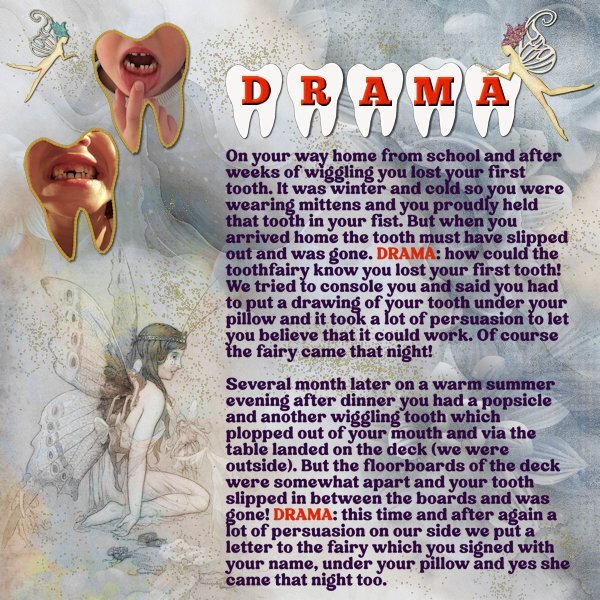
Suzy, thank you! Thanks to the Vector Workshop it was very easy to make a preset shape of that tooth-freebie and then embellish it and put the photos inside the shape. It was great to apply what we learned in that workshop to a layout.1 point
-
H -- Hygienist who tries to cut back on tooth fairy trips1 point
-
As soon as I saw the theme I thought of my oldest granddaughter and the dramas we had with her when she lost her teeth. At the time of the stories I happened to be visiting my family and I have photos of her when she lost 2 of her teeth. The background paper is Inked Florals DD 10048 which I have in my stash and I blended in the Fairy from Grunge-Forest-Fairy-Junk-Journal. I used the freebie from this theme for the title and thanks to the Vector Workshop I made a shape out of it and filled it with a part of my photo. In this manner I can use my photos without her being recognizable! Two more fairies by Sheila Reid - enchanted purple (and teal) hair fairy on Digital Scrapbook and a gold dust tube.
1 point
-
I used Cassel's WordSlats script for this one. I started with a black background and ran it three different times for each row of text. Copied one on top of the other and moved it to where I wanted the second line of text to be. Using the magic wand selection brush inside the new words, I switched to the original layer and hit delete. Once I hid the second layer, both lines were on one layer. Lather, rinse, repeat for the third row of text. Finally, all three were on one black layer with the words cut out. I used the magic wand again to choose the black and copied/pasted into selection the picture of the woman on the rock. The font is Hobo Std which is what Carole used on her free samples.1 point
-
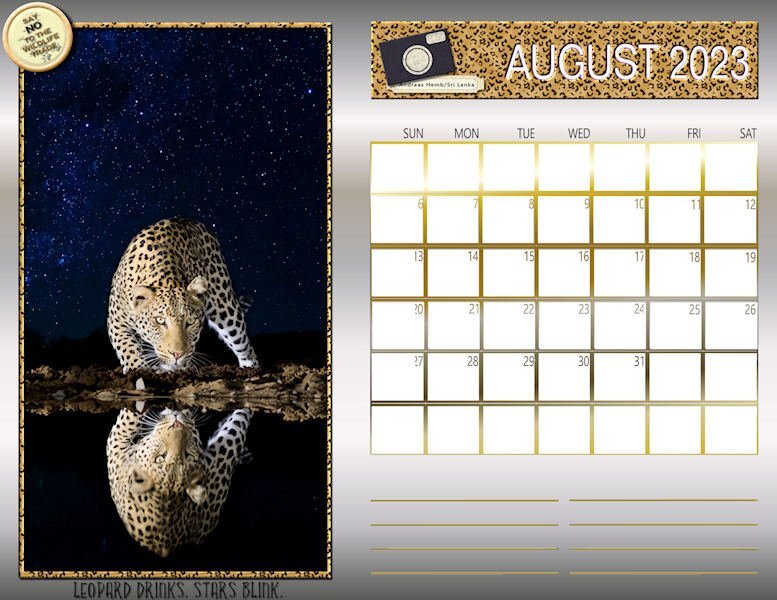
Happy August! Here is my August Wild Cat Calendar for 2023. The layout is from a template shared by Cassel last fall. The photo of the leopard is by a photographer from Sri Lanka named Andreas Hemb. The photo frame and the title strip are enhanced by the Effects/Sculpture with a leopard pattern. The chipboard camera art and label is from a mega kit called Cambodia by Marisa Lerin. The bottom title font is Yellow Fresh and the Say No brad was created from a brad template from Pixelscrappers. The calendar grid and lines for notes were treated to a gold gradient and I filled the background with a silver gradient. I also posted this full size in our Facebook files.
1 point
600x600.jpg.4850b41345d2c74b92afb0a05fc6c609.jpg)