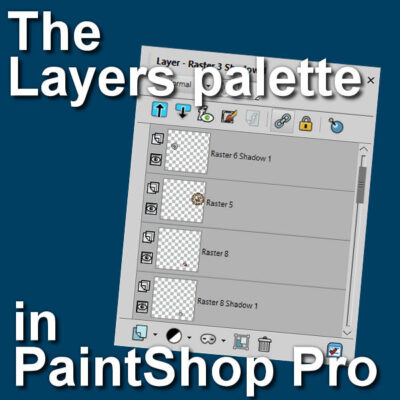

The Layers palette is extremely important for anyone using PaintShop Pro who wants to take advantage of the powers of layers. Layers allow you to manipulate elements independently, giving you so much more flexibility than if everything was flat. Let's have an overview of the Layers palette.
Where is the Layers palette?
By default, the Layers palette will appear, on the right side of your workspace when you start your PaintShop Pro. Of course, like many other workspace elements, you can change the location if you want.
What if I don't see it?
Occasionally, you might "lose" the Layers palette. Maybe you clicked on the X and closed it or maybe your program had a hiccup. If you are looking for the Layers palette and it is not there, you can retrieve it by going through View > Palettes > Layers or use F8 on your keyboard.
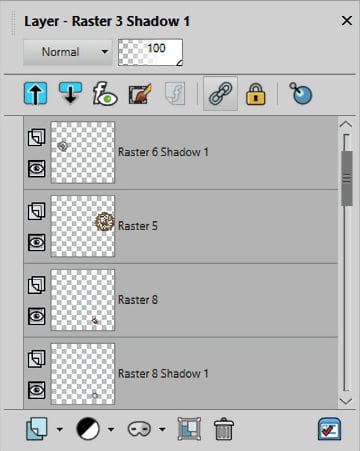
The top icons
The layers palette has various icons on the top and on the bottom. Each one has its place and function. Let's have a look at those, starting with the top icons.
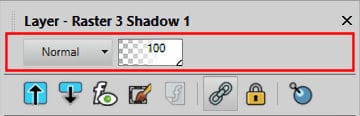
The Active Layer settings
This allows you to see the Blend mode (here it shows Normal) and the Opacity level for the active layer in your list. As you activate a different layer, those settings might change accordingly.
Collapse/Expand all layers
When you work with groups of layers, you can quickly expand all those layers or collapse them all, in one click. This includes mask groups, or any other group of layers.

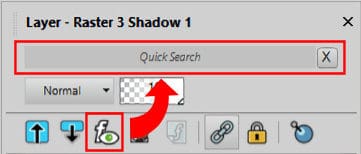
Quick search function
Once you click this icon, you will get an additional field added to the very top of the palette. That is where you can enter the name of a layer you are looking for. This can be convenient if you have lots of layers and you have renamed them in a particular way.
Edit Selection
This icon will turn any existing selection on your image into a floating reddish shape. This is great as it allows you to manipulate the selection in ways you could not with only the "marching ants". Clicking on that icon will toggle that functionality on and off. You can use this function to extract elements as in this tutorial.

Show/Hide the layer effects
This icon will only be active if you have a Layer Style applied to the active layer. Clicking on that icon will make the effect appear/disappear on your project so you can quickly compare the result with or without the Style. It will also display an icon on the layers where an effect is applied.

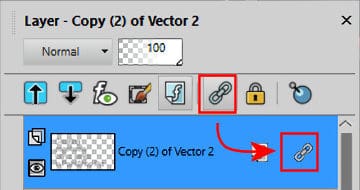
Link/Unlink
When you want to keep two or more layers perfectly aligned, you will link them together. The Link icon will appear on the layers that are linked together.
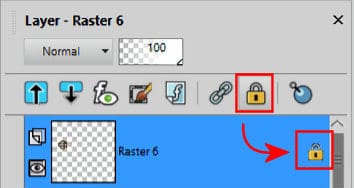
Lock/Unlock transparency
When painting or changing the color of any element, using the Magic wand would select the pixels and only let you fill them all at the same level of opacity. The Lock/Unlock transparency will make sure that fainter pixels will be filled at the same level of opacity. This will make the end result much less pixellated. This function is used in this tutorial on painting wordarts.
The bottom icons
The bottom section of the Layers palette includes more icons and they are mostly arranged to add various layers to your palette. Let's have a look.
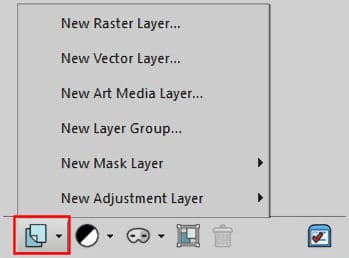
New Layer
The first icon will allow you to add a new layer whether it is a Raster, a Vector, or even a mask. By default, clicking on the type of layer you want to add will bring up a dialog window where you can choose various settings. In 99.9% of the time, you will choose the default. To skip the dialog window and simply use the default settings, hold the SHIFT key when you click on the layer you want.
New Adjustment layers
By clicking the specific Adjustment layer you want to add, you will get a dialog window where you can already choose the settings you want to apply to all the layers below that new one. Of course, Adjustment layers have the option to be non-destructive so you can change the settings layer. And since they act a bit like a mask, you can also brush areas where you want the adjustment to show, or not.

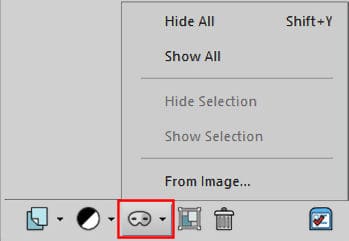
New Mask layer
This will add a mask or perform other commands on an existing mask layer.
New Group
At any point, if you want to group various layers, you will have to create a new group. This is the icon that will do that. At that point, the active layers will automatically be included in that group whether you have only one layer or several that are active. You can always add or remove layers from the group by simply clicking and dragging in and out of it.
![]()
Delete
This icon will delete not only the content of a layer but the layer itself. It can also apply to a group if the top "layer" is active: it will remove all the layers inside that group.
![]()
Manage preferences
Although it might seem like this icon is a bit out of place, it is actually quite convenient as you can access different settings you can change to display your Layers palette differently.
![]()
This will open up the General Program Preferences in the Palettes tab, where you can see some settings specific to the Layers palette.

Go ahead and explore those settings so you can really customize your workspace and the Layers palette to make your workflow as efficient as you need.


5 thoughts on “The Layers palette in PaintShop Pro”
Very helpful! Thank you.
Thank
you!
It is delight to receive your precise descriptions. Thanks for the PDF. 🙂
Thank you for all these good explanations!
This is very informative and good resource to refer back to. thank you.