
Using graphics programs allow us to manipulate images in ways that would have been unheard of, without those tools or extremely difficult or time-consuming. The Out-of-bound technique is one of those effects that can be done very creatively to enhance various photos. The principle is simple: part of the image looks like it is coming out of the actual picture.
Choosing a photo
Not all photos will yield a great result with this technique, so be on the lookout for some specific criteria:
- you need a well-defined element; since you have to extract it, it will be more difficult to extract a blurred edge.
- the element you want to go out of bound should be complete; at least, the element that will be "jumping out" should not be missing sections. That means that dangling legs should have the feet to see too, or the flower should not have straight cuts on the edges (unless you want to paint them back in)
- the background behind the element is not essential to the element itself; since you will remove it, it cannot be "attached" to the out-of-bound element
Getting started
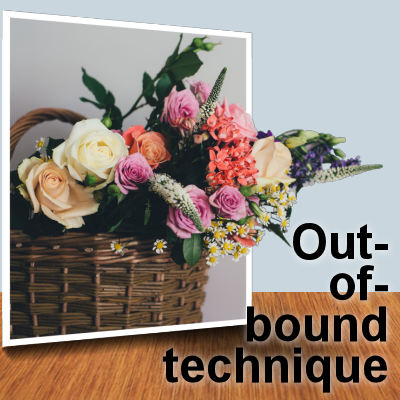
Let's start with a simple photo: a bouquet. Notice that the parts of the flowers on the right are complete and the background is not necessary so we'll have those flowers stand out of the photo.

The first thing you will need to do is promote that layer if it is a Background layer. If not, you can skip. If it is, go to Layers > Promote Background layer. Then, duplicate that layer with Layers > Duplicate (or right-click on the layer in the Layers palette and choosing Duplicate). Finally, holding the Ctrl key on the keyboard, select both layers in the Layers Palette, and click on the Link icon so both layers will be linked and perfectly aligned all through the process.

Click on one of the layers so that they are no longer BOTH active. Hide the top layer by clicking on the little eye icon, on the left of the layer. Then activate the bottom layer. That is the first one we'll work on.
Estimate the frame
With the top layer hidden, make a rectangular selection for where you would want the basic frame. We will be able to tweak it later but having an estimate will allow us to select the correct area for the top layer later. You have to make sure that the frame will be smaller than the full element so that some of the details can actually go out of bound.

Invert the selection either with Selections > Invert or Ctrl-Shift-i then delete that area with the Delete key on your keyboard.

Deselect with Ctrl-D.
The top layer
Now activate the top layer. Unhide it. Using the method of your choice, select the area that will be out of the bounds of the bottom layer. If you want to reduce the opacity of the top layer, you will see something like this and the circled area is what you need to select.

This should give you an idea of how far you need to do the selection/extraction as you definitely don't need to select the whole bouquet. In my example, I will go a little bit beyond the white flower.
My favorite tool to select an area is the Edit Selection tool.

Click on that tool and you will see a black layer is added above the top layer.

Nothing will happen to the top layer yet. This layer is simply acting as a mask. Activate the Brush tool with a size that matches the size or details of your element to select. In my case, it is set to 50 pixels. In the Materials palette, set your foreground to white and the background to black. Now, you are ready to "paint" in white, the area you want to select. It will turn to a reddish color, and that is normal.

You will likely need to adjust the size of the brush throughout that process if you have smaller details to "paint". If you go too far and want to "unpaint", simply use the right-click and it will paint in black, which will, in fact, erase that selection. When you feel you have selected all that you need, click on the Edit Selection icon again to see that actual selection with the familiar "marching ants".

If you need to tweak that selection, you can repeat the process by clicking the Edit Selection, painting more white (or black if you want to remove some), and clicking Edit Selection. Repeat those step until you are happy with the selection.
Since this selection is what will become out of bound, we don't need the rest, so let's invert the selection with Selections > Invert or Ctrl-Shift-i, and Delete. Then, deselect with Selections > Select None or Ctrl-D.

The final frame
We are almost done. This looks already like the flowers are sticking out of the photo but it would make for a much more "realistic" effect if the photo itself had a frame otherwise it might just look like a single image that is incomplete.
Is your current base rectangle touching the edge of the image? If so, you can either move everything toward the center with the Move tool (remember, the layers are linked so they will both move together) or you can adjust the canvas size with Image > Canvas Size and making it a bit larger. That is what I'll do.

Activate the bottom layer where you had selected a general area for the photo size. Using the Magic Wand, set to Opacity, select the photo itself. It should make a rectangular selection similar to what you had initially made.

Go to Selections > Modify > Select Selection Borders and set it to create an inside border of a size proportional to your rectangle.

Add a new Raster layer so you can manipulate it further. Then, flood fill with white to create that border. Deselect.

If you are happy with this result, save it as a .pspimage format and then, as a .png format so you can keep the transparency and then add this montage to another project. However, you can also add a few more details.
Last tweaks
If you want your photo to be at an angle, you don't really want to distort the photo itself as it would mess up all the work you did already on the selection, but we can give the illusion of perspective with the frame. That is why it is created on a separate layer.
Select the layer with the frame and activate the Pick tool (or the Raster Deform tool if you are using a very old version of PSP). Set the mode to Perspective (or hold the Ctrl key) and narrow the height of the frame on the side of your out-of-bound element.

Make sure you are not going INWARD as it might then become too far in and your selection won't reach and it will leave an obvious cut.
Now that we have the final shape we want for the photo, we need to trim the excess that is currently out of the frame. Using the Magic Wand set to Opacity mode and Contiguous checked, click on the outside of that frame. Just to make sure that every faint pixels of that photo outside of the frame is going to be trimmed, go to Selections > Modify > Expand and expand by a few pixels, like 5.

Then, activate the bottom layer, hit the Delete key on your keyboard and Deselect.

Now, you can save that image as a .pspimage and a .png file. You can then place your .png element on an interesting background, add some shadows that would emphasize the part that is out-of-bound, or add other decorative elements to the project. You are the designer, so be creative.

Sports photos can often be used and give a great effect of movement.

For other out-of-bound effects, check out the Out of this World Master Class.


