It is this time of year when everyone is considering a good deal for the holiday or just because it is there. Corel released PaintShop Pro X7 in August and people have been wondering if they need to upgrade. What does X7 bring? Let’s have a look at some of the main features of PaintShop Pro X7.
The Magic Fill
A lot of PaintShop Pro users have been drooling over the Content Aware Fill feature of Photoshop and wished that PaintShop Pro had the same thing. This is finally part of PaintShop Pro. The Magic Fill will fill in a selected area based on what the program can see around it. You can use this function to remove unwanted objects or elements from an image or fill in any missing area like in a damaged photo.

Although Magic Fill works great, it’s important to understand how the tool works so you can get the best possible result. Magic Fill samples a selection of pixels from the area just inside and outside the border of your active selection, then intelligently replaces the pixels inside your selection removing the unwanted portion of your image. Why is this important? PaintShop Pro has excellent selection tools, smart edge selection (which I’ll get into later), but this level of precision won’t get you the best result when using Magic Fill. As mentioned, the tool will sample from both the desired background outside your selection, and pixels from within the selection – meaning it will sample from your unwanted object, leaving you with a result you won’t be happy with. Play with Magic Fill and give yourself some ‘buffer’ when you’re making a selection around your unwanted object and you’ll quickly start getting good results. If you want more information on other ways to remove unwanted elements, you can refer to the Get Rid of It Master Class.
Text and Shape Cutting
Essentially, this function works with any vector object, whether it is a shape or text, allowing you to place the vector object on a photo and, by clicking the Text Cutter or Shape Cutter icon, the program will cut the photo in the shape of that vector object and paste it as a new image for you--all in one click.

While not entirely new to X7, you can still achieve the same results in previous versions by using a floating selection for the text and cut from there--but that works only on text, and not on vector shapes. This means you would still need a few more steps to get the same result, while the Text Cutter and Shape Cutter tool does it in a single click.
New Image Dialogue
For all the previous versions, PaintShop Pro had the same New Image window. You had some presets and you had the option to add your own. In this new dialog window, you have MANY more presets, whether you want to create a standard photo format, a standard paper size, a web object, a mobile device background, a social media cover image, and much more. There are currently 160 presets that come with PaintShop Pro X7, and of course, you can add your own.
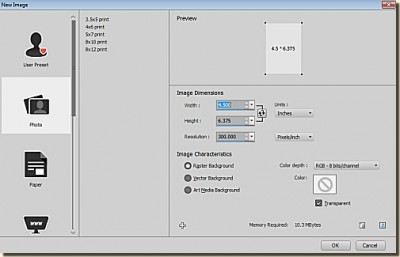
Another interesting feature of this new dialog window is that you get a preview of the format you are setting up, which will be very useful to warn you if you are entering the values to create a vertical or a horizontal image (and you can switch them with one click of the double arrow).
Smart Edge
There was a Smart Edge function in X6 with the Smart Select Brush where the selection would figure out, by contrast, where one element was ending the next was starting. It is a great help when selecting an object from a background. Now, in X7, this function also applies to a range of brushes and the Picture Tube tool. This allows you to brush on the edge of an element and not go over. You can also apply tubes along an edge and only show inside that line. Here is an example:
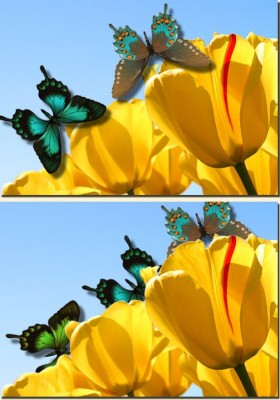
In the top image, Smart Edge is turned off. Picture tubes of butterflies were placed on the sky side, close to the flowers. In the bottom image, Smart Edge is turned on. On the bottom image, you can see that the butterflies appear to be behind the tulips. In fact, they are not, and even better, they are on a separate layer too! The program just checks the edge that is visible, and somewhat like the background eraser tool, will stop at a definite edge. Of course, this will work much better with well-defined edges, while blurred edges or busy images might not yield such a neat result.
Color Materials palette
One of the most obvious changes to PaintShop Pro X7, after the New Image window, is the Materials palette and Material Properties dialog. While we have been used to a square color display in the Material Properties dialog, with a vertical lightness slider and a horizontal saturation slider, this new dialog is very different.
The first change you notice is the shape of the dialog, which is now round instead of square. This is a new way of thinking about colors. You can change the hue by going around the wheel, and adjust the saturation by moving the handle toward the center. The lightness is set on a separate scale, which is that vertical slider on the right.
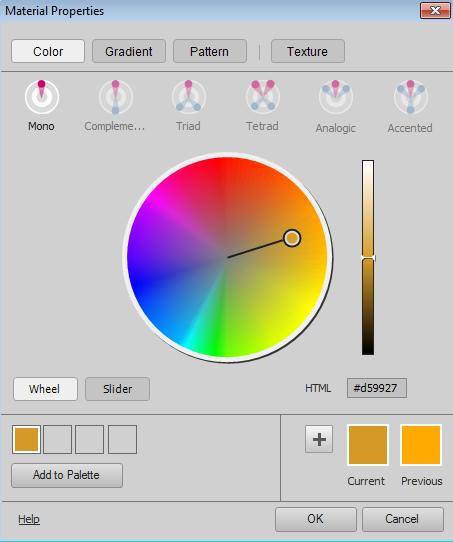
Unfortunately, it seems to lack the numerical values of the color you pick, on that view, but to compensate, you have the option of several slider views by clicking on the Slider button on the bottom left instead of the Wheel button (which is the default).
This will offer you several sliders, like a greyscale one, HSL, CMYK, RGB and more, which was not readily available in previous versions.
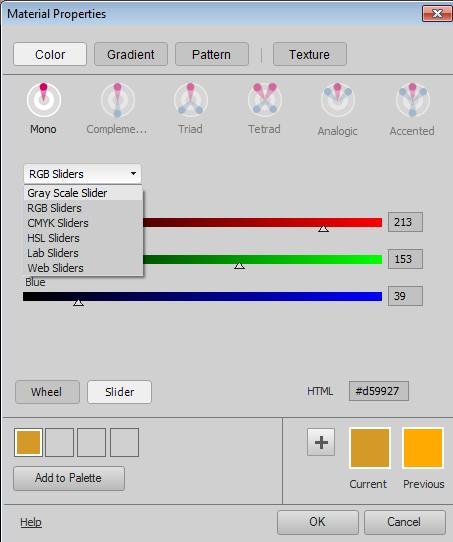
Another addition to this new Material palette is the ability to select more than one color to go together: complementary colors, triads, tetrad, analogic, and accented. Those colors can then be added to your swatches to be used later. No more need to go to outside programs or online to create your color palette.
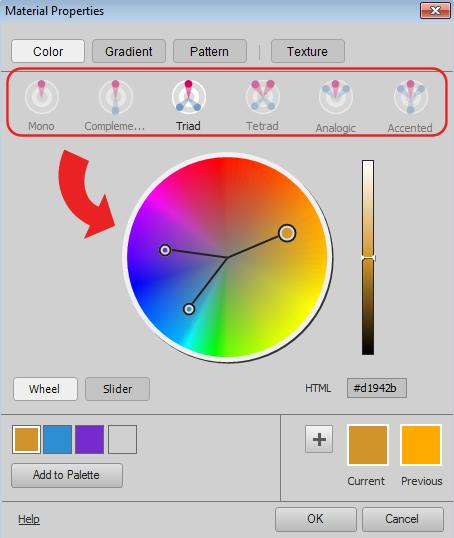
Yes, it takes a while to get used to this new material palette. After working for many years with the little square window, i got shocked when I saw it first. But like with anything else, it is a matter of using it, to get used to it.
Instant Effect preview
Although the Instant Effect palette is not new to PaintShop Pro X7, what has been added is a preview. This allows you to see what the specific effect will look like once applied to your image. It will save you time because you won’t have to apply the effect blindly only to find out you don’t really like that effect on your particular photo.
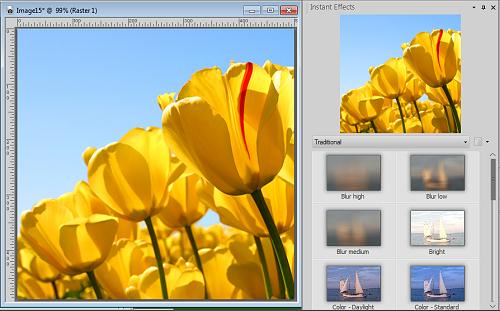
By default, you will have a tiny preview on top of that palette, but you can stretch it wider so the image is larger.
Mirror and Flip
A few versions ago, the Mirror and Flip functions were changed. Initially, both those functions would modify the placement of the object based on the center of the canvas, no matter where the object was initially placed. This was a function that was perfect when the user wanted symmetric edges, or four corners perfectly placed without the need to measure, but then, someone possibly thought this was an error and proceeded to "fix" it. After that, the mirror and flip would reverse the direction of the object but on itself only. This was a big issue for those who wanted that symmetry that was no longer available. Of course, some alternatives were possible (like these scripts Mirror and Flip, which offered both options to every user) but it was a loss. In PSP X7, after hearing those users complain, Corel not only brought back the initial Mirror and Flip function but also kept the newer options. So now, we finally have the best of both worlds!
More new stuff
Of course, to release a new version, Corel had to add more than just a handful of new tools and improvements, so let’s list them quickly here:
- new dialogue windows; aside from the New Image dialogue window other effects have now a full-size dialogue window, allowing you to see the before and after.
- faster brushes: on my own computer, I have not seen that much difference, but maybe it is because I am not using very large images with very large brushes. If you do, you should see some difference.
- XMP support: this has to do with RAW photography, which is something I don’t do. If you are an avid photographer, this should mean something to you.
Bugs
Unfortunately, as for any new program released, there are bugs in the program. Some functions are not working as well as they should, some details are broken and some crashes can happen. But those bugs are being worked on, and service packs should address them. One known bug is that now, unlike in the previous version, you cannot drag a layer from an image onto the workspace to create a new image. That function got broken, but it has been identified, reported, and being worked on. And so are others.
Conclusion
All in all, should you upgrade to PSPX7? Of course! Despite the bugs, there are some great new tools that will make your workflow easier and faster. If you already have one older version of PSP and you want to upgrade, the installation of PSPX7 will not overwrite your previous version so if something you need seems more comfortable with an older PSP, you can still use it. You can easily have more than one version installed, and even more, than one version running at the same time (I have 3 versions open right now, to write this blog post).
And now is a great time to take advantage of a good deal for PaintShop Pro X7, whether you want to upgrade, or whether you just want to add PSP to your graphic arsenal (check this article on why even Photoshop users might want to consider adding PSP)


6 thoughts on “What is new in PaintShop Pro X7?”
I currently have PaintShop Pro X5 Can I upgrade to the Ultimate X7 or just to the PSP X7
Pat
Hi Pat, f
From what i can understand, you can upgrade from X5 to X7. The ultimate version only includes additional goodies/plugins like Perfectly Clear, the Reallusion FaceFilter3 and some extra content, but the program itself is identical, so i suspect you can go from “regular” to “ultimate” if you want more goodies or from “ultimate” to “regular” if you already have them (i am not sure if they were included in X5 or not). Hope this helps.
Thank you for the information about the new version of Paint Shop Pro. Corel’s “Black Friday” deal, which was extended through the weekend (whom I received 3-4 annoying emails a day) sounded like a great deal. However, and you can feel free to tell Corel this, I won’t buy X7 until they fix that “drag & drop” feature. That feature is invaluable to me & has helped to speed up the process in creating a digiscrap layout. Furthermore, I hate what I’m seeing for the new Materials Palette. I feel like I have less control & less options, and I don’t like the look or overall feel of it. I would prefer that they go back to what they have for X6. So that, in itself, may make it that I do not upgrade plain period (despite liking & desiring the new Magic Fill, Smart Edge & Text and Shape Cutting features).
I understand your issue with the drag and drop feature that is broken, but it is going to be in the service pack, from what i understand. That means that if someone is delaying a good deal until the service pack is available, then the deal won’t be, anymore.
I also agree that the new Material wheel is a shock. I had the same reaction when i first saw it, but will it ever come back to the old format or will we have to adapt for any subsequent version? I don’t know.
Thanks for sharing your thought.
I purchased x7 yesterday with the black Friday special and was impressed with the price and this report is very helpful. I am looking forward to getting back into my psp’ing. Thanks for this report Cassel.
Shirley
I am happy you found this helpful and also glad you got a good deal on PSPX7!