Build-A-Kit
Wrap up
By now, you have just about everything you wanted to add to your kit. It is time to “package” it.
NAMING
We had touched on the naming convention throughout the workshop but to summarize, let’s see what would make the most sense to name all those files that you created:
- Use a prefix for your name. You might have noticed that my stuff starts with cass- . This will make it easier to associate my products with me, and by using always the same prefix, it becomes part of my “brand” so to speak. Since there is always a possibility someone else has the same initials, you CAN choose more than just your initials. That is really up to you.
- Include the name (or part of the name) of the kit. Each kit will be given a name, possibly related to the theme. Don’t leave spaces in the name. Use hyphens or underscore to separate the words or use uppercase for each word. So your kit name might be “A night to remember”, but in the filename, it could be “ANightToRemember”, or A_night_to_remember”.
- Use a description for what the file is. You can have “paper”, “solid”, “ombre”, “patterns” for different types of papers, but for the elements, use what they are, like “button”, “string”, “frame”, etc. If you can include a color, that is nice, like “button_yellow”. This can allow the user to find your elements if they use a search tool. And if you don’t have a way to describe further but have more than one “button”, or “string”, you add a number. That way, you won’t overwrite the previous “button”.
PREVIEW
You have already started working on previews pretty much from the start but here are some additional pointers:
- Use the same scale for everything. It is quite irritating when you find out that an element is much smaller than you expected because on the preview, it was the same size as another element, but it is not the case.
- Be careful of the layering. Depending on the number of elements and papers you have, some elements might be hard to see. Arrange them so the smaller elements might be on top of larger ones. For example, buttons and paper clips could overlap tags and frames. Once you rearrange layers, it is easy to “lose” a small element in the preview.
- Split the preview as needed. If you have many papers, piling them all in one preview might not give much of an idea of what they look like. If that is the case, make two previews (or more). You can separate the solids and the patterns or simply give a bit less space for the solid as you don’t need to show as much of each. The same applies to the elements. If you have 75 elements in a single preview, it might be hard to appreciate all the work. And if you have more than just a mini-kit, a separate preview for papers and one for the elements is common.
- Add shadows. The preview is likely to be “busy” and shadows will give more definition to the individual elements. It will be more “realistic”. A flat preview will not give as much punch to all the work you did.
- Add your name and kit name to the preview. Many users will keep copies of the previews only, in a separate folder (or even print them) to quickly search for the next kit they will use for their project. The preview will give them a quick overview of the color palette and the style. Then, from the preview, they will go search in their stash where they saved the kit. Make sure it is well-identified to you!
- Name the preview the same way you named everything else in your kit. Again, it will help with knowing who it belongs to.
TERMS OF USE
This is a little text file that is more important than you might think. Although we can assume that it is only to tell the user what they can do with the kit, it can also serve other purposes. Let’s see what the TOU can include.
- Your contact information. Whether you sell your kits in a store, or on Etsy, or just hand them out as freebies on a blog, sometimes, a user will want to get in touch with you. Maybe they want to report an issue. Maybe they want to ask permission to use your kit in a particular way and they are unsure. Maybe they want to share what they did with it. Include the store URL, your blog URL, or even a FB link, but also an email to reach out to. Designers change stores, so that is not always a reliable contact point!
- The Terms of Use. Can the user only use the kit for personal projects or can they make other supplies that they can sell themselves? In the first case, we call is “Personal use” or PU. In the second instance, it will be considered “Commercial use” or CU. There are other variations on those, and you can read more in this article.
- Credits. If you used others’ supplies, although they don’t always require it, it is good form to credit those designers. Did you use a script? Did you use some greyscale elements? Did you use templates? Maybe the user would love to get some of those supplies you used. It is a way to thank the designers and give them a little visibility.
The TOU can be a simple text file you create with Notepad, or you can make it fancier and export it as a pdf file. Just make sure it is a format that can be opened by anyone.
ZIPPING IT ALL
Now that you have all your files, all named correctly, it is time to package everything nicely. By now, your kit might be getting fairly large. That is why you will need to zip everything together, but before that, consider creating sub-folders as needed: papers in one folder, and elements in another. If you have a lot, you can separate solid and patterned papers. You can keep alphas in their own folder, etc. Try to limit the content of a folder to about 40-50MB. It just makes downloading the files easier. Not everyone has a good internet connexion.
Include the preview in each folder too!
Then, use any of the zipping applications you might have. Winzip is common. I use Winrar (which does the same). There is also 7-zip. You probably already have something on your computer, so just use that.
Remember to name the zip files the same way you named your other files. You need to be consistent!
HOSTING
If you are distributing your kits in a store or from a blog, you are already familiar with the various hosting options since you are probably using them already. If you are new to this and only want to share around with friends and other users, the size of the files will not allow you to share by email so here are some options for that.
Google Drive and Dropbox are two free (or low-cost) options where you can upload the zip files and share the link with others. They can then download them.
WeTransfer.com is another option if you want to transfer large files. It won’t host them, but you can use this free service to send the whole kit to someone.
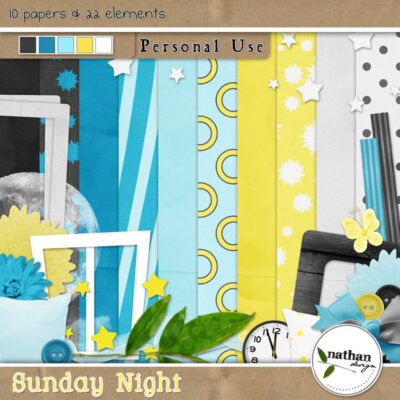
Credit: Nathan Design


