Home of the Scrapbook Campus › Forums › Showroom › Bootcamp – January 2022
Tagged: project 5
- This topic has 303 replies, 27 voices, and was last updated 2 years, 10 months ago by
Cassel.
-
AuthorPosts
-
January 30, 2022 at 12:05 am #70682
Here is my lunch. It’s a very basic lunch, nothing fancy, but it shows I learned the lesson of Day 2.
January 30, 2022 at 12:41 am #70683Anne,that happens to me too sometimes. I end up having to resave from the full size jpg. I also would love to know why that happens.
-
This reply was modified 2 years, 10 months ago by
Susan Ewart. Reason: spelling error
January 30, 2022 at 10:01 am #70689Thanks Cassel and everyone for responding to my problem of the text disappearing when resizing. I seldom use the feature of text wrapping so I don’t remember having that problem. I remember the class on that, but it has been a while. For some reason, I usually do my resizing after I save my full size as jpg, so that is probably why I don’t remember this problem.
January 30, 2022 at 1:36 pm #70694A few more thoughts on lessons learned this time around:
(1) I became pretty fussy about labeling each layer as I created it. “Photo” rather than “Raster 1,” “Beads lower R” rather than “Raster 7,” and so on. It’s much easier to identify which layer I’m working on.
(2) Similary, I became fussy about keeping linked elements next to each other in the Layers palette. For example, one layout used a scatter of beads repeated four times: upper/lower R, and upper/lower L. Keeping them together makes them easier to manage (and merge, if you want to).
(3) Having the drop shadow on a separate layer is really helpful, but be mindful that it’s possible to “rearrange” your layers in a way thqt separates the element from its shadow (take it from one who’s been there). That doesn’t hurt anything, but especially if you haven’t labeled your layers for quick identification — you may have a challenge locating it again.
(4) And of course, if you really can’t tell which raster layer is the one you need, you can always survey the project by making everything invisible, and then making one-at-a-time checks: it’s also a useful way to troubleshoot some problem that is sitting there, thumbing its nose at you.
(5) Finally, I’ll finish with the advice I offered in my previous post: check your tool settings. Example: I’d been having issues with the Text tool, so Cassel helped me sort out the problem. I returned to my project and began entering text; the cursor was moving; but no letters appeared. I sat and puzzled for a moment: that problem was not there before! Then I checked settings in the Materials palette and noticed that the small square below the “foreground” swatch was set to “transparent.” I’d been entering ghost characters! Easy fix.
Thanks to Cassel for the support and helpful advice. It’s been both challenging and rewarding.
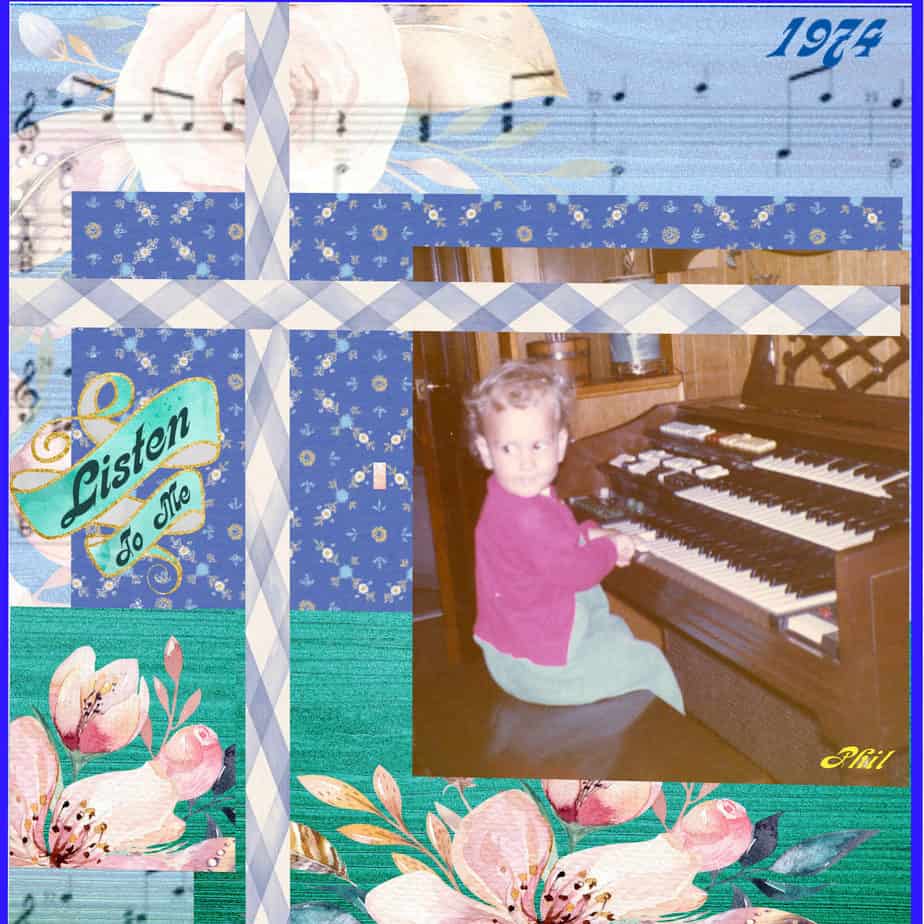
January 30, 2022 at 1:41 pm #70695Previous post also has my Project 5. I had problems with the Text tool, but here it is finished. The frame I chose was too narrow to use a bevel-edge, so I beveled the edge of the photo instead.
Thanks again to Cassel and the rest of the community for the support and encouragement.
January 30, 2022 at 11:46 pm #70720Perry, that is a good lunch you made! Looking forward to the other projects you will make.
Peter, great final result! I love your pearls of wisdom. Did you figure out what were the two P’s on the top left corner?
Remember that if you have not yet posted your four projects, you still have until tomorrow night to post them.
And take a couple of minutes to fill out the survey too!
January 31, 2022 at 1:31 pm #70739Cassel, I think the mysterious “two p’s” were on a second base paper that I hadn’t yet deleted. Probably another example of text that somehow got converted to raster, because I couldn’t select them to delete.
Thanks again for all your encouragement and support.
BTW, I lost the link to that photo-editing seminar you mentioned. Is it too late to sign up for it?
January 31, 2022 at 1:34 pm #70740Peter, if you are talking about the live class that will take place next Sunday, it is never too late. Go to the Master Classes page and the registration will be there.
January 31, 2022 at 1:48 pm #70742My final project.
Thanks for the tip about closing the jpg before resizing; I also lost my text and got it back by following your suggestion.
I am still having problems with my text. I try selecting the text but something happens so that my selection is of the raster layer below it. If I eventually manage to get the vector layer selected, I cannot get the text highlighted to be able to change it. I suspect that I am not understanding something basic here. 🙂
The other thing that has happened is that suddenly when I open a new paper etc , it takes over the whole workspace. Any ideas, please?
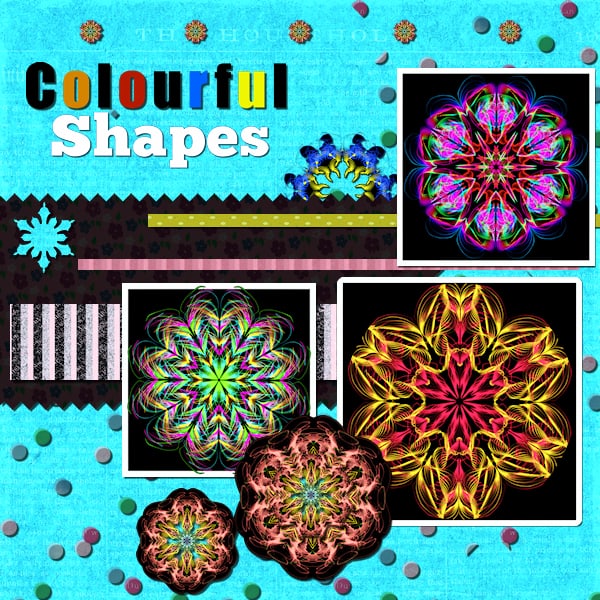
January 31, 2022 at 1:58 pm #70745Here is my submission for Project 4.
The pictures were created by me using another software — however, I frequently use the Kaleidoscope in PaintShop Pro.
Once again, I am concerned about whether the colours go together well.
The “snowflake” that is cut into the black was actually taken from a selection of the centre of one of the shapes, placed over the background, copied and then pasted. There is probably a better way to actually cut through the paper using the selected shape.
I tried to put shadows on everything but may have missed something.
I did notice for the picture on the right, the bottom one, I added outside instead of inside and it rounded the corners. I did not want to infringe on the image. Not sure why the corners ended up being rounded.
It has been fun to try this.
Thank you to Carole for setting this up for us.
Thank you for all who participated and shared your masterpieces.
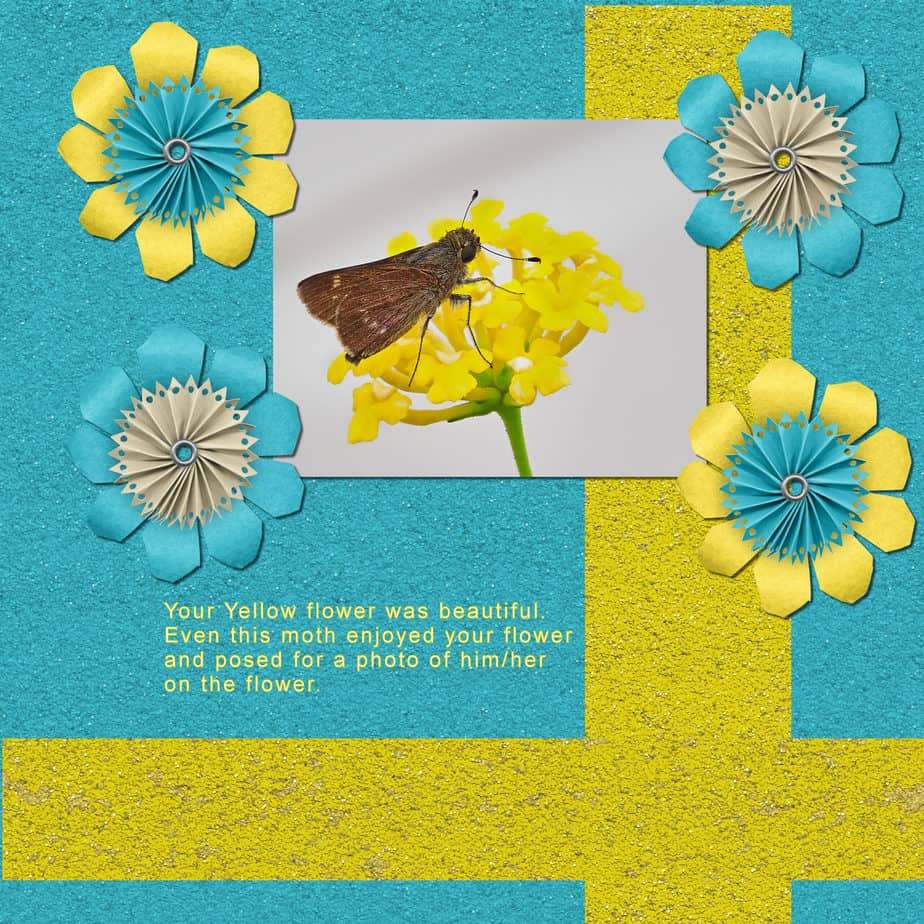
January 31, 2022 at 3:55 pm #70748Project 3. I did get some of the download jpegs, like the sparkles background. Still looking for the other ones, like the scroll one you used.
January 31, 2022 at 5:13 pm #70755I will rework the projects to make them better. For some reason Project 3 – all the pictures grouped into one and I could not manipulate each one individually. I could not get the group to ungroup. Also, I could not find more options on the text command to curve the text, or to change it to vertical automatically. The pictures, I could rotate them, but not flip them. I have to get more familiar with the PaintShop program. I can finally get more than one picture on the canvas without losing the previous one, they just kept disappearing. I am determined to learn this. It’s a challenge.
Kathy S
January 31, 2022 at 9:57 pm #70759Randy, I LOVE those Kaleidoscopes. The colors are great and I could go into a long and probably boring explanation of why they go together. If you also like it then it’s the right combo. I also would like to know about those rounded corners. I tend to crop (in camera) pretty close so I don’t want to use “inside” for the border. At the same time I like crisp clean 90 degree corners.
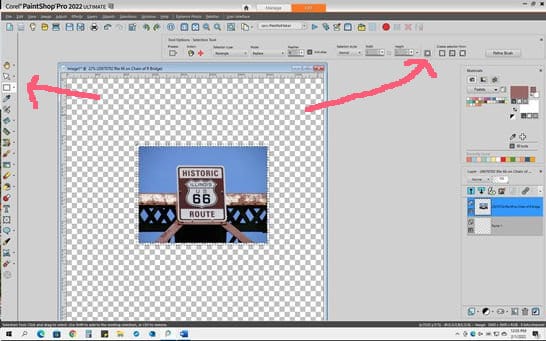
January 31, 2022 at 11:32 pm #70766Randy and Susan: to get the square corners on a selection frame, after you have selected the width of the frame in Selections>Modify>Select Selection Border, use the rectangle selection button and click on the button “Custom Selection” and then flood fill with your color or pattern. I am attaching a screenshot showing the completed frame and the button for the rectangle selection “Custom Selection”. Hope this helps. The one with the arrows.
January 31, 2022 at 11:41 pm #70770Hello I am submitting my project 5. I will definitely practice the text shadowing. I merged one of my texts with the background to move them together, and then could not figure out how to unmerge. Tomorrow I will play with it again and see if I could do better.
Kathy
January 31, 2022 at 11:56 pm #70773Kathy, to answer your question, once you merged two layers, you can’t unmerge them unless it is something you JUST did and you can undo it. If you want layers to stay “aligned”, you would be better to LINK them. Check this article about linking layers. Once linked, layers can be unlinked and relinked as needed, unlike the merging.
January 31, 2022 at 11:59 pm #70774Mary, Thank you so much. this is great. the screen shot is really appreciated, now I know where to look.
February 1, 2022 at 12:15 am #70776This is my Day 3 Project. I had fun creating it. I look forward to getting more papers and becoming more artistic in how to design a page. Thanks for the good training video.
February 1, 2022 at 12:22 am #70777Perry, that is a great start. I would suggest you add shadows to the yellow strips of paper too to be more consistent with the other shadows you added.
February 1, 2022 at 1:14 am #70778Oh Mary, I tried. I don’t have those buttons on either of my PSP (2020-2022) programs. I did the Selections>Modify>Select Selection Border, but see no rectangle selection button or customize button anywhere. Clearly I’m not seeing what I should be seeing. thanks again, this one is over my head.
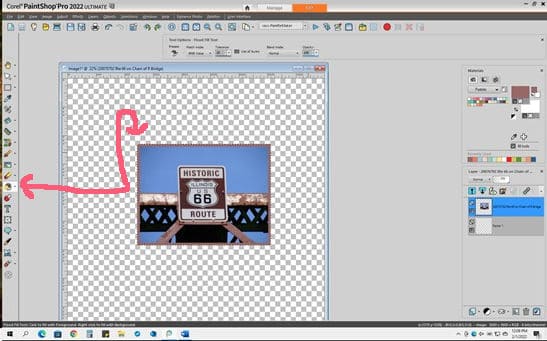
February 1, 2022 at 7:54 am #70784Susan, here’s a screen shot of mine. First you make a selection and then touch the button marked, before doing Select Selection Borders.
-
This reply was modified 2 years, 10 months ago by
Ann Seeber.
February 1, 2022 at 8:47 am #70787Ann – Thank you for posting the screenshot. This problem popped up for me again. Looking at your toolbar, I realized that the second half of mine was missing which means the options I needed weren’t available.
Using RESET ALL in the TOOLBARS tab of the Customize option and restarting PSP, the toolbar now looks like the one in your screenshot.
February 1, 2022 at 9:31 am #70788Gerry, often, those toolbars with lots of settings, are made up of multiple sections, and some of them might be pushed to the side and can only be identified with a tiny arrow or faint vertical lines meant to grab them.
February 1, 2022 at 10:48 am #70792Mary,
Thank you for the suggestion on addressing the rounded corners.
I will definitely check it out.
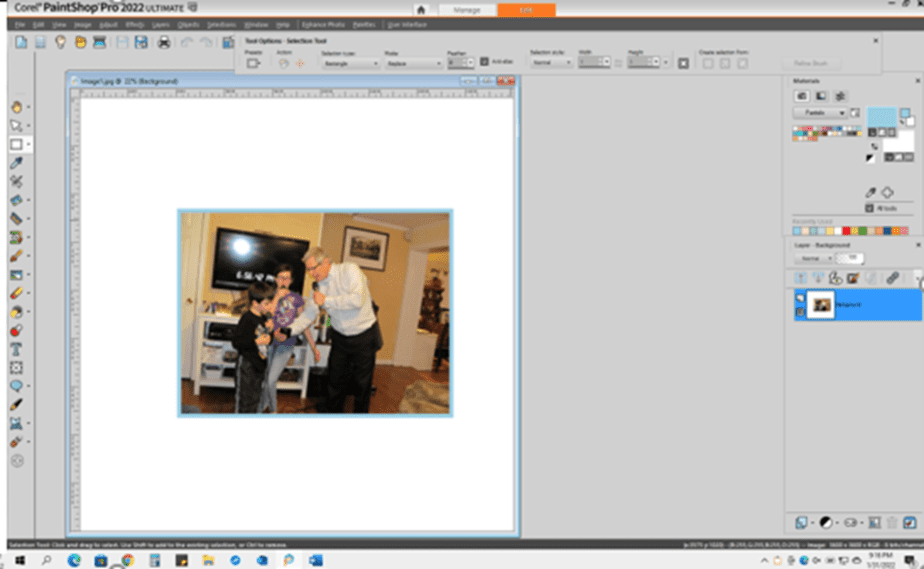
February 1, 2022 at 2:37 pm #70804Randy and Susan. I have taken a couple more screenshots to show how to go about the square corners.
1st using the magic wand and selections to select your border width; do not flood fill until you activate the rectangle selection tool. Then click on the custom selection button and OK in the custom selection box. Then you can flood fill and deselect.
Be sure your “Tool Options” palette is open.
-
This reply was modified 2 years, 10 months ago by
Mary Solaas.
February 1, 2022 at 2:42 pm #70806I think I will do a tutorial for that. There is one tutorial for rounded corners, now it is time to have one for square corners! Check for it on Monday.
February 1, 2022 at 3:02 pm #70807Thanks, Carole. My screenshots are too dim. And, you can explain it much better than me. Thanks for all you do.
February 1, 2022 at 3:14 pm #70808Thank you Ann, Mary, Gerry and Cassel for your help! I did make it work. And yes, I’d love a tutorial on this. Mary your step by step is great, directions were easy to understand. Ann, seeing it up close really helped to see what the buttons looks like. Carole, this is what I can add to something new I learned in this camp. Each camp, if I just pick up one gem like this tip, is like winning the technique lottery.
-
This reply was modified 2 years, 10 months ago by
February 1, 2022 at 3:55 pm #70810Yes, I tutorial please.
I think I have made it work before, but I can’t now 🙁
February 1, 2022 at 5:07 pm #70816There is one thing in particular that I learned that I will be using, going forward.
1. Opening the Scrapbook page that items will be added to. Keeping this page open.
2. Opening an image to add. (Making sure that there is room for at least part of the Scrapbook page to be visible.) Selecting the layer of the item to add and dragging it to the Scrapbook page.
Many times I have copied and pasted, but I like the dragging much better.
>>> And I probably should have know this, but found sometime during the Bootcamp, that when I have a folder open with something that I want to use in PSP, I can just drag a picture from the folder into PSP (Edit) – rather than open or open with.
There are other things too, but this one stands out.
-
This reply was modified 2 years, 10 months ago by
-
AuthorPosts


- The topic ‘Bootcamp – January 2022’ is closed to new replies.


