

Many digital scrapbookers have seen (or even used) quick pages to complete a project fast, or to give a try to digital scrapbooking with something that is extremely basic and won't require a lot of steps. Quick pages are ready-made pages where the user can just insert the photo in a placeholder, add their own title and text. All the other elements, papers and embellishments are already merged on the page. If you have complete layouts, you might be able to create a quick page, in just a few steps.
The layers
You need to start with a layered project. You cannot work with a jpg format to create a quick page. You can use either a .pspimage or a .psd file format, which still has the layers intact. Duplicate that image (Shift-D) to NEVER touch your original.

The title and journaling
Since the title and the journaling are somethings that are very personal to your layout, and will go with YOUR photo, anyone using a quick page will not need them, so just delete those layers. While you are at it, you can also delete any hidden layer. After all, if they are hidden, it is because you didn't need them in the layout, right?

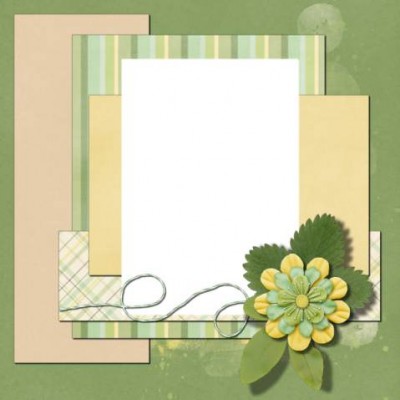
The photos
You obviously don't want to include YOUR photos in a quick page, but where you placed them is important as it will become the placeholder for the person who will use your quick page.
If your photo has a drop shadow, it should be on a separate layer. If it is not, you will just have to trim off the shadow that is currently on your photo and replace it with another one, on a separate layer. Don't worry about "ruining" your photo; you will remove it anyways.
Increase the Brightness of the layer with the photo so it turns white. See? your photo is now gone, and you have a nice placeholder.
Select that placeholder with the Magic Wand and while selecting all the layers below, hit the delete button to cut out that space. Repeat for each layer below. Once you are done, delete the placeholder layer. You should see the checkerboard pattern, meaning that you now have a hole through all the layers. Deselect (Ctrl-D).

Right-click on any layer in the Layer Palette, and choose Merge > Merge visible. You should nowhave a single layer with the whole page, ready to save as a png format.
And voilà, you have a quick page that you can give away as a freebie or sell. Beware, however, of the TOU (Terms of Use) of the designers whose supplies you used (if you used them). Make sure you are allowed to make quick pages for redistribution. Occasionally, a designer will not allow it. In that case, you better know ahead of time than after the fact, and after being caught.
If you want to see this process live, you can watch this video HERE
And if you really want to go faster, maybe because you have too many layers to go through, or you want to turn many layouts into quick pages, you can always use this script for PaintShop Pro: Quick Page Photo Cutout.
Now, it is your time to create quick pages for your friends and fans.


1 thought on “Creating a Quick Page with PaintShop Pro”
This is very useful and interesting, thank you!