

Picture tubes are a special feature of PaintShop Pro. They allow you to place images on your project in a random way, but you can also use different placement settings to create a continuous element like a rope, a set of footprints, or a wooden fence. How do you create picture tubes?
What is a picture tube?
Typically, a .psptube file will consist of a series of images, placed into individual cells, and with specific settings telling PaintShop Pro how to select and place those images on your project.
You can have a single image but you can also have up to 500 individual images. Some images are meant to be applied with individual clicks of the mouse (like individual flowers or animals), while others are meant to be placed while you drag the cursor (like a rope, a fence, or footprints).
How to export a single image as a picture tube?
Let's imagine that you have a signature or a logo that you want to use repeatedly. It is always the same image, and you don't want to have to open the file, copy it, paste it, close the original, and move it on your project. If that image is a picture tube, you can add it to your project with a single click. That is a time saver!
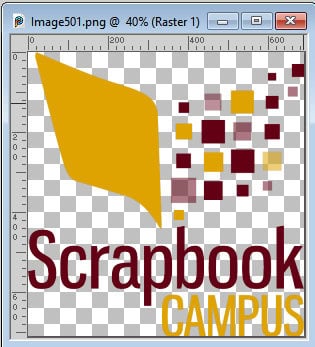
You might already be familiar with the Campus logo.
If I want to export it as a picture tube, I will go to File > Export > Picture Tube... and I will get this dialog window.
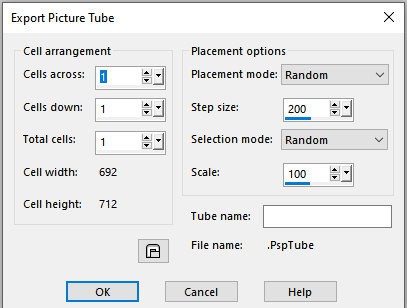
These are the default settings when you open that dialog window. When you have a single image, you can use those default settings and everything will be fine. You just have to add a Tube name so you can identify your picture tube.
How to export multiple images as picture tubes?
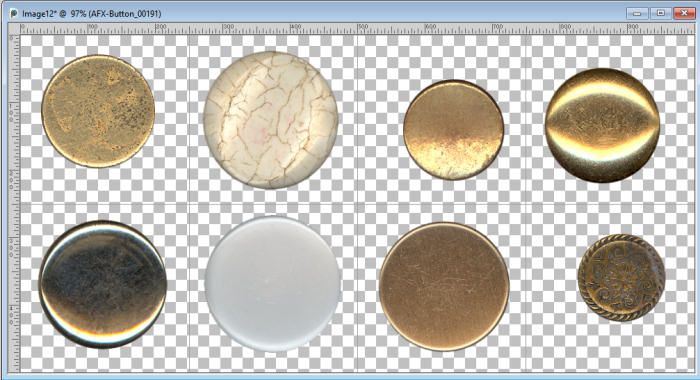
On the other hand, you might have a series of images (like flowers) and you want to export them as picture tubes. The first thing to remember is that you have to place all the individual images into cells. Every cell is the same size, even if the images are not. To help, you can use the Grid and set it to a size that will allow you to place the individual images in. Typically, use the largest image as a guide to set your grid. Add a few pixels for "padding" especially if you want to add shadows to your elements.
Add your elements to each cell. If you want to add shadows or bevels, this is the time for it. Make sure every image (with its shadow) is inside the cell.
Typically, I would suggest that you do NOT include a shadow on elements because you will have more flexibility if you add the drop shadow after you have added the elements to your project. However, in some instances (like for confetti), adding a very faint shadow will be necessary.
The next step is to merge all the visible layer. You have to keep those images with some transparency but on a single layer. If you don't do it, PaintShop Pro will give you a warning when you try to export them.
Then, you go to File > Export > Picture Tube... and you will get the same default dialog window, but this time, you will need to adjust some settings. The first one will be the Cell arrangement. You need to tell PaintShop Pro how many cells you have (remember, PSP can't "see" your images).
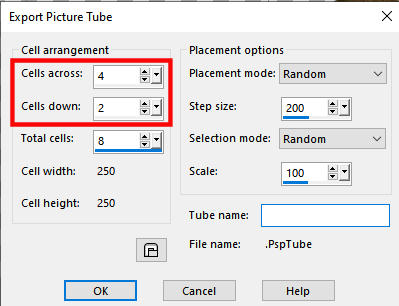
The next setting is about the Placement mode and the Step size. Those values will determine how the elements will be placed when you drag your cursor along your project.
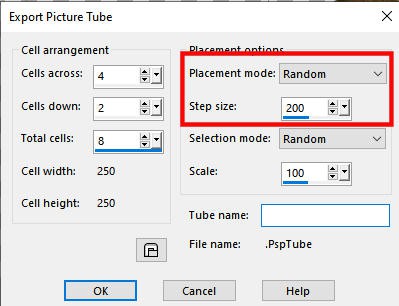
When you choose "Random", the spacing between the elements will be irregular. But if you choose "Continuous", every element will be evenly spaced, based on the Step size that you set.
Finally, the Selection mode will determine how the program will pick one image among the set you have.
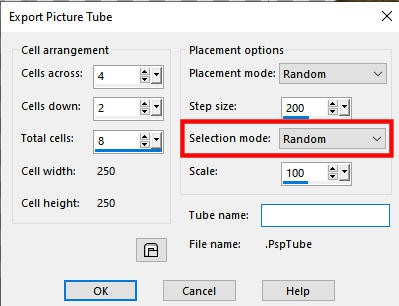
There are different options but if you have a series of buttons, you will just want PSP to pick them at random.
When do you need to export into a Picture tube?
Not every image with a transparent background should be exported as a picture tube. Over the years, many designers have extracted images (often people and objects) and offered them in png format that they called "tubes". Remember that picture tubes are meant to add single images repeatedly or multiple images in a series on a project. But if you have an image of a bride, how often would you need to add it to a project? Don't assume that every png image labelled as "tube" needs to be exported as a "picture tube". They are not really the same thing.
What to include in a series of picture tubes?
This feature is meant to save you time. Let's say you have 10 picture tubes of animals. How often will you need to have a giraffe, a fish and a cow on the same project? If you have a set of unrelated animals, you will need to apply one, decide if that is one you want, undo if it is not and repeat. That is NOT saving you time. You would be better having those images as png and open the ones you need.
If you want to have a series of images, make sure the elements would make sense together, on a single project. If you want animals, have jungle animals in one set, farm animals in another one, and pets in a separate one. That way, you MIGHT want to have a cow, a horse, and a turkey in one project. Those will make sense to be grouped.
For more details about picture tubes, check out the article Picture Tubes in PSP.
We also have some detailed classes on the topic of Picture tubes: Picture tubes in PaintShop Pro and Tubes with direction. These classes and many more are included in our DIAMOND membership.
And if you want to purchase ready-made picture tubes for your projects, check out the Creation Casse store in the Picture tubes section.


