We can use the Fill tool in a wide variety of projects. However, it does happen that the tool does not seem to work as expected. Unless you have a corrupt program (which is quite rare), there is usually a logical explanation and solution. Let's look at different reasons why the Fill tool might seem to misbehave.
Is the layer visible?
When working with multiple layers, we often order them, hide them, unhide them, etc. Are you working on the correct layer? Is that layer visible or hidden? If you have hidden the layer, you won't see the result of the Fill, even though it is there.
Solution: Check out the visibility icon beside the active layer. Is it hidden or visible?
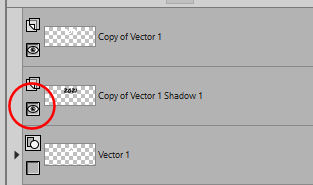
Is something covering your layer?
Assuming that the layer is visible, is it the active layer? It is common to try to apply an effect to a layer, while a different one is active. Usually, it will show on the active layer, even though it is not the one you expect, but occasionally, you might have a visible layer on top of the active layer. In this case, the Fill will be applied to the layer, as expected, but it will just be covered by something else.
Solution: Check what is on the layers above the active layer. It might just be hiding below.
Do you have a selection?
Whenever you have a selection, the effect you want to apply or the tool you want to use will be limited to that area. If you try to fill an area that is not selected, nothing will show. Make sure you use you click inside the selection.
Occasionally, the selection could have been created accidentally and is tiny. In that case, you don't see it, even though it is there.
Soluton: To remove any unwanted selection, go to Selection > Select none (or Ctrl-D). After that, the Fill tool should "work".
Do you have a texture applied?
Even if you have a solid color as a material, it is possible that you have a texture applied to it. Remember that "black will block" so if you happen to have a very dark texture applied, the resulting pattern will be very faint. Check the Materials Properties dialog window to see if the Texture is applied. It is here for older versions of PaintShop Pro or if you are using the Classic palette.
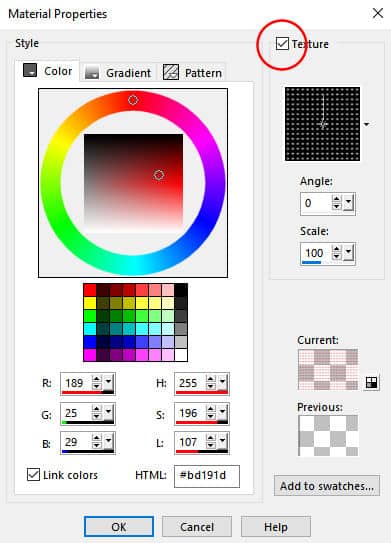
And for the newer versions.
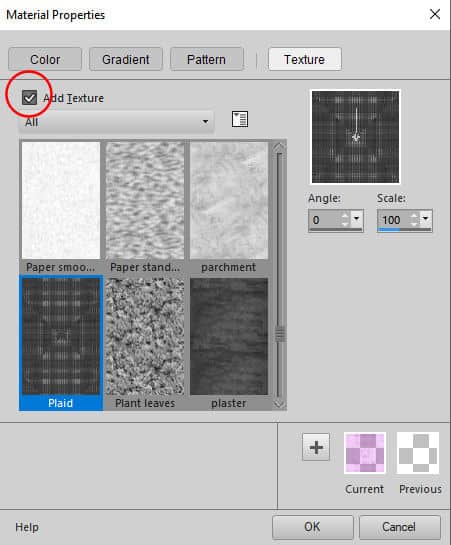
Solution: Uncheck the Texture option.
What is the Match mode?
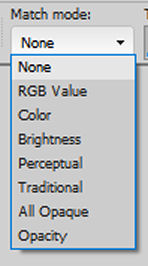
One setting for the Fill tool is the Match mode. This determines where the Fill command will apply. This is similar to the Magic Wand, which will select various pixels based on Opacity, RGB color, or other settings.
Let's start with this image:
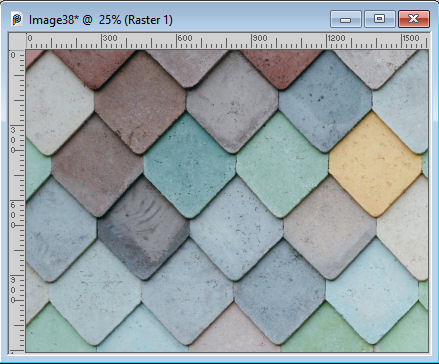
If I click on one of the tiles with the Match mode set to RGB Color, it will cover this area:

However, if I set it to Color, it will cover a different area:
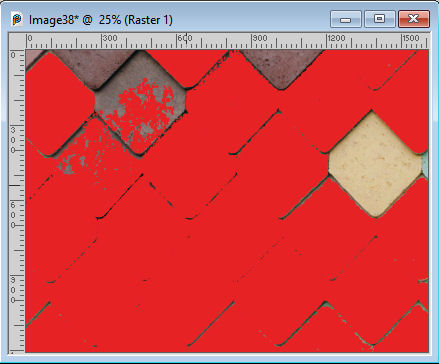
Most often, you will not want to fill directly on the layer where there is an image or a design, so you might think that this won't apply to you (unless you have the incorrect layer active), so check out the next possible issue.
Solution: change the Match mode set to None.
Is it using all layers?
There is one setting that seems insignificant but can seriously affect the behavior of the Fill tool. It has a little checkbox called "Use all layers".
![]()
This setting means that the Fill tool will consider all the visible layers on your image so it will select the areas to cover based on the Match mode you have chosen. So, if you have a selection to fill and the Fill tool is "spotty", it is likely due to a combination of the Match mode being set to something other than None AND the "Use all layers" being checked.
In older versions of PaintShop Pro, you will see "Sample merged" instead of "Use all layers", but it works the same.
Solution: Uncheck the "Use all layers"
What is the opacity?
The Fill tool can fill in different opacity, and that is available in the toolbar.

Although you will typically want to keep it at 100%, there is a possibility that you have accidentally changed it. It is also possible that you ran a script that used a different level. If that is the case, the Fill tool will use the last setting.
Solution: readjust the Opacity to 100%.
Is this a Vector layer?
The Fill tool can work on different types of layers: raster, background, adjustment, mask. However, it cannot apply any color to a Vector layer. If you need to apply the Fill to a Vector layer, you will need to convert it to Raster before. If you have set it in your preferences to automatically perform that operation, you might not see the warning message, and the Fill will work. However, it will have changed your layer from a Vector to a Raster, which might not be what you want. And the worst thing is that you might only realize it later, when you will want to manipulate or edit that Vector that is no longer there!
Solution: Choose a different layer to fill, or convert the vector to a raster.
Do you want more information on how you can use the Flood Fill tool effectively? Check out this article.


5 thoughts on “Troubleshooting – My Fill tool is not working”
I am glad I found this. I have never had a problem with the fill tool before. It was working just fine and then all of a sudden it wasn’t working at all. I have no idea how the the Opacity got changed. I didn’t even realize there were different setting for that tool. Thanks.
I think that at some point I have had all the above issues and that has taught me to look at the settings carefully if something doesn’t work as expected. These odd things learn you a lot! I’m glad that newbies have a blogpost to consult.
Will the fill work on a vector layer? It seems to me that it doesn’t but I may be misinterpreting what is going on. Thank you for the good hints.
Side question….is there a way to get rid of Markus the smile face pop up? I would ask him but I’m afraid he’d get offended but sometimes he is over a link I want to press without his help.
You are correct, and you cannot use the Fill tool on a vector. If you do, however, you will get a popup window that will tell you so.
For the side question, right now, you can’t get rid of Markus. He is in training. You can ask him some questions, and I review his answers afterward. If his answer is incorrect or incomplete, I give him some additional training so he can answer correctly next time. So, don’t hesitate to ask him some questions.
I never even thought to look at opacity or match mode. Usually it the “use all layers” that causes me issues. I also dont think to look at the match mode. Now I will be more careful and notice what’s on the tool bar.