

This tool is called "magic" because it is powerful, but those powers can be intimidating when you don't understand all the intricacies of what can be done. The Magic Wand is probably one of the most commonly used tools by many PaintShop Pro users, are they using it in the best way possible? Let's look at the many settings that can make this tool do magic.
The basic settings
As for most tools in PaintShop Pro, the Magic Wand has a series of settings that you can use to achieve the result you want. Let's look at them.
![]()
The Presets
This setting exists for any tool in PaintShop Pro. It allows you to save your settings so you can reuse them in future projects. Although the Magic Wand might not lend itself to many presets, it is always there if you need it.
Action
Those two icons refer to the Magic fill and the Magic move. The Magic fill is where PaintShop Pro will fill in a selection based on what is surrounding it, while the Magic move will also allow you to move the content of that selection somewhere else. These icons only because available once you have a selection made; until them, they are greyed out.
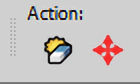
If you are using an older version of PaintShop Pro, you might not have those settings as the Magic fill was introduced in version X7 while the Magic move came with version X8.
Mode
There are three different modes you can use for the Magic Wand: Replace, Add, and Remove. These different modes only refer to the behavior of the tool itself and not the end result. For example, if you want to "remove" a background, you won't be using the "remove" mode as it is not its function. The mode refers to the selection you want to create: do you want to Replace the current selection? Do you want to Add to the current selection? Do you want to Remove from the current selection?

These modes can also be changed using the keyboard modifiers; Shift = Add and Ctrl = Remove. This means that it might be simpler for you to keep it set to Replace and only use the keyboard if you want to modify your selection.
Match mode
This setting is probably one of the most misunderstood ones. It is meant to determine which pixels will be selected when you click on a certain part of the image. Are you telling PaintShop Pro to select all the pixels of the same color? or all the pixels of the same opacity? Using the wrong Match Mode will cause the Magic Wand to not behave as expected, especially if you are following a tutorial and that particular setting is not specified (authors don't always think of mentioning it as they keep one as default without telling anyone).
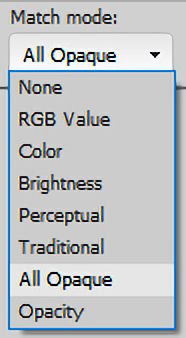
None: in this instance, the resulting selection will not match any criteria of the pixel you clicked on: everything will be selected. You might as well select all (Ctrl-A) and get the same result!
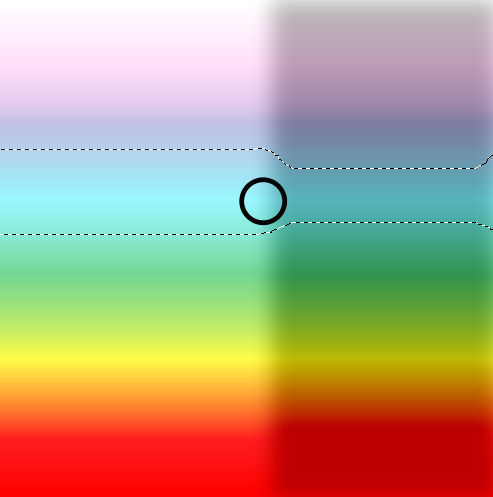
RGB Value: this is probably one of the most common modes you will use. It will select all the pixels that have a similar RGB value (red-Green-Blue) to the pixel you clicked on. This is often what we want: click on the red color of a flower and expect that all the other red flowers will be selected. This Match Mode will often need the Tolerance value adjusted to give a better result. We'll look at that a bit further. Here is the resulting selection, if I click in the middle of the circle, on an aqua pixel.

Color: although this is fairly similar to the RGB Value setting, it will select all the pixels of similar shading as the one you click on.
Brightness: as its name implies, it will select all the pixels on the image that will have a similar Brightness value, even if the color is different.

Perceptual: this one will select the pixels based on a combination of Color and Brightness as the one pixel you clicked on.

Traditional: this mode will select the pixels that are similar as if you had chosen the RGB Value plus the Brightness.

All opaque: as its name says, the Magic Wand will select all the pixels that are not completely transparent. Of course, you have to start by clicking on a non-transparent pixel in the first place. This can be a great way to find very faint pixels that you cannot see.
Opacity: unlike the previous option, it will select all the pixels that are of a similar opacity as the one you clicked on. This would be useless if you are working with a photograph as everything would be 100% opaque, but if you start working with png images, this can be a game-changer.
Tolerance
When you select one of the Match Modes, you might want to select all the pixels that are EXACTLY matching the one you clicked on, but unless you are using only solid colors like in an illustration, you will want to include a certain range of pixels. For example, you might want to select all the red petals, even if they are not exactly the same red. That is where the Tolerance value will come into play.
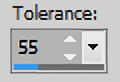
If the Tolerance value is set to 0, only the pixels that are exactly meeting the criteria of the Match Mode will be selected. Here is an example. Using the RGB Value Match Mode, and clicking in the center of the circle, with a Tolerance of 0, you can see that only a few pixels, here and there are now selected.

Changing the Tolerance value to 20, while keeping the other settings identical, the resulting selection will be like this:

So you can see how it now selected a wider range of reds. Of course, if you wanted to select all the reds in this image, you would either have to increase the Tolerance much more OR select another area where the red is more "in the middle range" as opposed to a darker red like in this example. And of course, you can also ADD to the existing selection, and click in another location.

And the process can be repeated several times until all the sections you need are selected. When using an illustration with solid colors, it is a simple process, but with photos, it can require more steps and more tweaking of the settings.
All Layers and Contiguous
These two settings can help you select certain areas and exclude others.
For the All layers, it will be available if you have multiple layers on your project. Sometimes, you might want to select all the white from one layer, but there are other layers with the same color. You then need to determine if you want to select only what is from one layer (for example, if you want to delete that section), or if you want to create a mask that is based on the whole project.
For the Contiguous option, it will determine if you want to only select the area adjacent to where you clicked or if you want to select everything everywhere that will match the criteria. For example, if you want to select ALL the empty areas in and around a shape, you will keep that box unchecked and you can click on the outside of that shape.
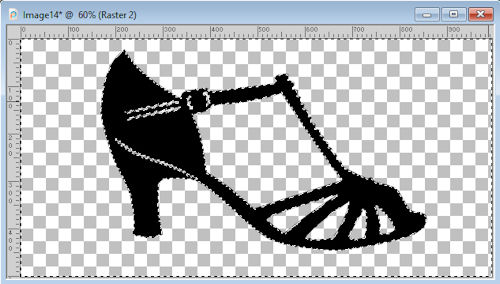
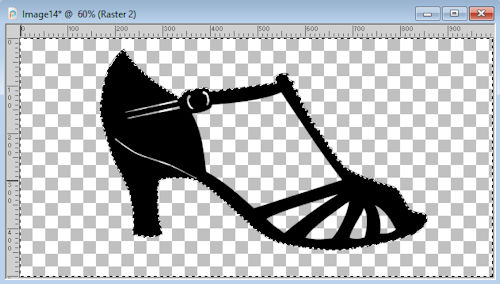
But if you want to select only the OUTSIDE of the shape, you will check that box and click on the outside with this result.
Feather
This setting will add feathering to your selection immediately after you complete that selection. Although it can seem like a time-saving option, it also lacks flexibility as you cannot change the amount of feathering afterward. If you notice that your selection seems fuzzy and larger than you did make it in the first place, you might have changed that setting accidentally. Keep it at 0 by default. It is probably how you will use it 99.9% of the time.
Anti-Alias
This is the one setting that will let you make a selection that will look rough and pixelated (if it is unchecked) or smoother and a bit better looking (if it is checked). This setting determines if the pixels will be included if they are fainter than the initial one. I have to say that for the Magic Wand, that Anti-Alias is not doing such a great job, unlike other selection tools, but to be on the safe side, keep it checked!
Now that you know a bit more about the Magic Wand, you might be able to troubleshoot what is happening if the tool does not yield the result you are expecting while following a tutorial, or what settings to use when you want to achieve a specific selection for your next project.


2 thoughts on “The Magic Wand in PaintShop Pro”
I needed this. Thanks for pointing me here.
This is a very usefull course, thank you very much!