

Preset shapes can be very useful when doing graphic work for several reasons: you can reuse them over and over again, and being vector format, they can be used in any size you need without losing quality. And furthermore, there are some advantages in having some vector shapes to use with other tools and commands. But how can you create your own preset shapes to reuse later?
Draw your shape
In order to create a preset shape that will be in vector format, you have to create your design using one of the available vector tools. You can use the Ellipse tool, the Rectangle tool, the Symmetric Shape tool, the Preset shape tool (yes, you can start with an existing preset), the Pen tool or even the Text tool (which can create vector objects). There is no native tool in Paintshop Pro to convert a raster layer to a vector, however, you can use outside tools or sites to do so. You can read about one of those tools in this blog post.
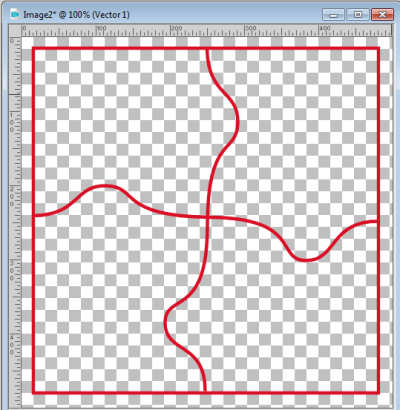
In this example, I am creating a puzzle shape. I used the Rectangle tool to make the outline, and the Pen tool to draw the vertical and horizontal lines.
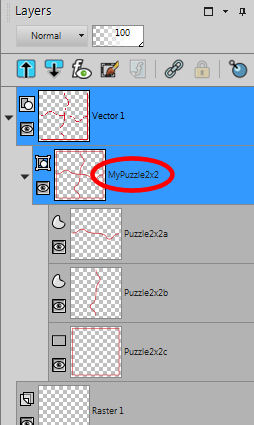
Once you create your shape, you have to take a good look at the Layers Palette. It is possible that you will see something like this:

If that is the case, you will want to open the Vector1 layer by clicking on the little triangle on the left of it. This will display the individual vector objects (which are all part of the vector layer).
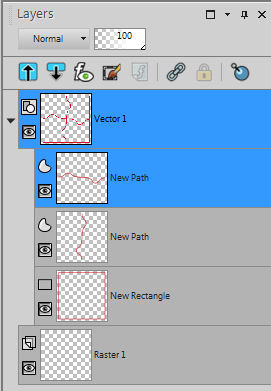
You can see one object, the NewRectangle was the outside line made with the Rectangle tool. And you can also see the NewPath objects (there are two of them) for the horizontal and vertical "cuts". Each line or shape that you add will become its own object underneath the vector layer.
At this point, you can save this as a .pspimage file and reuse it later but this will not allow you to redraw it on another project in a different size. So that is why you need to export it as a Preset Shape.
Naming the layers and objects
One important step for exporting the new design is to assign the correct name. The first assumption would be that when you go through the export process, the name you need to enter will be the name of the shape. Wrong. Let's test this and see what happens.
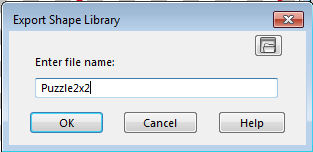
I'll go to File > Export > Shape and I'll enter the name Puzzle2x2.
Now, checking the list of Preset Shapes, we can see this:
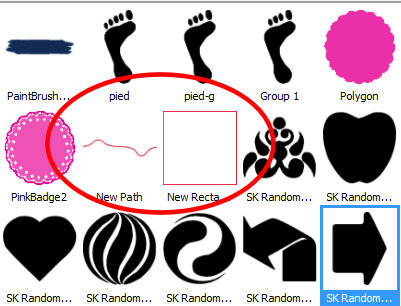
As you can see, the name "Puzzle2x2" does not show, and the shape is not there either. In fact, I see one shape with the name NewPath that looks like one of the lines I drew, and the NewRectangle which is the outline of my puzzle shape. So where did that name go? It didn't disappear into thin air. It is the name the FILE itself and you can see it if you go in the Windows Explorer:

So, that tells you that we just named the file but not the shape. Furthermore, we didn't even save the shape itself, but we saved the individual objects instead. So, instead of NewPath and NewRectangle, we want an actual name for the shape, so let's rename all those layers.

Let's save this with the name Puzzle2x2-1 and see what it does. We know that the name I enter when prompted will be used for the file name and not the shape name, so what will display now, in the Preset Shapes list?

We still didn't get the whole shape but I saved an individual object, with the name I gave it. That is a start but it is still not allowing me to reuse that shape I created. Although I named the file, layer and objects correctly, there is still something missing.
Group those objects
As you might have noticed, the name of the objects below the Vector layer is what will show up in the Preset Shape list, but it is not helpful to have them all appear separately, so let's GROUP them. Select all the objects, right-click on one of them and select Group. Then, rename that group to what you want the shape to be called.
And export it again. Now, let's look at the list of Preset shapes once this is exported.
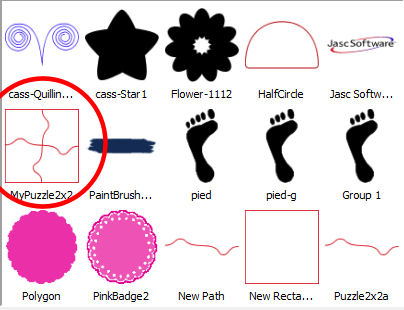
As you can see, now the hole shape is saved with the name given to the group. Of course, if you have a single object, you wouldn't have to group anything, and the name of the Object would become the name of the Shape.
Summary
With all these explanations, you might feel a bit overwhelmed. At least, you will now understand why your saving a preset shape incorrectly would yield odd results. So let's summarize the exact steps you need to take:
- Draw your shape with as many vector objects you need
- If you have more than one object, select them all in the Layers Palette, right-click on one of them and group them
- Rename the Group to what you want the shape to be called in the list of Preset shapes
- File > Export > Shape and give it the name of the file (it could be the same as the name of the shape, for convenience)
Yes, it is that simple!


5 thoughts on “Creating your own preset shapes in PSP”
Love this little tut. I remember way back when I was learning PSP it took me forever to figure this out on my own. Trial and error, over and over until I finally got it. This is a good one for anyone learning PSP! Nice tut!
Holy moly, *best post ever* !!! Making preset shapes has been my nemesis for years! Thank you so much Cassel, I will work on this, practice it and hopefully it will open a whole new world for me!
Yes, a powerful tool that is a little convoluted to use, but now, you’ll know better!
Took me a couple of tries, but I think I got it. I’m going to practice now to make sure. Thanks so much. 🙂
Glad you found it helpful. Practice is often needed. Even I have to review those steps as I also tend to forget since it is not something I do very often. Preset shapes can be powerful tools for so many projects.