This month, I am offering you to discover another plugin that might be fun to use in your projects. As an added bonus, this is a free plugin, although you have the option to give a donation. The purpose of this plugin is to create some text with various preset "looks" that you can still customize.
Downloading the plugin
You can download the plugin directly from their site, HERE. Click the Download Windows setup orange button to start the download. The file is not even zipped, so you will be downloading a simple .exe file.
Installing the plugin
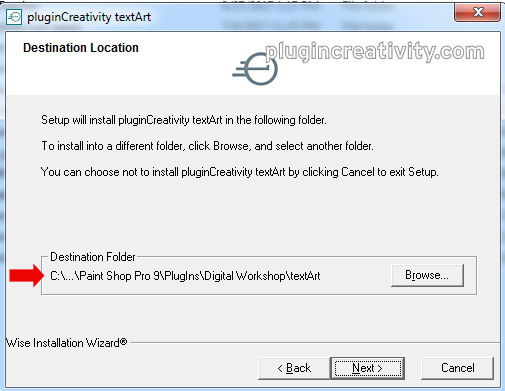
Although the installation seems very straightforward, I had some issues, so I'll share my process so to make it easier for you. By default, it installed the plugin in my old JASC PSP 9 program. I am not sure where it would go if I didn't have that version, or where it will want to install in your system but beware of the location it chooses and correct it if needed.

Although you can probably just point PaintShop Pro to that particular location, it might become a little annoying if the default installation program gets uninstalled and you don't remember that your plugin was installed there and now, it would not work on your current program. So basically, it would make sense to have it installed in your current program, or even in a completely different folder (maybe where you keep your plugins) and then point PSP to that folder. That would prevent any deletion of the plugin if you ever have to uninstall your PSP.
You also have to remember that this plugin is a 32-bits plugin. It means that it will work ONLY on the 32-bits version of PSP. It also means that if you choose to install it in the plugin folder of PSP, you choose the correct version for it.
Using the plugin
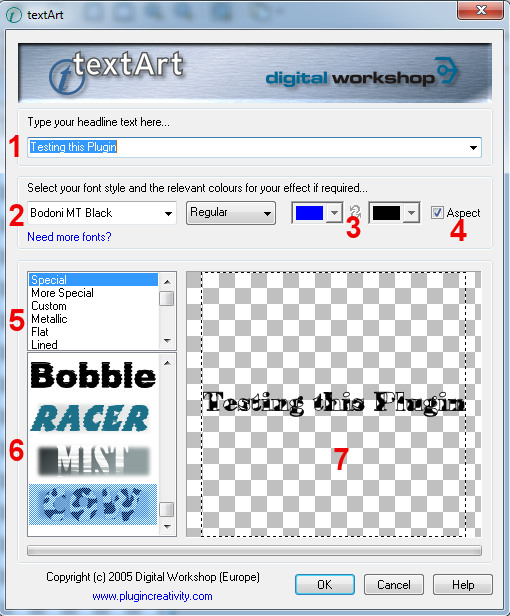
The interface for this plugin is quite straightforward. Let's have a look at the different sections of the interface.

- This is where you type in the text you want to enter. Obviously, you can only get one line of text at the time.
- Choose the font you want to use.
- Choose the colors for the text. Some effects will use those colors, others won't.
- When it is checked, the text will have a "normal" aspect. If you uncheck it, the text will stretch to fit all the space available on your image or the selection.
- There are many effects and they appear in different categories. It will be easier than to scroll them all one by one
- These are the effects you can choose from
- The preview that will give you a good idea of the look you will get for the text.
From that point, you can see how easy it is to use. Many of those effects are probably replicable in PaintShop Pro, but if you want to go faster, this is a good tool for it.
Things to watch for
The first thing to remember is that the resulting text will NOT be editable. It will appear just like any other raster layer object.
Second, the plugin will apply the text on the active layer. If you have something on that layer, it will "merge" with the new text. So you better create an empty layer just for it.
Another detail to consider is that there is a known (and annoying bug) in this plugin: when you scroll down the list of fonts inside their interface, some fonts might lock up the whole program. In that case, you have no choice than to close it using the Task Manager. That is quite annoying so make sure you have a saved version of your project before you use this plugin, just in case. Constantia seems to be the font that locks my computer, and it is the same one mentioned in their support page. They suggest you can move that font out of the Windows folder. Not the most convenient solution, but if you want to use this plugin and you don't need this font, I guess it is a good enough way to solve the problem.
Samples
Here are some samples of text you can create with this plugin.


So what would you do with this plugin? Try it and show off in the forum.


1 thought on “Featured Resources – TextArt”
just downloadend the plugin thanks Cassel