PaintShop Pro has gone through many versions. If you are a long-time user, you probably used more than one version yourself. With each new release, come some new features, new settings, and sometimes, new ways of using the program. At times, those new elements are great. At other times, we miss "the old ways". If that is how you feel about newer versions of PaintShop Pro, maybe there is hope for you. Some "old ways" are still available, if you know where to look!
Text entry window
Starting several versions ago, PaintShop Pro allowed you to apply your text directly onto the canvas. I am sure that uses often asked for this as it seems more intuitive. If you used older versions, you might still like the idea of typing your text on a Text entry box. You can edit it on a plain white background, instead of struggling with a busy background .
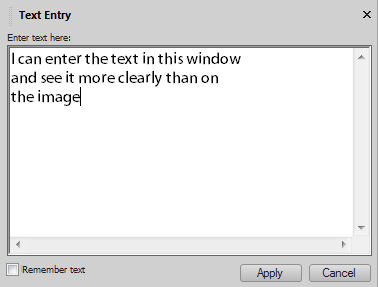 If you still want the Text Entry window to type your text, hold the Shift key when clicking on the canvas. That will automatically bring up that Text Entry window you were familiar with.
Similarly, if you have some very small text, or text outside the image, you can open the Vector layer (by clicking on the little arrow on its left) and while double-clicking on the Text object while holding the Shift key. Then, the Text Entry window will pop up, whether you used it in the first place or not.
The old Material Properties window
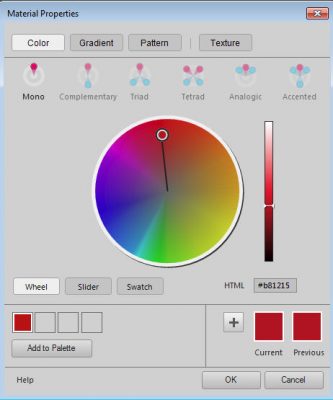 With PaintShop Pro X7 came a brand new Material Properties window. In 2014, I had the privilege to visit the Corel team during a trip to Ottawa. Greg, the product manager at the time, asked me how I liked the new Material Properties window. I hesitated to answer in front of everyone, but I had to be honest "I don't like it and I feel I am not the only one".
That new window was focusing on a circle to pick the colors. New tools were also added to find matching colors in different color schemes. This was totally new and before that version, one had to rely on online tools to find complimentary colors. Now, it was all included in that single window. Although some people loved that new addition, many felt it was just an overkill as they didn't need those functionalities, and missed their old "simple" Material properties window, especially to pick colors.
Also, the newest window only allowed to view only 6 large gradients/patterns/textures at the time, or 25 if you picked the smallest displays while the classic window allowed you to see up to 200 such samples at the time since the display window was "stretchable". If you are the kind of user to collect a lot of supplies, (gradients and patterns), the new Material Properties window will require you a LOT of scrolling!
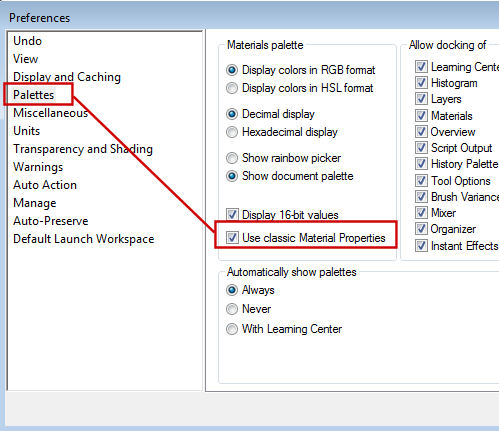
If you miss that old display, you can still get it. Starting at version X8, the option to use the classic Material Properties was added (but it was not advertised very much!). You can get it by going to File > Preferences > General Program Preferences and click on Palette, and check the box beside "Use classic Material Properties", and you will get back that familiar window!
The Layer Palette
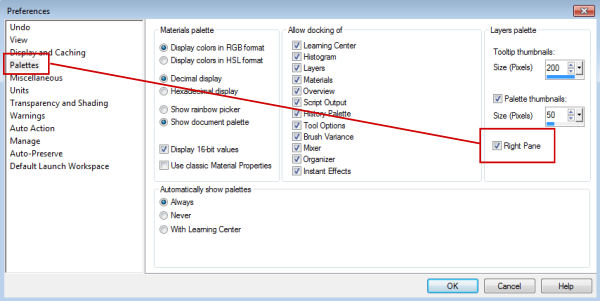
In older versions of PaintShop Pro, the Layers palette included one pane, on the left, with the layer type and the right pane, with other settings, like the hide/unhide icon, the opacity, the blend mode, the link set and the locked transparency. Everything was on a single line, except for the layer preview which was only available by hovering over the layer.
With version X1, the information in the Layers palette was rearranged and a layer preview was added. However, the information like the blend mode and the opacity were now changed position and were visible on top of the palette and displayed the information on the active layer. If you liked the previous way to display this information, you can still recreate that look with File > General Program Preferences and go to the Palette option, and on the right, you will see a checkbox for "Right pane". Once you click it, you will get back your familiar right pane in the Layers palette.
Missing commands?
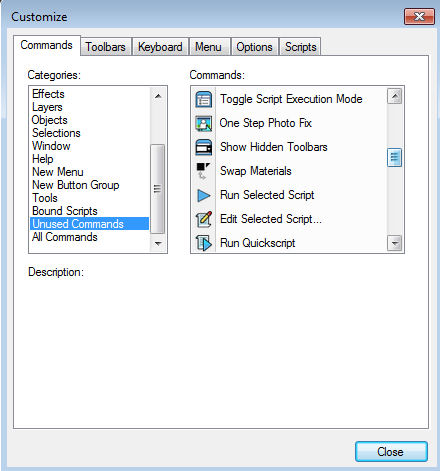
Over time, various releases of PaintShop Pro have seen new effects and commands added, but it looks like some are disappearing. But they are not. Probably in order to "clean up" the interface a bit, some commands have been just hidden. If those commands are useful to you and your workflow, it is easy to retrieve them. Go to View > Customize and on the Commands tab and click on the Unused Commands. You will see a list of all the commands that are "hidden". Simply click on the one you want, and drag it to the toolbar or the menu you want to move it to, and you'll have it, next time you want it.
Missing supplies?
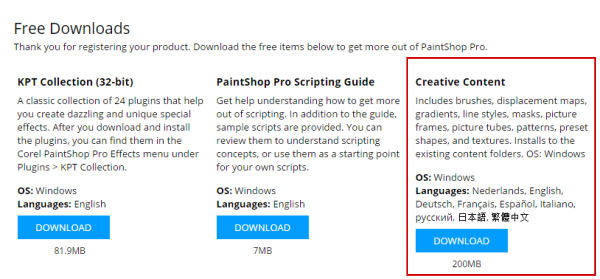
In recent versions of PaintShop Pro, many users have been shocked that they could not find the brushes they had in previous versions, or the gradients that came in their old PSP, etc. Those supplies were removed from the installation process, likely to make the installation file smaller. That is normal.
Those supplies are still available when you register your program as you can go to Help > Download more content. You will get redirected to this page to download the extra supplies not included in the installation. Beware that those are not necessarily NEW supplies. They might be just what you already had in previous versions, depending on that version.
Now you know how to use "the older ways" if you prefer. You still have to decide what features you like from your current version and which ones you miss from "the old days". Not all the new features have the option to revert back. In some cases, you can still check and get the tools in the way you were comfortable. Maybe, with time, you will start enjoying the new way to use your PaintShop Pro.
Are there any other "old" features that you miss?



4 thoughts on “The old ways of using PaintShop Pro”
Merci Carole, j’ai retrouvé ma palette de couleur 😉
I was wondering how to get the old Materials Properties back – thank you!!!
As always, Cassel, if there is more than one way to fix things, you will find it. Bless you, I’m thrilled with both the Text Box and the old Materials Palette! Thanks again, Annette
Oh, having the Text Entry window back is worth its weight in gold, thank you so much! This is wonderful!