Once you have worked with PaintShop Pro for a while, you likely have found some details in the customization of your workspace that will suit your own workflow. Can you improve on it? Possible. Maybe there is some basic customization that you don't know about, you never thought of. But if you are new to using PaintShop Pro, here are a few pointers to get started.
Get to the right tab
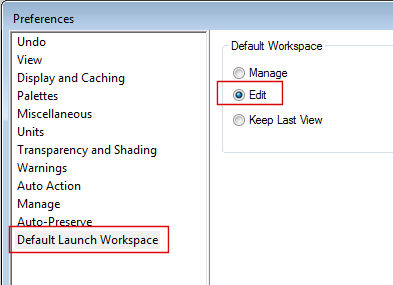
The first time you start PaintShop Pro, it will open in the Manage tab. That is likely not the tab you will use the most often, especially if you use PSP for editing. On the top, you will see those three tabs: Manage, Adjust and Edit. Click on the Edit tab to access it. In order to always start on the Edit tab next time you start your PSP, go to File > Preferences > General Program Preferences and under Default Launch Workspace and click on the Edit radio button
Clear your space
By default, when you install PaintShop Pro, you will get a work area that is full of palettes and toolbars. Do you need them all? Maybe, but they tend to take up a lot of valuable space for you to work. That being said, choose which ones you need and which ones you can remove. Even if you MIGHT use them again later, you always have the option to put them back. To start, I tend to remove the Organizer and the Learning center palettes.

You might want to hide different palettes but those are the ones I tend to discard. In addition, you can also choose to auto-hide palettes when you are not using them. Simply click on the pin icon and the palette will hide when you are not using it, and if you need it, hover over it and it will reappear. That is faster than having to go back to View > Palette > Material to get access to it

Change the color
This might be a matter of personal preferences but if you don't like the dark grey workspace, you can change that with View > Workspace color and change it to Medium Grey or Light Grey. I tend to prefer Light grey as it is more similar to most other programs I am using.
Tabbed or untabbed
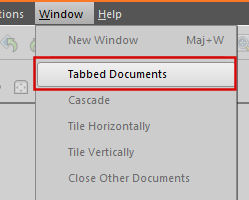
Again, this might be a manner of preference but if you create scrapbook layouts or collage, you might like to be able to see several images on your workspace, just like you would if you had those images and papers on a table or desk. By default, the windows will be tabbed, so you would only see one at the time. If you want to change that, you can go to Window > Tabbed Documents and click on that checkmark to remove it.
Rulers
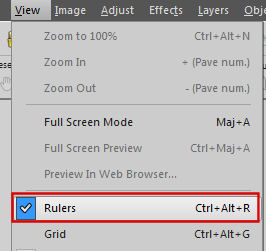
Again, you might like to know the actual size of images or elements or use rulers to help you place and align them on your work. This is accomplished with View > Rulers and simply checking it.
Toolbars you often use
If you are a beginner, you might not yet know what toolbars you will often use. In my case, since I very often deal with scripts, I will want the Script Toolbar. I can get this toolbar (or any toolbar) through View > Toolbars and pick which one I want. Once the toolbar appears, it will likely be floating, so it is up to you to place it and dock it where you want it.

Customize further
PaintShop Pro allows you to customize your workspace even more by adding commands that you use very often or removing those that you never use. Go to View > Customize and in the first tab, you will see a list of ALL the commands available. Pick the ones you find yourself using very often, click on them, one by one, and drag them onto the toolbars. You can also place some commands in the Layer Palette. Personally, I like to put the Repeat command in the Layer Palette because I often apply a similar effect or execute the same command on multiple layers, often to apply a shadow.
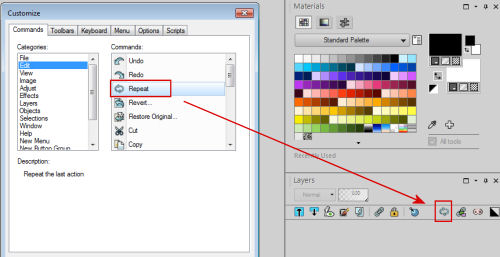
At the same time, if you have some commands that you know you won't be using enough to take up valuable space in your workspace, you can click on them and drag them in the center of your work area and it will disappear. Don't worry if you change your mind later, you can always re-add them in the same way.
Save your workspace
Once you are happy with the way your workspace is set up, make sure you save it. You don't want to have to repeat this whole process if anything is to happen. Save yourself some time. Save your workspace. You can do that with Files > Workspace > Save. Since workspaces do NOT work on a different version of PSP than the one it is created for, it would be a good idea to add X9 (or whatever version you have) at the end of the name. And yes, even though it seems like you can load a workspace from another version, remember that the tools and commands and functions might differ from one to the other, so you would not take full advantage of all the newest features if you load an older version workspace.
Also, beware that whenever you install a patch on your PaintShop Pro, everything will be reset, so saving your workspace will save you time once a patch is applied!
From this point, you should be all set to start working efficiently with your PaintShop Pro. Remember that it is YOUR workspace and YOUR workflow, so you might want to add to these steps or skip some. You might have other types of customization too. What do you do to customize your workspace?




2 thoughts on “Setting up your PaintShop Pro”
Cassel thank you for the great tips
Thank you for the help with so many questions.