Forum Replies Created
-
AuthorPosts
-
Here’s the finished card I made for the Cards For Hospitalized Kids Charity using the plaid paper I posted earlier today. The image is from Di’s Digi Stamps and the square lace frame is by Jackie Edwards at Craftsuprint.com I hope it will brighten the day for the little kids in the hospital.
- This reply was modified 3 years, 1 month ago by Dee347.
I made this paper using the Plaid Paper 1 tutorial. I plan to use it for a greeting card I am making for a children’s charity.
I made this for the Boot Camp a few years ago. I think I used the decorative border tutorial to create the background.
I used the Color My World Class to color a grayscale butterfly image from Pixabay.com and turn it into a sepia or vintage look butterfly.
I used the Picture Frames In PSP Tutorial to create this framed image of my little chihuahua hiding under the tree last year.
I changed the color of a flower from purple to pink using the Color Your World Class.
- This reply was modified 3 years, 2 months ago by Dee347.
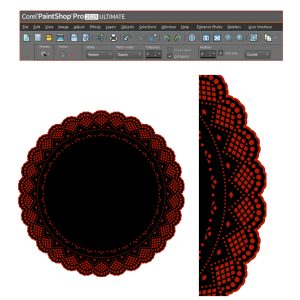
You are right. The farthest points on left, right, top and bottom are not rounded when I zoom in close after selecting. so it isn’t evenly expanding all areas of the object I selected. Is there another way I can make a selection and modify expand without using the magic wand tool?
I have attached the doily I downloaded from Pixabay if you want to experiment with it.
Thanks,
Dee
Ok, I tried it again at 300dpi and the same thing happened. It cuts off the rounded edge only on the mid point of the doily on all 4 sides. All of the other rounded edges on the doily are expanding and rounding fine. So somehow it is cropping or constraining the farthest points on all 4 sides even though there is at least a inch all around the doily to the edge of the canvas. It is doing the same thing with a lace border strip.
The size of both the frame and the doily are 5″ X 5″ at 150 dpi.
It’s odd that it is rounding the areas on the doily that are not at the edges and only cutting off the parts at the far edges on all sides.
Ok, I checked and it does follow the edges closely that are being cut off.
So, I tried this again with a different image. Unfortunately I am getting the same results with the edges cut off. Must be a setting somewhere I need to change….
I’ve attached snips of my setting for the magic wand selection and of the results.
I followed all the steps exactly as shown in the “making a sticker post”. But I am still having the very far edges on all 4 sides cut off. There is 1″ of space between the frame and the canvas edge so plenty of room there. Any other ideas of what can be causing this to constrain the edge or cut off the edges?
Thanks for the lovely comments and for sharing your techniques for coloring. I am fairly new to PSP and have learned so much from these challenges.
I used the technique to color one of the crochet tubes to match a paper I created with the Plaid 3 script. After coloring the crochet tube, I created a frame using the Mitered Corners script. Added a baby photo and clip art from Freepik.com.
Day 3
I played around with different textures and decided to use burlap instead of wood. It was lots of fun seeing how the scratched effect came out by changing the different settings.
Here’s my fish embellishment.
I plan to do a page with a vacation photo at the beach so it was fun to try to come up with a design that kind of looks like swimming fish.
I downloaded it and it has two files. One as a jpg and the other as a eps file. They have a lot of these on the Freepik site so there must be a way to use them, but maybe it requires Adobe Illustrator or Photoshop. Can’t figure out any way to use them in Paintshop Pro 2019.
I was looking through images on Freepik today and noticed they have a lot of these gradient pages on the site. They have many gradient images combined on one page. Is there a way to import them into PSP so I can use them as gradients?
I used the tut to create these flowers and a frame. Had a lot of fun trying different settings.
For the gold challenge, I created a frame using a chain link and the mitered corners frame script. Love that script and use it often.
I have a question about using a gold seamless pattern I created.
I opened a image that had a nice gold pattern so I cropped it down and created a .pat file which I saved in the PSP 2019 patterns folder.
I also have the cropped gold pattern image open in PSP. I created my raster shape and clicked on Effects, Texture Effects and Sculpture. But when the new screen opens and I click on the pattern file down arrow, the pattern I created and saved isn’t there. So my question is, from the Effects, Texture Effects, Sculpture screen, how do I access my open pattern file or the .pat file I saved in the PSP 2019 patterns folder?
Thanks for all your help!
Day 5
I used a brush that has a shape that looks like the top of a palm tree and ran that around the irregular oval I brushed on. I added a starburst effect to plain paper layer behind the mask to make it look like the sun was shining on the masked area. Very fun technique to use.
Day 4
I found all the elements on Freepik.com
Paper and template from the download links Cassel posted this week.
I had a lot of fun working with the watercolor brushes.
Thank you Annie and Barbara for your lovely comments. I am a newbie to scrapbooking and a fairly new user of PSP so I am learning a lot from these challenges.
The projects that everyone have posted for this challenge are wonderful.
Not much time to work on this today, but I did do a page for day 1.
Thanks Cassel, I redid the page making the photo larger.
Cassel, I have a question about coloring a black and white digital image. I have some rubber stamps that I use to make cards. I was thinking of stamping the images, then scanning them into my computer to use as elements on scrapbook pages. Was wondering what the best way is to digitally color them in PSP. I want to fill them with patterns and solid colors. Is using the magic wand tool the only way or is there a better way to do the coloring for a more professional looking result? (In the past when I have used the magic wand tool in Photoshop Elements to color a image, I get a small white line showing in between the color fill and the black outline when I print the colored images.)
Day 7
I used papers from AMB Illustrations and the Cookie jar and talk bubble elements from Laurie Furnell on Etsy.
I had a great time this week and learned so many new things. I am feeling much more comfortable using PSP. I’m sure I will be using it a lot more now that I understand the basics.
Thanks Cassel – You are a great teacher!
Cassell,
After I flood fill the black part of the label with gold, is there a way I can add a solid color stroke around the inside and outside edge of the gold part? (Like you can do around the edges of a font?)
Thanks,
Dee
-
AuthorPosts