Home of the Scrapbook Campus › Forums › Lobby › Suggestion Box › Photoshop stuff you wish you could do with PSP?
Tagged: texturing/bumo maps
- This topic has 21 replies, 7 voices, and was last updated 2 years, 7 months ago by
Chris Schults.
-
AuthorPosts
-
October 8, 2015 at 11:52 am #7490
Have you ever found a tutorial to create something or a particular effect and wish you could do it with PSP? Or maybe you are trying to “convert” a Photoshop tutorial to PSP but are having trouble?
If you have been in this situation, why not post a link to that particular tutorial or a link to the end result in the forum (or send it to me directly) so we can look into how it could be done??
Let’s see all that PSP can do, and we don’t know!
Cassel
March 5, 2016 at 5:24 am #8682Hi Cassel, I know this is an older post but hope it is an ongoing one but i wish PSP could do ‘clipping masks and turn a raster shape into a vector one’
Also, not sure that PS can do this with their brushes but even so, I wish PSP could have the brush ability to do a long tapered end. Now I know we can play with the brush variance a bit but I cant get nice long tapers only short stubby ones that make good teardrops but not hair strands.
Another thing I would like from PSP is the ability to drag from the layers and drop straight into the image like PS. Lazy I know as we can already achieve this but drag and drop way would give you a bit more time to play and all these bit more times add up to a big time. LOL
Sheila xx
March 5, 2016 at 9:40 am #8687Thanks Sheila
i wish PSP could do ‘clipping masks and turn a raster shape into a vector one’
In fact, although PSP can’t do the “clipping mask” like Photoshop does, i made a script that does a similar process:
https://creationcassel.com/store/index.php?main_page=product_info&cPath=7_10&products_id=253As for converting raster to vector, that is not yet possible with PSP. There are ways, if you have CorelDraw, for example (but that is $$$ overkill for most people). There is another third party program that can do that: AlgoLab Photo Vector
https://www.algolab.com/downloads.htm
There is a 10 day trial period and from my earlier tests, it does save in .pspimage format.Nevertheless, i would LOVE to see that functionality in PSP too (and i have told the staff there too!)
I wish PSP could have the brush ability to do a long tapered end.
Not sure if it would work, but did you try using the Art Media brushes, like the Oil Brush?
I would like from PSP is the ability to drag from the layers and drop straight into the image like PS.
Just to clarify, where do you want to drop? PSP already has a drag and drop ability but maybe you are talking about a different kind?
And don’t worry that it is an old post. I always want those suggestions.
May 11, 2016 at 10:34 pm #9280Hi,
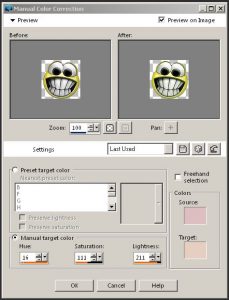
There’s a function called “Manual Color Correction” that I haven’t seen discussed anywhere. You can locate it by right clicking an empty spot on the PSP Edit screen. Select “Customize” from the drop down menue, then under Categories click “Unused Commands” and scroll down to “Manual Color Correction. I’ve attached a <snip> jpg of the window)
There are a number of pre-set skin-tone and other settings available. Also, a number of different methods of manually matching colors. I’d be very interested in a seminar demonstrating how to get the best results when using this feature – particularily when matching flesh tones.
May 11, 2016 at 11:04 pm #9281Thanks for the suggestion Scott. Since i don’t do much of “photo correction”, i am not very familiar with this command and its possibilities. I’ll look for someone who might be more knowledgeable than i am, or i’ll learn first to teach second.
I agree that there is a lot of “hidden gems” in PSP!
May 12, 2016 at 4:15 am #9282I use manual correction tool a lot but not for use on photos as such. When I have an element i have made like a bit of lace or shape etc. I then do these important steps, 1. grey-scale it and then 2. increase the colour to 8 bits. Then you can use the manual correction by having the the source colour as a dark grey and the target colour as what you fancy. It will still work without grey-scaling it but not such a good colour result. I always save a version in grey-scale and then if I want a different colour I can just go into manual colour correction to get the shade i want to match what i am doing.
Sheila xx
May 12, 2016 at 5:46 am #9283I also use the Manual Correction Tool like Sheila does. You can change elements easily that way.
May 12, 2016 at 4:40 pm #9284Thanks. I tried using the grey-scale method with varying success. Using a neutral grey “source” eliminates the blending and unpredictability of the resulting “target” color. But that still doesn’t explain why the “source” color box was put there in the first place. I have a feeling the software designers had something specific in mind for that function – why the many flesh tone pre-sets?
One other mystery – at least to me – what is the purpose of the “Freehand Selection” check box? Every time I check it, the software crashes. (PSP-X8) I’ve had the same thing happen in the past with PSP-X6)
May 12, 2016 at 5:03 pm #9285From what i can see, the Freehand Selection is meant to select an area, in the left pane, instead of using the dropper tool. It will select the average color in that selection you will draw (when it works!).
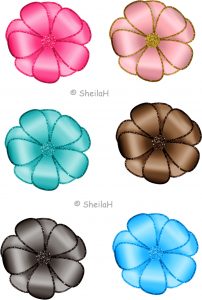
May 21, 2016 at 6:13 am #9361I have been playing today and this is what I made using a preset shape which I coloured and then shaded using The method of selecting, feathering and using the brightness and contrast tool as shown by Cassel to give my creation some dimension. Following on from this thread of using the manual colour correction after greyscaling and increasing to 8 bits, this is an example of what i did with the one creation. I also turned it into a brush. TFL.
Sheila xx
February 2, 2018 at 1:36 am #16924Hi, I hope this thread is still relevant.
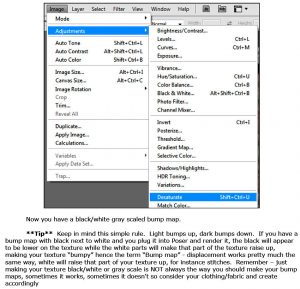
I use Poser and sometimes I like to make my own textures for some of the clothes for the 3d models for my own use. I know how to do this but am a bit confused with making a bump map of the texture tile I want to use. I have a tutorial, but written for Photoshop, it is on clothing texturing.
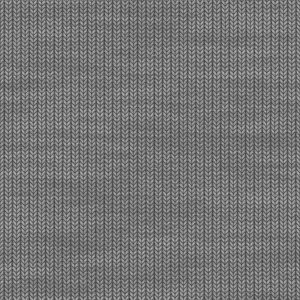
I can follow it with PSP 2018 up to making my bump map and this is the graphic from the tutorial – what is the equivalent in PSP, as I can only see Greyscale and then adjusting with maybe Brightness/Contrast. This was a blue knit tile before I made it grayscale with no colour adjustment applied yet. Would I have done this right. Jan
February 3, 2018 at 11:43 am #16942Jan, a bump map in PSP seems to be quite similar to Photoshop: what is light will appear like a “bump” and what is dark will appear as a “dimp”. Greys will be in-between. We recently had a Master Class on Textures, and it is available in the Campus here:
These bump maps images you have (the knitted fabric) can just be saved as is. If you save it in the Bump Map folder, it will be used in the Balls and Bubbles command. If you save it in the Textures folder, it will appear in the Material Properties window (to apply colors and materials) and the Texture command (to create the 3D effects).
Hope it helps.
February 3, 2018 at 7:27 pm #16944Thanks, will definitely try this.
March 8, 2018 at 6:06 pm #17802Cassel, I make planner inserts in paintshop and often have to line up the numbers 1-31 down a column, or across a row from left to right and it is quite tedious trying to get it to line up perfectly in PSP (not nearly as pretty as you can do it in Excel or another word processing program), I feel like I am missing a “snap to grid” or some other technique, or can you make a script that I can buy or something? I make these a lot and would love to automate this process.
March 8, 2018 at 6:16 pm #17803To make them in a column would be super simple with PSP:
- create a text with the Text tool where you would enter 1 [enter] 2 [enter] 3 [enter] 4 [enter] and so on. That will place all the numbers one below the other.
- if you want them closer together, adjust the Leading value to something like -0.6 or so (it will depend on the font and the look you want)
- that’s it.
For the top row, it is a bit more tedious, of course, as you likely would have to place guides in the center of each column/box and place the numbers there, one by one. Yes, a script is probably possible, but do you have some settings that are always the same? like the same font, the same size, the same size of boxes?
March 9, 2018 at 8:42 pm #17813No, it is not always the same font, so I see – I’m probably stuck with just placing it manually. I thought it was worth a shot, thanks so much for taking a look – I appreciate it! 🙂
March 9, 2018 at 8:46 pm #17814Since you can open a pdf file in PSP, could you do that in Word or Excell or something like that and export/save it as a pdf before bringing it into PSP? It won’t be editable in PSP but it will be perfectly aligned.
March 10, 2018 at 12:31 am #17815Ah! I never thought of that! Brilliant idea! I’m going to try that and see how that works – thanks so much Cassel, you are a genius! <3
March 10, 2018 at 12:33 am #17816Once you have a pdf, it will likely appear with a white background. Change the blend mode and the white will disappear like magic!
March 10, 2018 at 12:33 am #17817Once you have a pdf, it will likely appear with a white background. Change the blend mode and the white will disappear like magic!
March 10, 2018 at 12:35 am #17818Thank you so much!
May 20, 2022 at 6:01 am #76951Something like puppet warp in PS. See before after in image
-
AuthorPosts
- The forum ‘Suggestion Box’ is closed to new topics and replies.


