Home of the Scrapbook Campus › Forums › Showroom › BOOTCAMP September 2020
Tagged: Adventure
- This topic has 111 replies, 26 voices, and was last updated 4 years, 2 months ago by
Ken Russ.
-
AuthorPosts
-
September 21, 2020 at 10:51 am #47487
I’m here to try boot camp once again. 🙂
I am not a psp beginner but I am learning 2020 as I graduate from psp 9. I haven’t use psp for many years I think the very last time I used it extensively it was ver. 7. So I’ve got a ways to go.
I have a gazillion photos and at least 5 big projects I want to work on. I am making a scrapbook for each of my kids and a vacation 2020 scrapbook and hope to create a special memories book just for me.
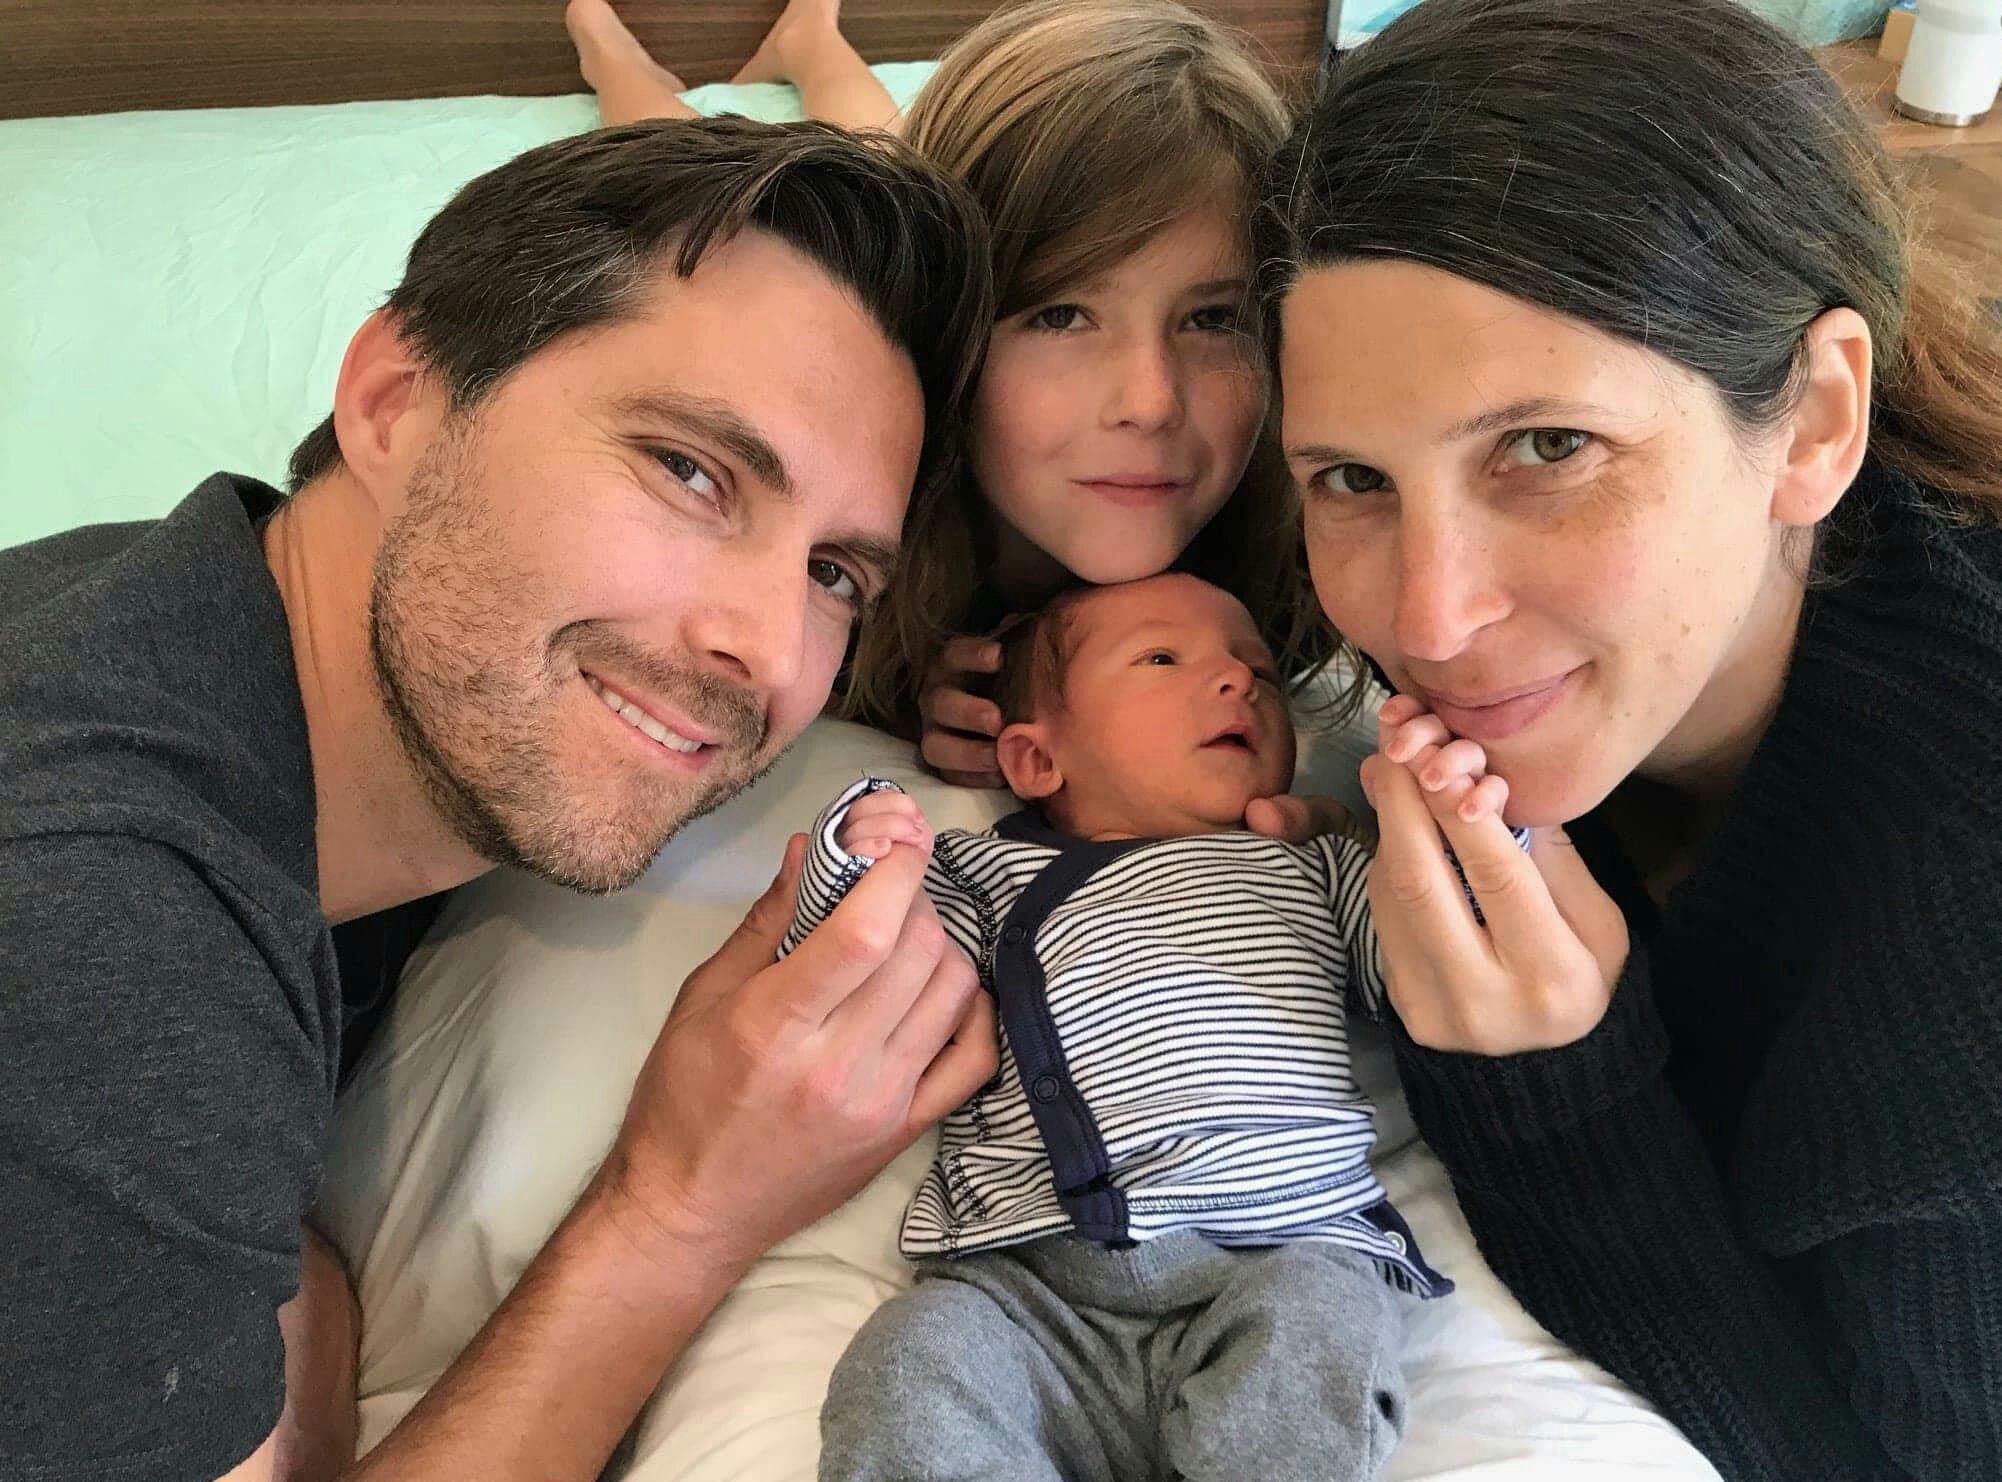
here is a pic of my grandkids and family.
September 21, 2020 at 11:20 am #47491This is my fourth project (you did not mention my 3rd one Carole in your critiques, but I want to get credit in the drawing, so I am posting it again here along with Day 7)
Today’s project was fun….I had forgotten about the grid line lineups. I could not find a glitter in my patterns that would look like glitter on my project and forgot that you offered a link for some more. I will try them next. I notice that I have a pattern folder and a glitter folder. Maybe my glitter is not for such big files as scraps are? Do I need to combine the glitter and the pattern in my PSP files maybe? Thanks for your great video and all your help.
I used a scrap file called Marisol Pretty Things by Janiscrap Designs 2007 and colorized it using Change to Target.
September 21, 2020 at 11:40 am #47493Ok, I used one of your glitters, so maybe size does matter?
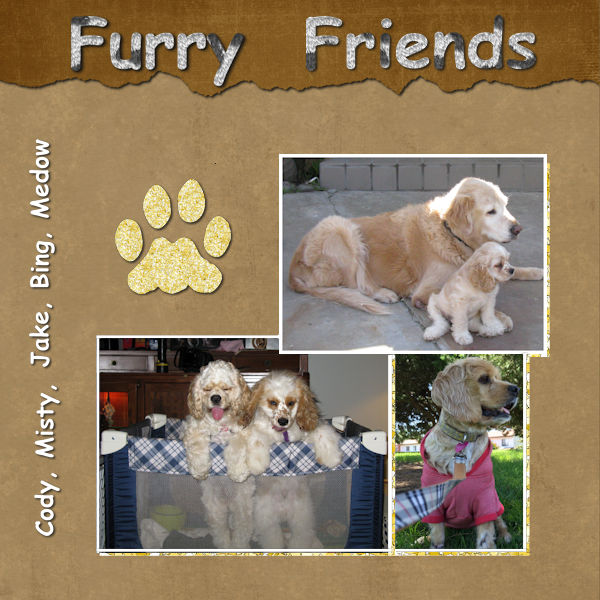
September 21, 2020 at 2:18 pm #47495Fur on text created with EyeCandy plugin, I used ChineseOrient-glitters4 for paw print and outlines on images, Papers from pixelscrapper.com. Meadow the little girl with pink shirt on was a rescue that I fostered while she healed from abuse, she was adopted by a wonderful lady and her daughter, Meadow now has an Instagram account and has new friends.
September 21, 2020 at 3:44 pm #47500Hey all…. I’m sorry I haven’t participated daily.. we found out recently a family member is in end stage cancer so our days are really just…I’m sure you understand what I’m trying to say.. Anyway, Cassel to answer your question real quick… I’ve used all versions of PSP since it first came out. They always manage to change things around and make me jump back to one version or another. We’ll see how this one goes. I’ll be bowing out of this boot camp but promise to come back for the next one.
Have fun everyone!
September 21, 2020 at 11:09 pm #47511Ann A, I apologize for not commenting on your Bubbles project. In fact, it got added to Nathalie’s feedback. I commented on the fun way you had the letters on the title. Not sure what really happened. As for the glitters, you can put that folder inside the Patterns folder if you want. You just have to make sure that your PSP is pointing to that Patterns folder and then, it will “see” those glitters. And yes, you can play with the size (Scale) of that pattern to get different results.
Rita, we will wait anxiously for your projects!
Peter, is that a photo of you? I would suggest that you go much much softer on the bevels as it gives a very thick look to your elements, which would then not be realistic to be placed underneath a photo. That page would be quite heavy! Is it possible that you are applying a bevel instead of a Drop shadow? They are one on top of each other in the Effects menu.
Lavada, yes those guides are so useful and can help when you want to align or size images or elements. Glad you learned about a new tool.
Cindy, you can probably add a larger and more blurred shadow on a bow since it is not completely flat (like a paper or a photo). Try it on bows and knots.
Diane Co., looking forward to the beautiful projects you will do.
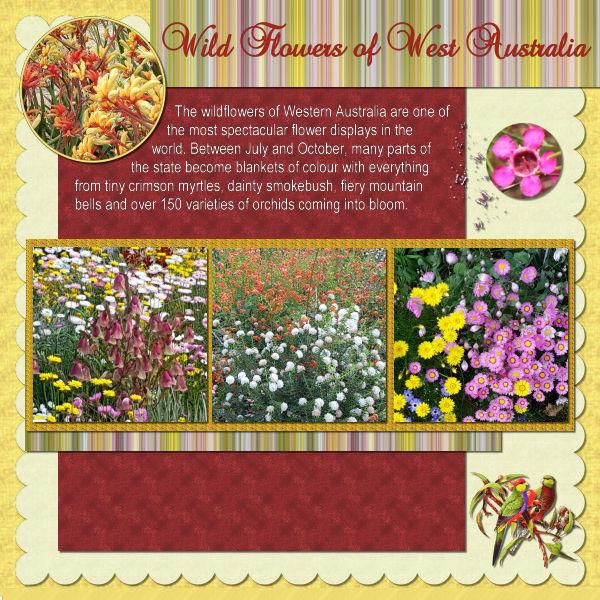
September 22, 2020 at 1:01 am #47513The papers and photos are all mine.. the parrots and small butterflies were in my ‘stash’ and the words are from Ms Google!. Unfortunately it is hard to do justice to the wildflowers and just how far they extend but they are amazing.
I have the scallop paper again .. took me a while to make a template I liked and I am still working to get a nice bevel edge.
Cindy – if you like I can give you the template I made for the scallops – which is just a line of circles cut in half. Or a blank paper you could play with. Sounds like Bruce Lee was meant to be with you.
Jan – waving back at you from lockdown!!
It is always interesting to see the great projects being presented.
September 22, 2020 at 5:01 am #47515Attended my granddaughter’s gender reveal party on Sunday and got some good photos and videos on my iPhone. The center photo is a still but the other two are clipped from the video. I wish I knew how to safely enlarge them. They led to this Bootcamp layout that illustrates their joy! A young black bear wandered into the celebration, looking to share the delicious BBQ! You can see him on the bottom left. 😉 I used the papers and alpha from the Somewhere in Time kit and the text is Bradley Hand which needed to be heavier so I added a stroke in the same black and that did the trick!
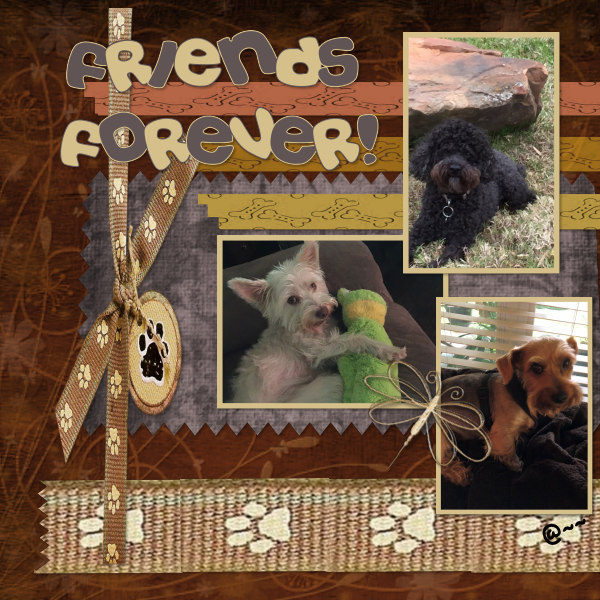
September 22, 2020 at 6:04 pm #47520Well I finally got Project 3 (friends) complete! I struggled with the filling of texture for some time and somehow I managed to overload the program and it would not budge. I had saved my work but there was something in that file that was just continuing to throw a spanner into the works. SO.. I deleted it and started from scratch again and here is the result. I can say that I am getting very good at filling with texture and colour. I used some paper and elements of Sheila Reid’s “Speed Zone” kit from Pixel Scrapper. Now to get going on Project 4….
I am enjoying seeing everyone’s fabulous work here and how diverse the project turn out to be.
September 22, 2020 at 7:37 pm #47525BOY!! That was a fun video. I hope I don’t lose it. Problem is finding it again I think. I really enjoyed the pinking shear cut and the frames around the pictures. Much easier than the way I was doing it.
September 22, 2020 at 9:00 pm #47528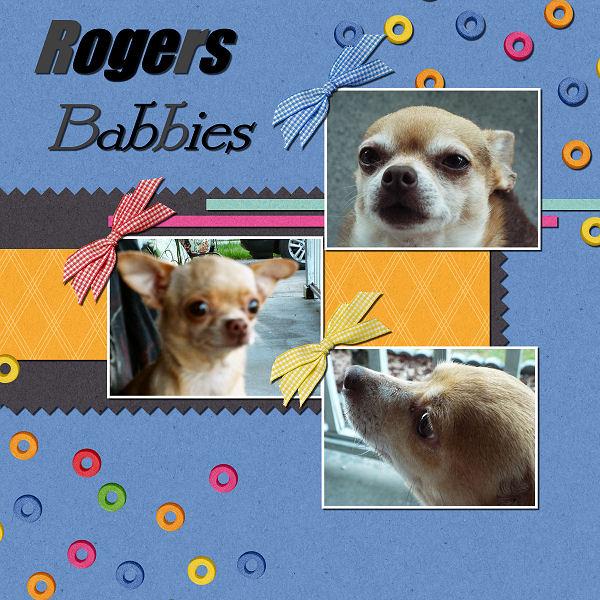
meet tobey (top) hes sister rubby(bottom) and lulus who is on the left.. these are my hubbies babies..tobey and rubbie are 9 years old and lulus is 4. using jack 9 i had some problems with being able to highlight just one letter at a time so i ened up having to use the magic wand to and clicking on the letter to change the color.. i’m not sure if its because i am using such and older version or i just could not understand how to do it.. but i had fun trying.
September 22, 2020 at 9:20 pm #47530September 22, 2020 at 10:39 pm #47531Euka, it is a great idea to create that template; scalloped edges can be tricky to do, and they are so fun to have!
Ann S, have you tried 2021 yet? Enlarging with its AI seems to do a pretty good job That is a great page too.
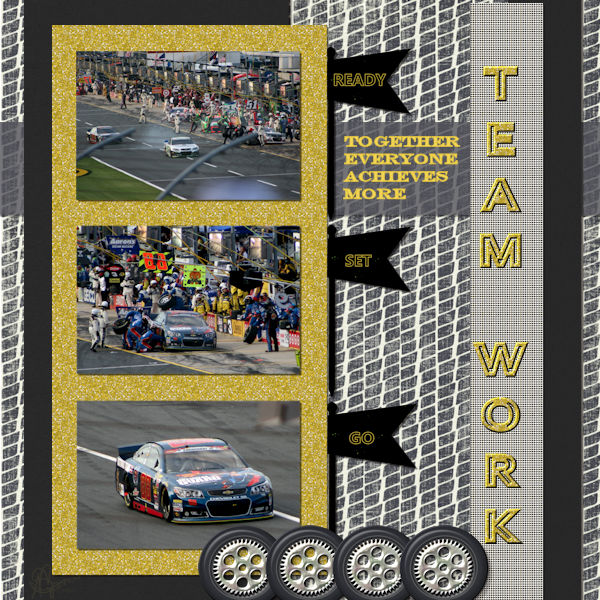
Nathalie, that is such a fun layout. I can see how you enjoy those races!
Ann A, I am curious, how you were doing pinking before? Resizing can be tricky when you want to place something in a specific area. I suspect that the little cluster with the knot and tag was resized using the Pick tool and using the left/right nodes. You might want to check this article to make sure you never squish anyone while resizing.
Lavada, those are cute pictures. One little detail (and older members will know that I am picky on that) is about the direction of the shadows on the spray of beads. You likely have flipped or mirrored it for the bottom left set: do you see how the shadows are in a different direction than the ones on the top right? If you are using JASC PSP9, you can highlight the letters, one by one, in the Text entry dialog window. Did you try that?
Peter, I notice your buttons have a square “background”. Did you download it as a png element or as a jpg? I see you managed to get those letters in different colors. That is a fun trick, right?
September 22, 2020 at 11:52 pm #47533That was a fun project. Here’s my project #4. It’s really great to see other imaginations at work! Nicely done everyone!
September 23, 2020 at 12:51 am #47537Golly gee willikers Cassel that was a fabulous lesson! I agree with Ann A., that trick to “Pinking” edges is amazing. I am fast forwarding and have an idea on how Euka Euka created her beautiful scallop edge paper template. EE you did a very precise job on that, well done!! I also loved the lesson on using selections to create a border. Both those “tricks” will be put to good use!
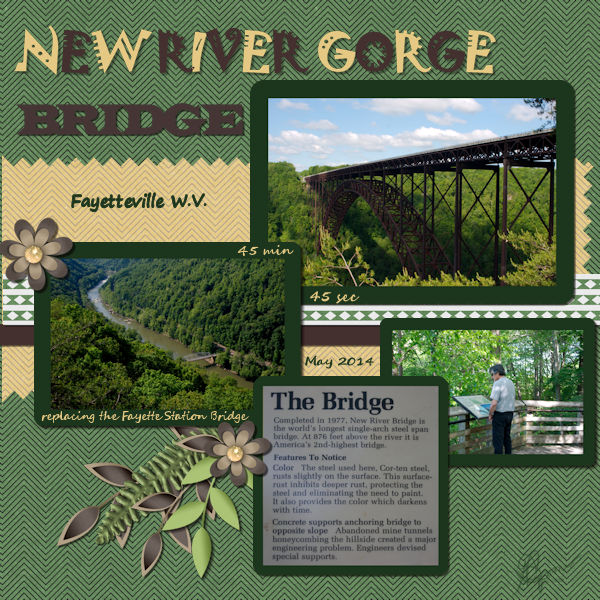
Here is my Project 4, I know the the lesson only used 3 photos but I had to include the info board pic (used the perspective tool again 😉 ) that Pete was reading for my benefit (and those of you who read it)LOL.(ps, times have changed since it was built and is now the 4th longest span according to Wikipedia) On our road trips to the race tracks we try to find some interesting sites to visit along the way. This was on our way down to Charlotte NC, just outside Fayetteville WV.
Love seeing everyone’s take on our projects/lessons.
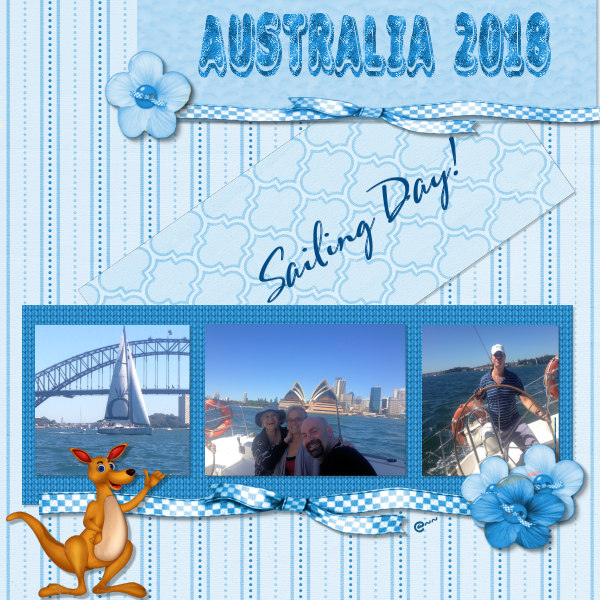
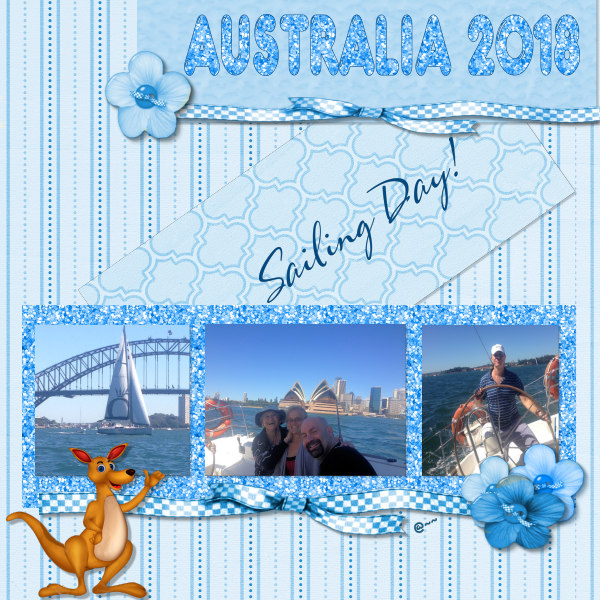
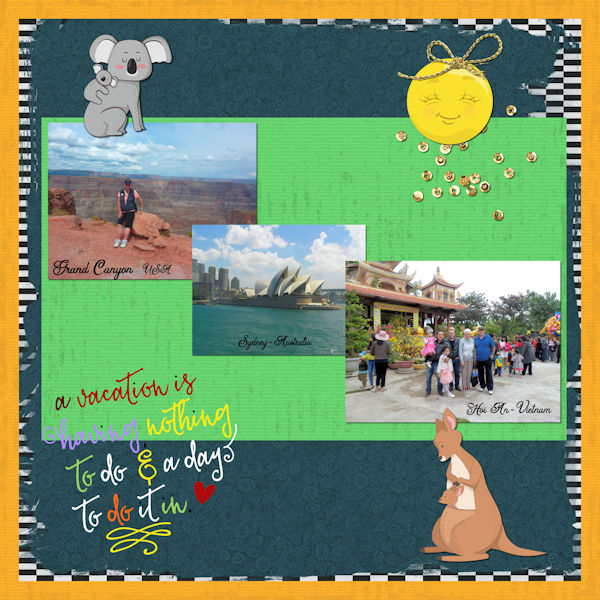
September 23, 2020 at 2:34 am #47539Just finished Lesson 7. My photos taken on overseas trips to the USA and Vietnam. Sydney was home so not a trip.
I used a background paper I found I had in my collection that had an interesting edge, two Aussie animal .pngs and a fun emoji. I did not use glitter paper, but used glitter elements instead. The text saying was another element that I just coloured.
It is lovely to see the different approaches everyone is making, the individual touch.
September 23, 2020 at 9:55 am #47549No I have not done pinking before. It is a new and exciting trick to me, and neat to know from another of your articles that it can be done with brush tool and picture tube tool too. What I have done another way is to add a frame around a photo by duplicating it and flooding the duplicate and enlarging it with the pick tool. Not nearly as exact as your way.
I read the article on enlarging with the pick tool, but not sure from your critique note if my ribbon is wrong? It looks OK to my eye, but notice on your article that I cannot see a problem on a few of the examples like the Scrapbook logo square except one is rectangular and one square? The kit I used (and many of my collections over the years) has been reduced to 200 by a program I used on many of them to save space because I did not plan to do any scraping but loved the collections. Thought I might use them for tags down the road. Do you think I might just as well trash all of them and start a new collection?
Thanks for your help! and the lovely tutorials. Is there a way to save the tutorials to a folder?
September 23, 2020 at 9:43 pm #47568Hi Best Teacher, Hi All Love everyone’s Art Hi Euka Euka YEs Please may I get your template, thank You. I dont know how yet to make them or use cliptoit, or do alot but I did this Project. 🙂
I did not Fuss, or Sweat, or have to walk away ect I could follow instructions made me feel so good. I need that. 🙂
This is Bruce my last rescute he turned out to be me, and I know he rescued me. I used tubes paws and tube hands and Our Teachers Ribbon script, and the mail stamp from our Teachers store, I used our Teachers button maker to match my work, and I made the tube of bruce and I used the Sparkle Script from our Teachers store. And I used the Kit our teacher put for us on the lesson Thank you to them too and my Teacher. woot woot… no cussin or sweating no pouting just smiling.
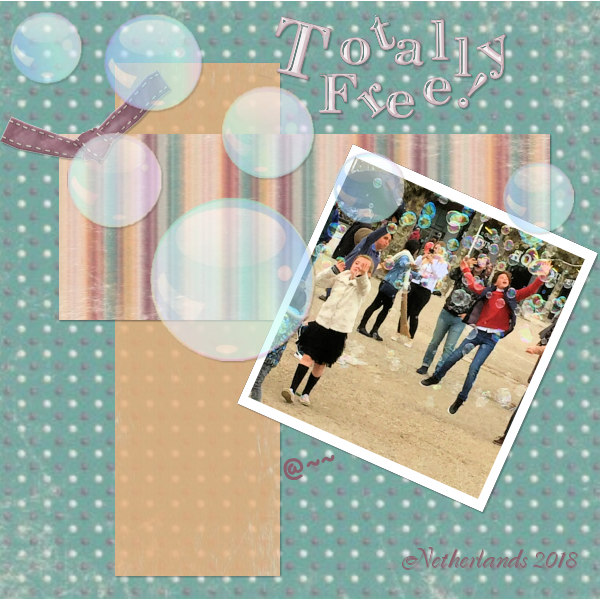
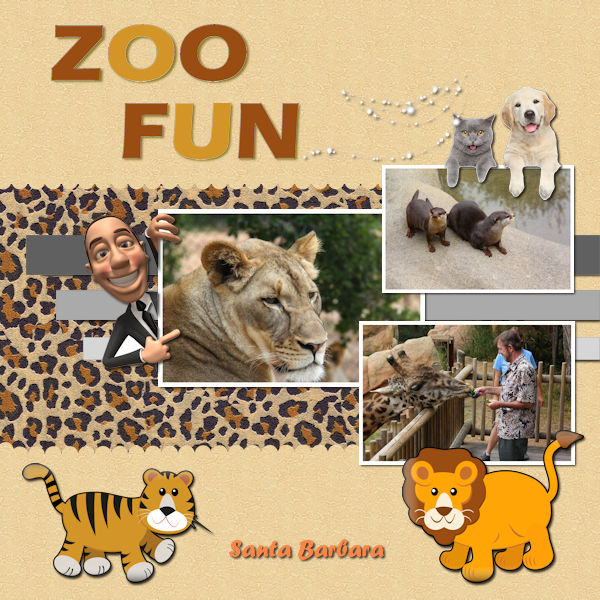
September 23, 2020 at 10:28 pm #47570Random elements found on Pinterest and made transparent, photos from Santa Barbara, CA zoo.
September 23, 2020 at 11:28 pm #47571Rick, that is a beautiful dog and you really showcased him well.
Nathalie, I am glad you discovered those “tricks” and that they will be put to use in other projects. So many commands in PSP are just “hidden gems”. Even if it asked for 3 photos, it is perfectly ok to add a 4th one, as it really was very suitable!
Jan, I love that wordart! It seems that the purple word is a bit hard to read. Are you able to change that color? If it is a png file, you can “paint” it using the trick described in this article.
Ann A, about the ribbon, if you look at the dog tag, it is no longer round and I can just assume it was round in its original format, which is what makes me suspect that when you used the Pick too, you didn’t resize using a corner handle, but a side one. Can you look at the original ribbon/tag to see if the tag was round or not? Maybe I am wrong?
Cindy, I recognize those sparkles!!! good work on those! I think I will have to make a tutorial just for that Clip To It script! 🙂 One little suggestion: the paw tracks would probably look more defined without shadows. If they are “prints”, they likely would not have shadows at all. Just a detail. If you have kept all the layers and the shadows are on separate layers, try to hide the shadows and see how it looks.
September 24, 2020 at 2:20 am #47573My very pink PINK project. The 3 flowers are West Aust wildflowers and the Camellias were from my mother’s garden. I have been leaving space at the bottom of my projects so I can add text later.
The papers are mine including the vellum, the pink strip is from the photo I used for the background colour and the 2 lighter ones coloured from the lighter camellia. The elements from my stash.
Thanks for article you posted for Jan it was very interesting – recolouring is an area I have been struggling with, esp. when I make a textured paper, to keep the texture featured the only way I have found seems to be the hue/sat/colorize but the colours like you said in the article are not always right, but then I do get some interesting ones! I do convert to grey scale first .
Cindy – if you would like to email me your email I can send you the template I made and a paper you can use as it would be too big to post here .. my email is euka2308@gmail.com Hope that is ok Carole.
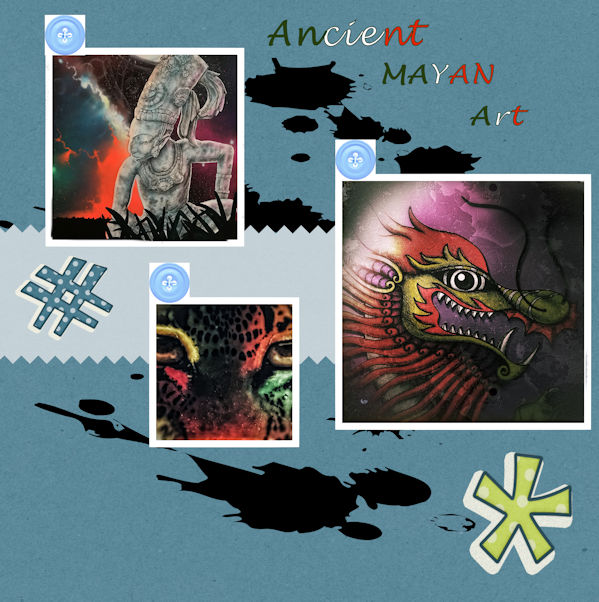
September 24, 2020 at 2:55 am #47575My Project lesson 9. As I also use a program called PoserPro 11 V3 I had made these images in it, so I decided to showcase them as The Girls of Paris. Bye the way Poser uses 3D models, so that is what these are.
I did learn and use those two tricks Carole demonstrated in the Video with the frames and the Pinking of edges. I was trying to do frames before around photos, but of course it was not this technique, so it did not work out. Thanks Carole, neat trick, I will use this again.
Edit to add, that the girl in the sunglasses must have still been a .png so this is what happened with the frame and I liked it, so kept it.
So ool la la, the girls of Paris
September 24, 2020 at 4:33 am #47581Day 9 Project #4 – But it’s not Bees, it’s Bears! This incident happened last Sunday at my grandkids gender reveal party. We were out in the woods and black bears are common in the area. Interacting with wild bears like this is definitely a no, no! The animal, more likely than not, becomes used to human contact; repeatedly ventures close to homes and ends up euthanized because the homeowners are frightened by this persistent bear. My daughter, in blue, reached out to the bear and he snapped at her arm but, luckily, just grabbed her shirt! My grandson, in shorts, really started the trouble by enticing the bear closer instead a chasing it away, as he should have. My other, older granddaughter, who is a wildlife biologist gave him “HECK!” She did call the wildlife people and they said, just shoo it away, so we did by banging pots together and using a long pole to push it away. It eventually left, meanwhile I was shooting a video, which is where these stills came from.
I started with a kit called Somewhere in Time but added to it from one called Adventure Time. I found the bear silhouette on CleanPNG.com but it was persistently insisting on having a green background, though it looked white or transparent in my files. I would select the bear and copy/paste as a new layer and the background would be there too! I finally selected the bear and CUT it from it’s background and pasted as a new image just to test it and that worked!
I used the Adjust/Depth of Field tool to isolate the bear a bit and blur the busy backgrounds in the photos. You won’t find that paper with that striped pattern anywhere because I took one from the kit and changed all the pink stripes to dark blue. And I used the Effects/3D Effects/Chisel on the date on the rock, with just a hint of a white shadow that made the text pop.
The title is an alpha from the kit that took some fiddling to get it to fit. The apostrophe in DON’T is the top half of the exclamation point reduced.
Enjoy, but remember, DON’T FEED THE BEARS! 😉
EDIT: I couldn’t take the color of the chairs any more so I pulled them back and filled with dark blue sueded texture.
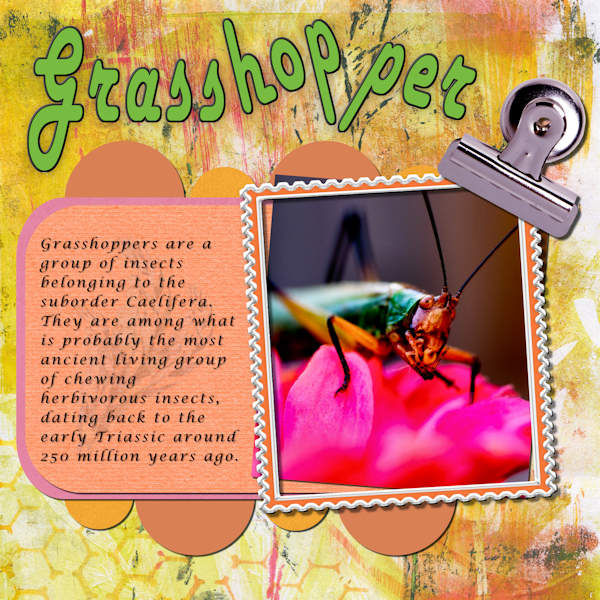
September 24, 2020 at 8:14 am #47585September 24, 2020 at 2:31 pm #47593This was a pic that I happened to get lucky with. First my camera didn’t have the macro lens on. Then I had to hunt for the tripod. Then I had to find the little critter again while he posed for this shot. Here’s my Project 5.
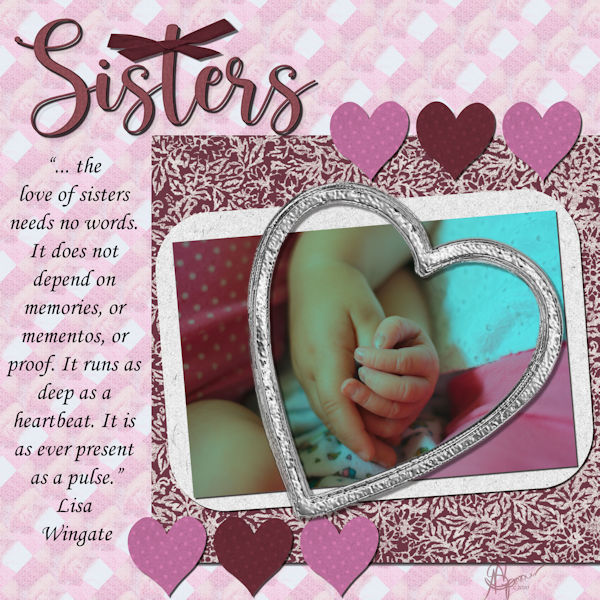
Thanks Cassel for all the tips and tricks and a great workshop. I learned quite a bit about scrapbooking, and now that I have gotten my feet wet who knows where it takes me.September 24, 2020 at 4:20 pm #47595Project 5 is done and dusted. This pic is of my two granddaughters when the youngest was only days old and eldest 18 mos. They were sleeping next to each other on the couch but somehow their little hands found each other!
This boot camp was excellent! I have been so excited to get up and see what the “Project of the day” was going to be along with the new lesson. Thank you again for sharing your wealth of knowledge Cassel!
I created my own background paper from the early beginnings of this project, and also made the heart elements and frame. I struggled with the text in the selection box but finally got it to work. When I got it it was magical! That is one trick I will have to practice with to get it down to the science.
Oh man this group is full of talented people. I have so enjoyed seeing your beautiful work! Thank you to all of you for sharing and inspiring.
September 24, 2020 at 8:54 pm #47600I seen Natalies couldn’t find mine but here it is revisioed
September 24, 2020 at 10:33 pm #47601Euka, it is quite ok if you want to share your work. If the file is not huge, you can also post a link in this section, but you have to host it somewhere else than in the Campus (Dropbox or other). And that very pink page is very pretty and the colors match perfectly the photos.
Jan, I have often seen Posers as “creepy creatures” shapes. Yours are more attractive and “normal”. Great idea to showcase them, and I am glad you used those tricks! That is the goal.
Ann S, that is a great page and also a great story. I hope you will find a way to incorporate that story either with your page or with a matching page, which could then make a double-page.
Ann A, if you have saved your page in .pspimage format, you can re-add that tag and make sure you use the corner handles of the Pick tool to resize it. See how it differs.
Rick, if you stick around, you will have more opportunities to try other scrapbooking projects! I love how you used the technique shown to create those regular but uneven shapes on your page. That is how the same projects can be customized and look completely different and unique.
Nathalie, that is such a sweet photo you showcased! I am really happy that you enjoyed this Bootcamp. Stay tuned for our next “challenge”, in the next month.
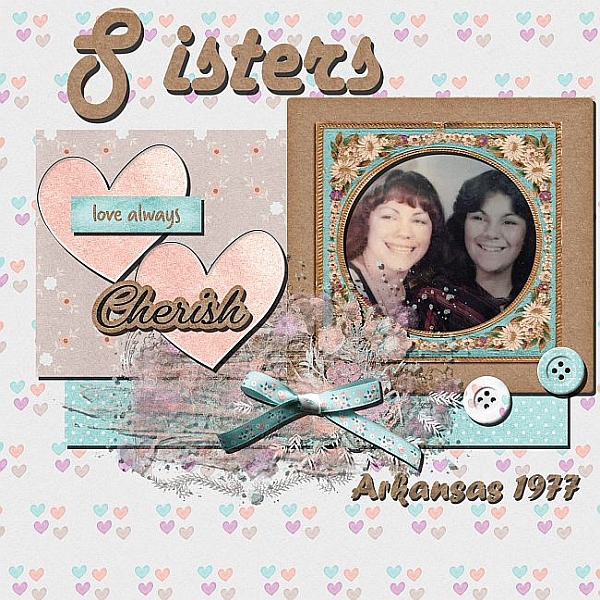
Cindy, there seems to be a theme of the day with “Sisters”!
September 25, 2020 at 1:49 am #47606My Teacher, My Teacher,
I HAD SO MUCH FUN, IT WAS LIKE CALGONE. i FOLLOWED YOU PERFECTLY, except for font had some problems and trying to move layers around that’s always a puzzle, hate it when it takes me like 5 tries is there a secret to moving them the first time like you do?
Euka Euka, I tried to friend you on fb I wanted to get that temp you said, I could but this lesson made me feel powerful going to go and re Read what you said, and try to do it.
The kit was one I bought on Pixel Srapbookers, I hope they dont mind I, kinda fudged some of it for how I wanted this to look.
T H A N K YOU C A R O L E, MRS. CASSEL YOU ROCK
NOW I GET TO BE IN THE DRAWING… WHOPP WHOOOP good luck all I LOVE THE THOUGHT. TY TY TY
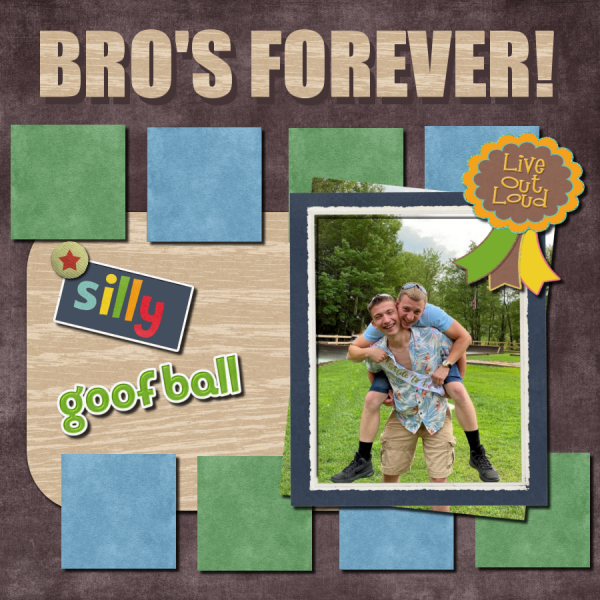
September 25, 2020 at 5:07 am #47609Here’s my final submission for this class. I was looking for an interesting photo to feature and these goofy guys filled the bill! This is my grandson in front horsing around with his soon-to-be brother-in-law who is also the soon-to-be Daddy from the gender reveal. We were at the engagement party for my oldest granddaughter and her fiancé.
I used papers from Somewhere in Time and the word art is from the Frootloop kit. The font is Impact which I played with by duplicating it and coloring the dupe with the darkest shade from the background and positioning it like a shadow behind the tan title. I wanted to make it look like the wood had some thickness. Flowers and bows didn’t seem to fit the theme so I gave them a ribbon award from the Exuberance kit instead.
Most interested to see the results of the contest on Monday! Good luck, everyone!!
-
AuthorPosts


- The topic ‘BOOTCAMP September 2020’ is closed to new replies.


