Home of the Scrapbook Campus › Forums › Showroom › BOOTCAMP March 2021
Tagged: BOOTCAMP March 2021 day 11
- This topic has 172 replies, 18 voices, and was last updated 3 years, 7 months ago by
Susanne Lietz.
-
AuthorPosts
-
March 23, 2021 at 4:36 pm #55277
Okay. Finally here is Adventure – Project 2?? I’ve lost track. Maybe I am getting too picky. got some help from Rookie??? Laurie on this one. Don’t remember exactly what I’ve done since this has been a work in progress for too long!!
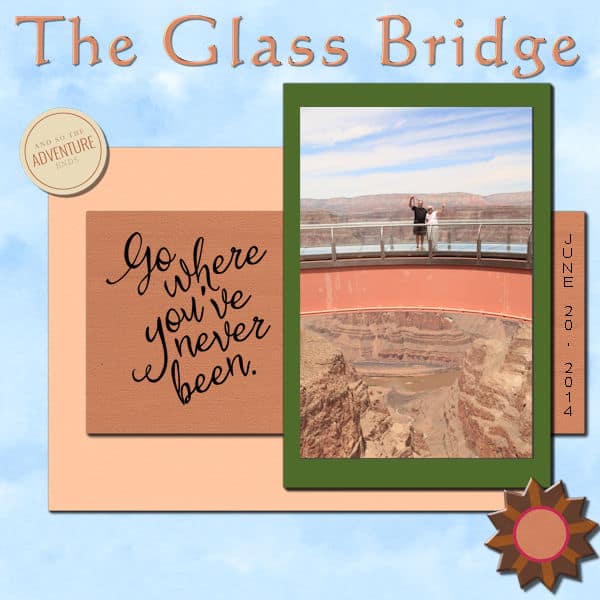
Love all that has been posted since I last posted. Everyone’s doing GOOD.Incidentally, The Glass Bridge is on the Hualapai Indian Reservation. The bridge is actually acryllic and not glass. They make you take off your shoes and put on booties that will not scratch the surface. You see down, down, down into the canyon where the Colorado River is just before making the bend into the border between Arizona and California. It was awesome! They also have a mock up of an old western town at the same place. There was a singing cowboy there who played some of the OLD western songs just for me. Loved it.
-
This reply was modified 3 years, 9 months ago by
Mary Solaas.
March 23, 2021 at 5:33 pm #55282Here is my 4th project. I used papers that I had created a while back, created scallops along the edges instead of the jagged edge. Kept with the theme of bees
March 23, 2021 at 6:33 pm #55297Third project. The photo was taken last week in the old city of San Juan. The photo was divided in three parts of equal size and later the sections were resized to three different sizes. All the papers and elements downloaded from Pixel Scrapper.
March 23, 2021 at 6:51 pm #55301Jose, I love the way you split the photo into three images, while maintaining correct perspective.
March 23, 2021 at 7:08 pm #55305Sue Thomas, I really appreciated your comment. Thank you. It take me some time deciding how I was going to present three pictures on the same theme related to the old city. After the idea pop up, it take me longer to do the project. In general, it take me some time from beginning to end. So, your comment is very welcome.
March 23, 2021 at 7:25 pm #55306Jose, you are most welcome, kind comments boosts confidence, and creativity. We have all been there, we had to start somewhere. I like the colour scheme of your papers, they don’t distract the eye from focusing on the photos.
March 23, 2021 at 9:46 pm #55318Hi Everybody
wow you guys are Rocking…here’s my Bruce he is a a Private investigator he is also a spy. Love this Campus you all are Great.
March 23, 2021 at 10:57 pm #55320Ron, you are correct that text does not need shadows because they are ink. However, in your layout, I would suggest using the Drop Shadow COMMAND to add some darkeness around the white text and not to make a “real” shadow. Something more like what is illustrated in this article about keeping text legible. As for the indented replies in the forum, I don’t code anything and I am dependant on the WordPress plugins to make the forum look the way it does.
Wendy, nice to see that your photos were sized correctly with no distortion. I would suggest that you move the flower element from the top slightly to the left or rotate it a little tiny bit, just so the text does not overlap the little “tail”. Just a matter of realism. The Friends layout is great and colorful. I love that text background paper!
Anita, you are right: shadows have so many options to mean different things on a project. At first, it can be daunting, but with practice and observation, it will become easier.
Paul, I can see that you are already using different shadows for different elements on your page. That is something that is improving, isn’t it?
Peter, if you feel stuck on any step, don’t hesitate to post the question in the forum. We have members from all over the world so someone is likely up and able to help you quickly. And I agree that the Help (F1) is typically not very useful if you don’t already know most of what you need to know.
Laurie, which layers are locked together? Typically, a shadow will be linked to the source layer, so they would move together. However if you are to duplicate a layer that has already a link, that link will also be duplicated so both layers will be linked. I am not sure if that is the case for you but it is a possibility. Could you post a screenshot of your Layers palette?
Mary, because of the topic of that Glass bridge layout, you might want to consider creating acrylic letters for the title. You should be able to find the instructions in this class. It is not part of the Bootcamp, but you can always edit later if you want.
Sue, I am always fascinated by your wordart pieces!
José, that is a great way to display that photo. I can see that you are already comfortable with the tools and are not distorting your photos.
Cindy, I see that you are using the frame in the right orientation now with the dog not being upside-down!
March 24, 2021 at 6:04 am #55327Everyone here is doing such great work! I love to come here and be inspired by all the layouts posted.
March 24, 2021 at 8:30 am #55329Project 3: Used one Chinese glitter element. The rest of the elements are a hodgepodge of images I found.
 March 24, 2021 at 12:10 pm #55339
Modified papers from Creative Fabrica as were the beeeeeeees. The three photos are of a walkthrough I made from some overgrown conifers the previous owner planted. I replaced with more suitable mixed trees and shrubs, everything that couldn’t be used was recycled. I thought I would try something other than rectangles for this one lol
I’m not sure what number project this is, or what day of the week it is here, on the plus side I’m having fun.
March 24, 2021 at 2:03 pm #55343This is my Bootcamp Day 9 design.
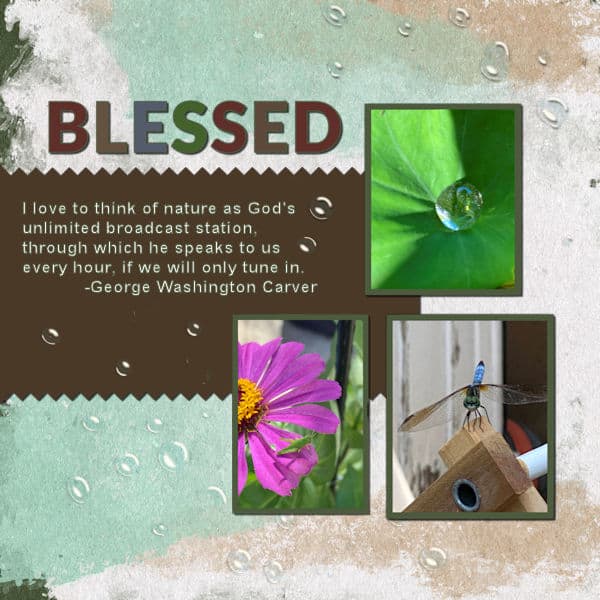
I am a practicing Catholic, so not going to church in person has been a real struggle and sacrifice for me during this pandemic. But, even with all of the hardships like social distancing, not shopping, not eating out, God has blessed me greatly. Last summer, we spent a lot of time outside on our covered patio. It was awesome to watch and observe the many little ‘nature’ gifts that came my way. For me, they truly were little blessings.
I down-loaded a water droplet scatter to go along with my nature theme. After applying them to my design, I noticed that the highlights on the droplets did not correspond to my left-sided light source, and neither did my water droplet on the leaf picture. I rotated both my picture and the water droplet scatter so that the highlights were more uniform. I wasn’t sure how to highlight the scatter. I ultimately decided that softer was better. It was a guess because I have never shadowed water before.
-
This reply was modified 3 years, 9 months ago by
laurie solaas.
March 24, 2021 at 2:12 pm #55348This is my Bootcamp Day 9 design.
I am a practicing Catholic, so not going to church in person has been a real struggle and sacrifice for me during this pandemic. But, even with all of the hardships like social distancing, not shopping, not eating out, God has blessed me greatly. Last summer, we spent a lot of time outside on our covered patio. It was awesome to watch and observe the many little ‘nature’ gifts that came my way. For me, they truly were little blessings.
I down-loaded a water droplet scatter to go along with my nature theme. After applying them to my design, I noticed that the highlights on the droplets did not correspond to my left-sided light source, and neither did my water droplet on the leaf picture. I rotated both my picture and the water droplet scatter so that the highlights were more uniform. I wasn’t sure how to highlight the scatter. I ultimately decided that softer was better. I am not sure I did it correctly, because I have never shadowed water before.
March 24, 2021 at 2:17 pm #55349My issue with the Layers on wanting to move on my friends design has magically fixed itself. Could be, I just needed to restart PSP. Sometimes, I think my laptop gets stressed out by the needs of the program and then it hiccops.
-
This reply was modified 3 years, 9 months ago by
March 24, 2021 at 3:16 pm #55354Well, again I thought this would be a lot easier than it looked… and to begin, it worked fairly well. But I couldn’t get the “scatter” flowers to resize. I couldn’t get the rastered text or the scatters to drop-shadow. I wanted to add some more text, but the text tool stopped working. Something is wrong, and I can’t figure out what I’m doing that gets these features to not work, when they did with the last project. Any thoughts?
March 24, 2021 at 3:33 pm #55356Peter,
March 24, 2021 at 3:39 pm #55357Peter, with regard to the drop shadow on the text, you have to covert the text from a vector to a raster, did you close the vector text, and select the raster layer to shadow. perhaps you selected the wrong layer by mistake. I suspect the flowers are a picture tube. If so, before you scatter them you have to create a new layer to scatter them on. That could be why you couldn’t place a drop shadow on them, you probably scattered them directly into another layer. To resize the scatter, you go to the top tool bar and lower the size, before you scatter. If they are to small, click on undo, and increase the size until you are happy with the result.
March 24, 2021 at 3:49 pm #55358I learned the hard way that if you have an items selected on another layer, that the tools won’t seem to work. I had this happen to me a lot when I first started using the program. I’d forget to deselect and then try to use a tool on one of the top layers, and nothing happened! I don’t know if this could have been an issue with you or not. If so, try a Control D, when tools won’t work and then try again. I also couldn’t scale something before, and that’s because I forgot to set it to ‘scale’ word on the tool bar. In the beginning, when I forgot to do this, I spent 20 minutes once, trying to scale something, doing the same thing over and over. I don’t know if possibly that was the issue with you but I hope this helps.
March 24, 2021 at 7:11 pm #55370Day 7, Project 3
March 24, 2021 at 7:24 pm #55371I hope I didn’t get to busy with this one. All of the paper came from MyMemories and I don’t remember where the scallops at the bottom came from. I really didn’t think I need any thing else after I got the text on the page. I did put a little glitter on the page with a Picture tube and I really had to make lots of changes to get it as thin as I wanted.
I ‘m really impressed with so many of your pages. Just in the last day or so Sue, Jose, Cindy, Ron, Paul, Laura and Peter have all loaded up great pages and that is just on page 4 of the community. I’ll go back to the other pages later.
Keep up the good work, we only have one more page to do.
Fran
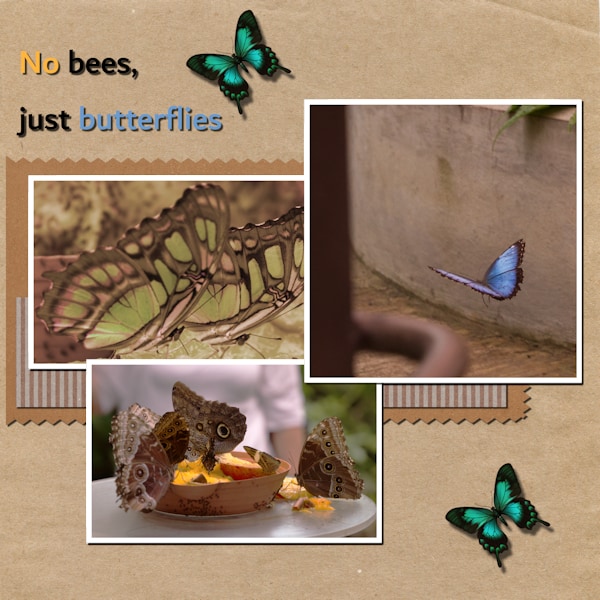
March 24, 2021 at 9:41 pm #55380Project 04. Papers downloaded from Pixel Scrapper. The butterflies pictures tubes are from PSP 2020. The picture tube already includes the shadows. The photos were taken on July, 2018 in a butterfly farm in San José, Costa Rica.
March 24, 2021 at 10:08 pm #55383Everyone is doing a wonderful job on their pages, so much creative talent being displayed.
Jose, another beautifully executed page. The butterflies in the bottom photo are Pearly-eye. I enjoy photography, but I do have a passion for shooting the wonderful world of insects in macro.
March 25, 2021 at 12:58 am #55384Sue Thomas, thanks again. Good to know that you have a passion for shooting insects in macro. I owns a 100 millimeters macro lens and with the pandemic I am beginning to explore macro photography but mainly with flowers in my back yard.
I am glad that I register for the bootcamp. I have learned a lot not only by viewing Cassel videos but also by looking at the magnificent work of the others participants.
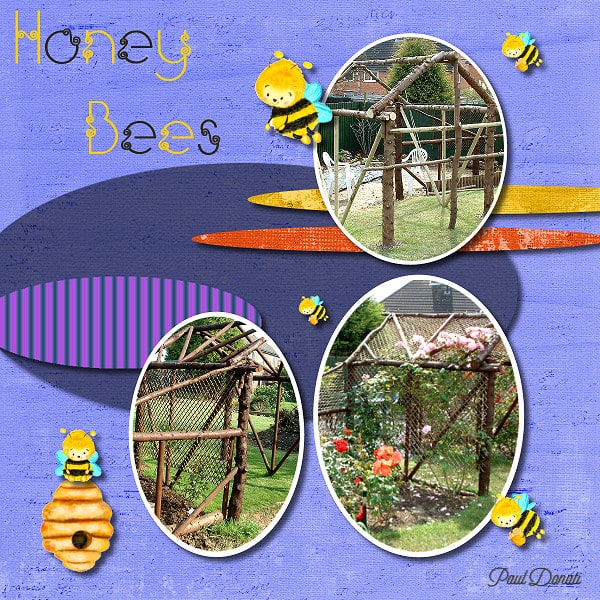
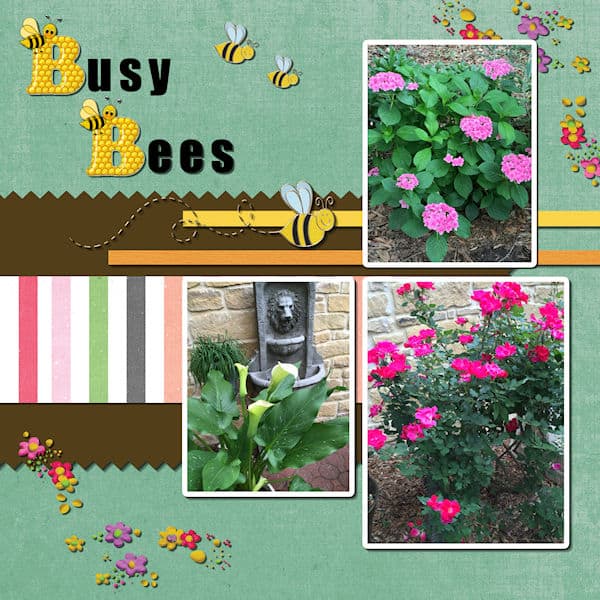
March 25, 2021 at 7:05 am #55391Finished Day 9 Project 4 Busy Bees. It took me a while to get the Selection Borders done, but it was fun and I found a new way to add borders. I used papers from Pixel Scrappers Gina Jones, Jessica Dunn and Marissa Lerin. I made the brown background by using the dropper tool to find the right shade. The bees and flower scatters are from Pixel Scrappers Janet Kemp, and the letter B is from clip-art I had. The flower pictures are from my backyard. I loved the diamond edge border around one of the rectangles. That is amazing and I know I will use that method a lot. Thank you Carole for showing us how to do that.
March 25, 2021 at 11:30 am #55395OK, here’s my second attempt at assignment 2. Thanks to Sue Thomas and Laurie Solaas for their VERY helpful advice. It turns out that PSP decided to create a new layer (unannounced and not asked for) for some of the text I was creating, which kept me from seeing it. Also, somehow my base-paper got selected, which made many tools unavailable on other layers. I ended up making all layers invisible (thanks for that trick, Cassel!) and then – one at a time – looked at each layer to see what was on it. My missing text showed up on several different layers (the result of several failed attempts) so I deleted all the extra layers and placed the text again. Curiously, I couldn’t get the “return” key to place text on a second line. I created a second text element, but then PSP wouldn’t rotate it; AND, when it came time to save as .jpg, that text element wasn’t there. Not sure why
My take-home lessons: do a “select: none” often; label each layer with some identifier so I’ll recognize when PSP has “provided” an extra layer I didn’t ask for; don’t be shy about making all layers invisible, and then checking each one individually. This is particularly important for me, since I’m vision-impaired and those teeny little images in the “layers” area are almost useless for inspection purposes.
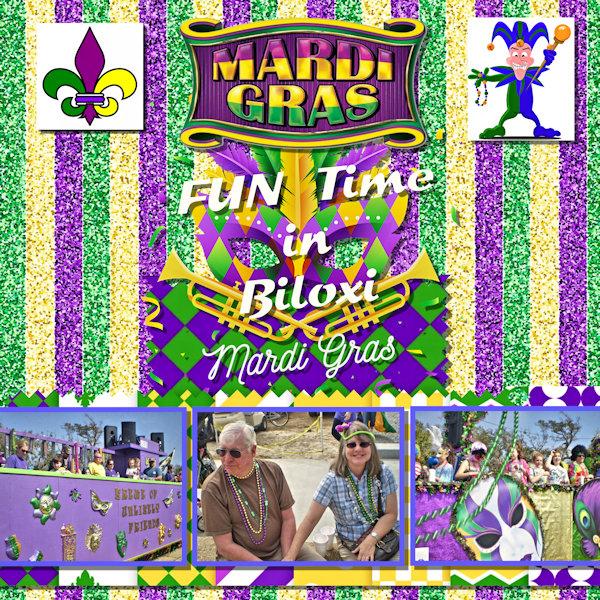
March 25, 2021 at 2:17 pm #55399Project 4: Mardi Gras in Biloxi, 2011 when sister and BIL from GA came to visit. Went back and forth between video and editor so hope I didn’t miss doing anything from tutorial. Photos and elements from free stock sites.
-
This reply was modified 3 years, 9 months ago by
Ron.
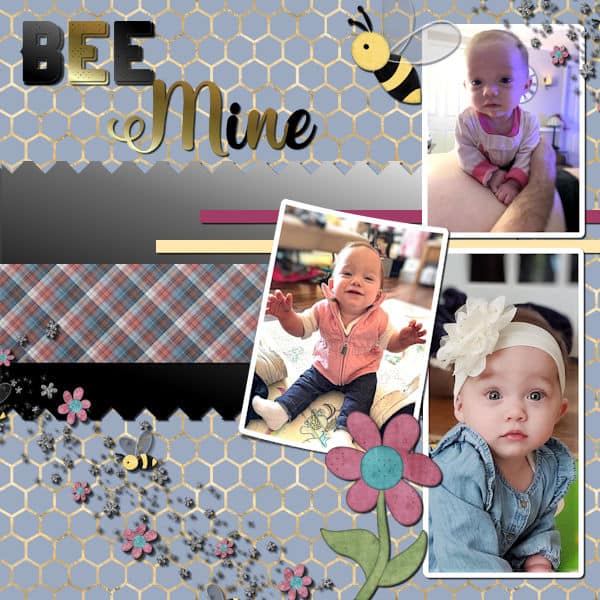
March 25, 2021 at 3:30 pm #55403My Day 9 Project 4: BEE MINE. Here’s Sonya again; last time she was on a ride, this time she’s posin’ 😉
Something new I tried; the center photo is lifted up using the tutorial in Creative Scrap.
Edit: I made some revisions. I wasn’t happy with the total look of the page. I think this is an improvement.
-
This reply was modified 3 years, 9 months ago by
Ann Seeber.
March 25, 2021 at 5:47 pm #55407I’m loving everyone’s Busy Bee layouts. All so unique and pleasing to the eye. I hope everyone continues with scrapbooking.
Jose, I love your butterfly scrap page. The photos are beautiful. The layout compliments the photos perfectly in my opinion. This is so much fun, isn’t it? I especially love your layout with the photo in three sections.
Cindy, your Bruce is hilarious in the photo. You got a laugh from me. 🙂
Anita, oh my gosh your garden photos are beautiful. The colours you used in your layout make the photos stand-out.
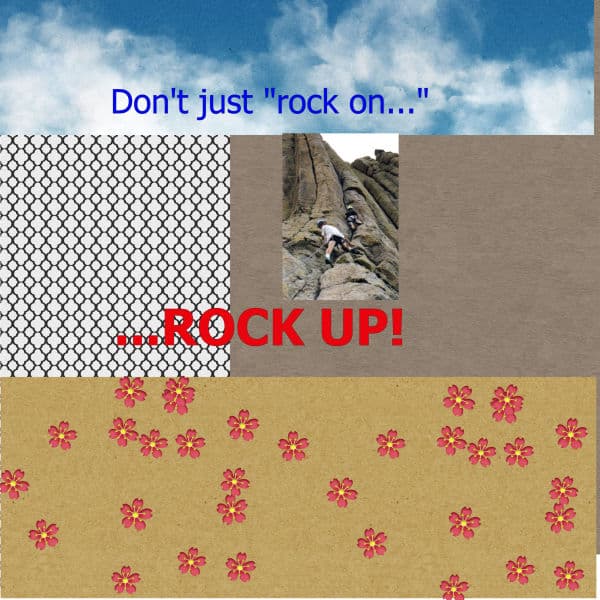
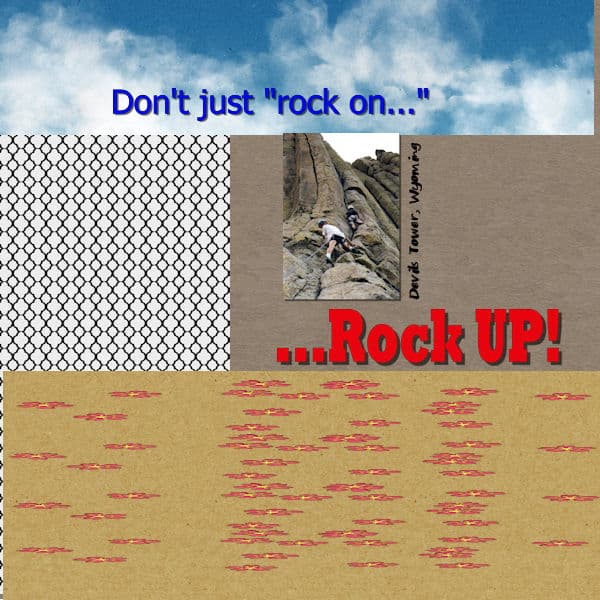
Peter, I love that photo and the wording is brilliant. A challenging climb for sure.
wow Ron, I now want to go to Mardi Gras. The layout makes it so appealing. Love it.
Ann, Sonya is so precious in those photos. She will love seeing this when she is older. A beautiful keepsake.
Day 11: Concentration
This is my fur baby Zoe, a rescue dog we adopted at 10 months old. She is now 10 years old and still full of life like she was as a puppy. Her groomer gave her the bandana as a Xmas gift. The Christmas kit I used came with wordart. I played with layering the bottom papers and I rather like how it looks. I was not happy with my last scrap page. This one is far more pleasing to me.
Great job everyone!
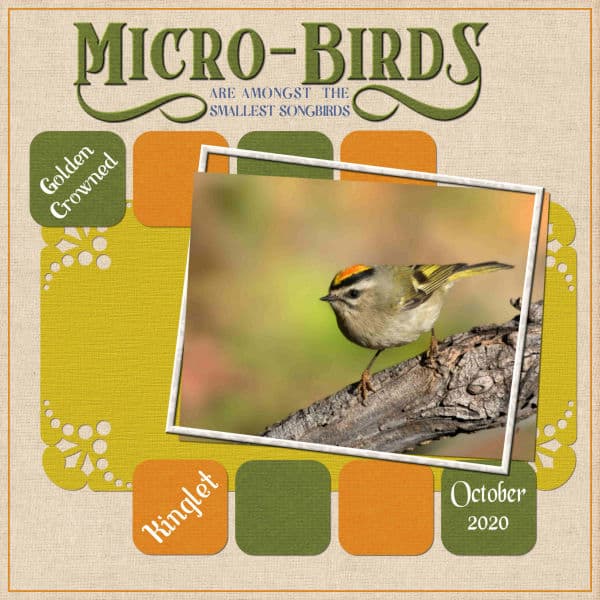
March 25, 2021 at 5:51 pm #55410Here is my 5th and last page for the bootcamp. I always enjoy participating in challenges in the campus. I’d like to congratulate everyone that has taken part, and posted their pages. You have all done wonderful, creative pages, taking me on a journey around the world with you all. I’m not new to the campus, many of you know me for my love of taking nature photos, particularly birds and insects. For my final page, I chose this delightful little male Kinglet. I used colours from the photo using textures and overlays. I enjoy creating word art. For the tile I used the font Corona, with glyphs. I used one of Carole’s corner punch brushes on the paper under the photo. I created the frame myself, using effects, textures, sculpture, and chose a faint pattern closest to the lightest colour on the Kinglet. I have 2 extra tips for you. I also lifted the top left corner of the photo above the frame, by using the selection tool, selected a portion, promote to a new layer, placed the promoted layer above the frame. Of course it has to look realistic, and feasible, as if it was in real life. I also placed a thin orange line around the background paper. Select all, on a new layer contract by a few pixels, flood fill with orange, contract by a few pixels of choice, hit delete. A big thank you to Carole for running the bootcamp. Also Carole, thank you so much for your comment on my word art!
March 25, 2021 at 6:18 pm #55413Ann and Wendy, lovely work. The lifted corner is a great effect Ann. Cristina and I use that technique a lot. Carole has the lifted corner script, which will do either corner, or all corners. Wendy, you don’t need to make a Xmas card for 2021, you have a made a perfect card, to be send either by ecard or posted.
-
This reply was modified 3 years, 9 months ago by
-
AuthorPosts


- The topic ‘BOOTCAMP March 2021’ is closed to new replies.


