Home of the Scrapbook Campus › Forums › Let’s talk › PSP stuff › More Efficient Printing?
- This topic has 11 replies, 2 voices, and was last updated 8 years, 7 months ago by
Dianne.
-
AuthorPosts
-
March 22, 2016 at 1:10 pm #8835
My brother has tasked me with scanning and printing some historical items (they are personal papers that were loaned to him by the author for research purposes; no copyright involved). The scanning is itself taking me some time (there are about 200 pages involved) but now I am looking at printing item by item (can you tell I lack enthusiasm?). I know there are some batch processes for PSP but I haven’t used any of them. Do you have any suggestions on how to approach this print project, or is one-by-one going to be the best course? Any ideas would be most helpful. Thank you. Dianne
March 22, 2016 at 1:26 pm #8837The batch process is for batching the work in PSP. You would have to identify what tasks you need to batch. I don’t think printing is part of the tasks that you can batch (although i am not 100% certain). Same with the scanning itself. But would you have to do some editing on those items? if they are documents, would they need sharpening? better contrast? Unfortunately, it COULD also be a one-by-one process if editing varies from item to item too.
For the scanning, make sure you scan at least at 300 ppi resolution if they need to be printed back (higher if you can).
As for the printing, maybe you can outsource that? send the images to a printshop?
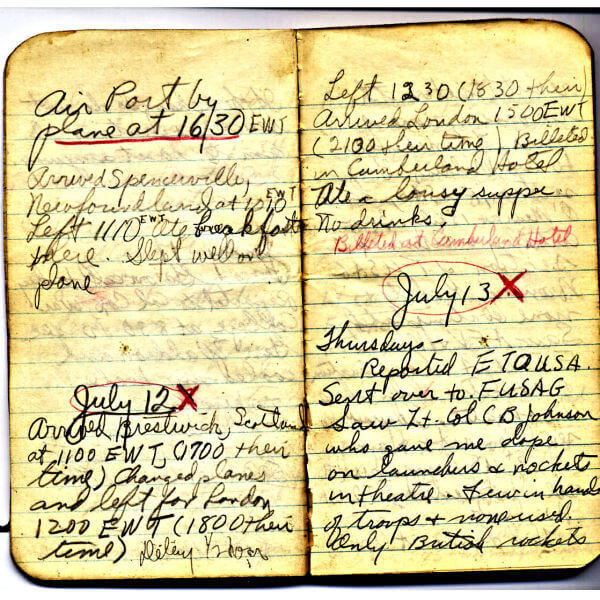
March 22, 2016 at 2:00 pm #8838Well, as I look at my scans, I can see that that master class in adjustment layers is going to come in handy. Some of the pages were written in pencil in World War II (!!!)–you can imagine how faded they are, and what a miracle the Levels have turned out to be to bring them into sharper relief.
It is definitely a one-by-one process at this point.
Well, most normal people could outsource this project but my brother has two issues…one is that he doesn’t own a computer, and the other is that he has the tiniest military retirement that you can imagine (cost is a big issue with him, even the most minimal). Since I will work for breakfast, I am cheaper than the alternatives (though, I have to say, he may be getting what he paid for).
The bad news is that there are four books (albeit small ones). The good news is that I have scanned the first book and am slowly slogging through the printing of it.
Thank you for your suggestions. Onward. 🙂
Dianne
March 22, 2016 at 8:54 pm #8839I made it through the first book, 25% of the project, started the second and my computer decided it had enough. I think it was tired. I took this as a sign to quit for the day. But I did get a lot of use out of curves and levels before I crashed and burned.
March 22, 2016 at 9:58 pm #8840I would love to see some before and after images of some of your work using those Adjustment layers. It could be something interesting to see in a different context, especially as a way to improve an image, and not just adding fun effects.
April 9, 2016 at 4:06 pm #8972I’m not going to say I’m very adept at this but the top image is the original scan. By using adjustment layers, I tried to bring out some of the pencil and red. I was trying to retain some of the original coloring which is why I didn’t go for black and white, which might have been a little clearer. I may still do that where there is no red on the page. I’ve never done this kind of thing before so I am afraid my results are rather crude.
You can delete the images once you looked at them (or you can tell me how I can. They have no archival use.
Dianne
April 9, 2016 at 4:20 pm #8973I don’t have any experience either, but did you try a combination of an adjustment layer that would create a black and white effect with another one? Or maybe duplicate the layer and turn one to black and white and then adjust the blend mode? I am not sure which one would work, as there might be many possible options depending on the colors, textures and details of the original image but maybe something to look into?
As for removing the image, you can probably just edit your post and remove it from there?
April 9, 2016 at 4:29 pm #8975That’s a good idea. I have several hundred of these pages so I have plenty to practice on. 🙂
April 9, 2016 at 4:33 pm #8980OK I took a shot at it. I started with the bottom image, and applied 3 adjustment layers:
- Curve
- Level
- Fill/Clarity/Sharpeness
And then there is the end result. Since I don’t know what the actual document looks like, I am not sure if the end result is satisfactory or not, but it can give you a starting point.
April 9, 2016 at 4:35 pm #8981Also, if you find that the same types of adjustment layers and settings are working for a majority of the images, you can record a script with them. Since the adjustment layers are still editable afterward, it would give you the option to tweak them as needed (and save time).
April 9, 2016 at 4:52 pm #8982The actual document looked like the top scan with my dithering being on the bottom. I’ll try your Curve-Level-Fill-clarity. I don’t think I’ve ever used Fill-clarity for anything. Maybe saving the settings as presets would work for me. I guess this is the document to practice on. Thank you!! Dianne
April 12, 2016 at 2:05 pm #9029Here’s something that actually worked well for some of the pages….I just went to Adjust – One Step Photo Fix. Now that is the lazy person’s path, I realize, but on some of the pages that were mostly faded ink, it worked quite well. On some of them I went back and applied one or two of the presets and my brother seems pretty happy with the results. Which is all I really care about. 🙂
-
AuthorPosts


- The forum ‘PSP stuff’ is closed to new topics and replies.


