
When working on photos, we might want to remove a background element, often a grey sky, to replace it with something "prettier" or just different. The Background Eraser tool is commonly mentioned as the tool to achieve this first step of removing the unwanted area. Although it is a great tool, it might not always work as you expect it, and it might leave you somewhat puzzled by its behavior. Let's have a look at how it works and what the various settings affect the end result for you.
What is a background?
In the Layers palette, we often have a Background layer, which always ends up displaying its content behind everything else. Nothing can go behind it, as it is in the background. But once the layer is promoted to a regular Raster layer, what is the background? How would PaintShop Pro know what is the background in your image? In fact, it does not. This tool was named that way so it can allow YOU to remove the background. However, you could really remove anything, whether it is the sky in the background, or maybe the white wall behind the subject as they are both behind. Believe it or not, you could remove the white fence in front of your subject with the same tool. It just might not make much sense!
In fact, PaintShop Pro does not care what you are removing or whether it is REALLY in the background or not; it will remove sections based on a color selection.
Getting started with the Background Eraser
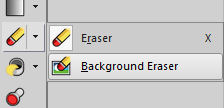
You will often find the Background Eraser tool hidden under the Eraser tool. If you don't see it immediately in your tools, click the little arrow beside the Eraser and it will display the other tool, which is the Background Eraser.
Once you activate this tool, you will see a lot of options available in the Options toolbar.

Working layer
Since you want to use the Background Eraser to remove part of the photo, it is essential to not work on a Background layer. It might sound counter-intuitive but the very nature of a Background layer is to fill every pixel, so you cannot remove anything to get transparency. In using the Background Eraser, that is exactly what we want, right? We want to remove a section (thus making it transparent) to then replace it with something else. So if your photo displays as a Background layer, right-click on the layer and Promote Background Layer. Now, you are ready to work on that layer.

Starting with the Background Eraser
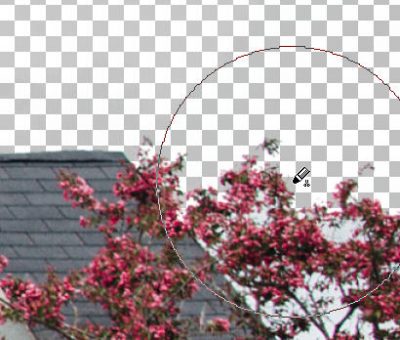
As mentioned before, the Background Eraser will work based on colors and knows nothing about your actual background. When you have your tool activated, and hover over your image, you will see this: the eraser icon inside of a circle (or a square, depending on the brush tip you selected).
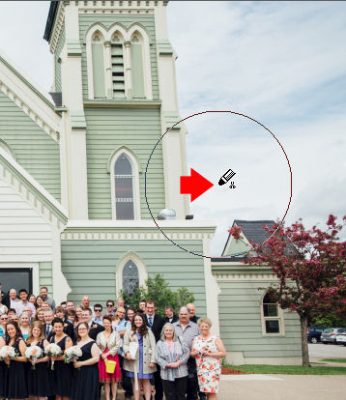
The position of the eraser icon will determine the color that will be sampled to be erased from the circle area. The circle is the size set up in the Size option. You will obviously adjust this value depending on the size of your image and the size of the area you are working on.
![]()
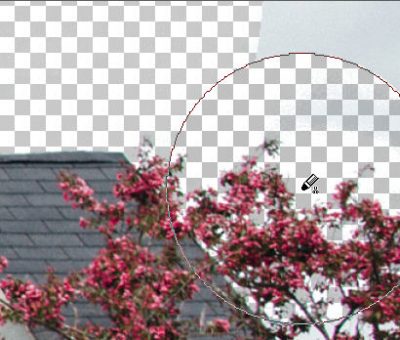
Clicking on that area, PaintShop Pro will identify the color at the center of the circle, and then delete that color from the area selected.
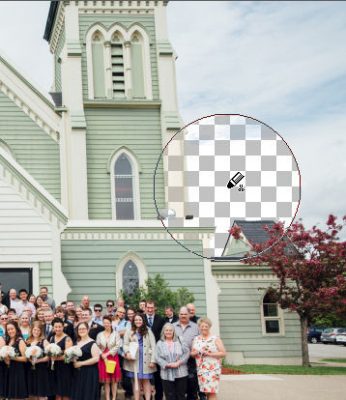
Notice that all the blue in the sky was not removed. That is likely because the sampling was identifying a more "white" color than a blue, so it removed the white while leaving the blue. That means the tool didn't do a perfect job with one click, but it really did what it was supposed to do, based on the information it had: the sampling color and the area.
If you notice that the area being deleted is much smaller than the circle you expect it to clear, check the Brush Variance palette (F11). If you have a graphics tablet, it is possible that the size is set, by default, to Pressure. Change that to normal and the tool will behave as you expect.

Erasing everywhere
The Background Eraser will remove the areas adjacent to the center of your cursor, but what about all those tiny sections in the trees? You can click on them individually, but it could become very tedious and not efficient at all.
That is when the Limits setting can be changed. If it is set to Contiguous, it will only remove sections that are directly "connected" to the sampling area. But if you set it to Discontiguous, it will be able to "skip" over sections to remove pixels further.
Soft or hard edges
In order to have a better view of this detail, I added a purple layer below the image and started again with the Background Eraser. I used the default settings, with the Discontiguous limits. Notice the difference between the erasing along the edge of the roof, and the erasing in the trees.
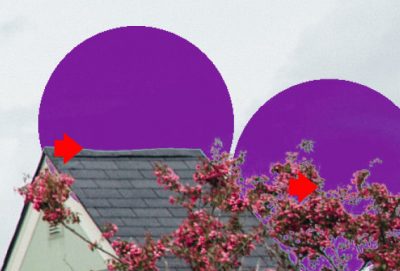
Along the roof, the details are clean and as expected. However, in the trees, you can see that fuzzy edge that shows that not everything was erased. Why is that? That is because close to a blurred edge, the colors are somewhat mixed, yet, the Background Eraser will not delete everything as it does not know if it should or not. That is where the Sharpness setting will come into play.
![]()
By default, it is set to 70 and the result above is what it will yield. Let's reduce that value and compare the result.
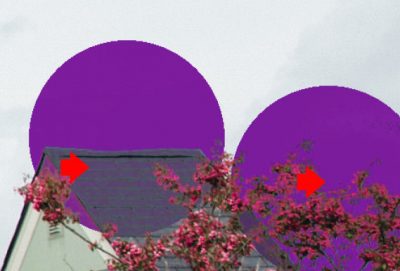
As you can see, that blurriness around the tree branches was removed. That is great, but what about the roof? Yes, it removed more of the sampled color, and since some of that color was found in the roof, it removed it too. So what can you do? There is not a single setting that will typically allow you to remove ALL the background of a photo; you will have to change some settings throughout the image to get the best result.

Using two different Sharpness settings for each click, the end result is more pleasing.

Using other tools
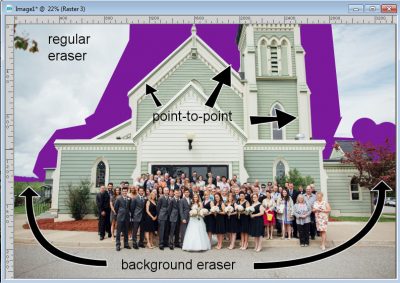
In some instances, the Background Eraser will have a hard time making the difference between a background color, and an element that is very similar in color. In those situations, don't expect PaintShop Pro to be smart enough to know where to stop. That is probably where this particular tool can no longer give a satisfactory result. But remember that PSP does have many other tools, and in the case of an area that could be outlined with the Selection tool, it might yield a better result. In our photo, the outline of the church had very straight lines, so the Freehand Selection tool set to point-to-point is just what is needed.

If I was to combine the Freehand Selection tool, to remove close to the church building, the Background Eraser tool, where the details are more intricate, and finish off with the regular Eraser tool to delete the rest, I will be on my way to get all the background removed.
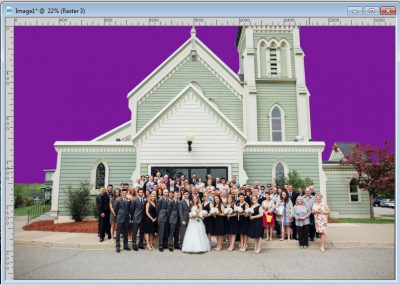
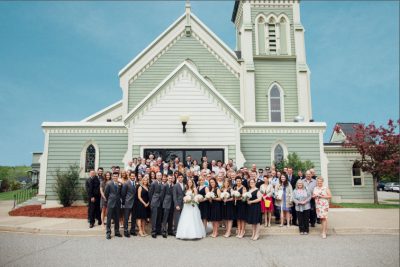
As we explained in the beginning, the purple is only an additional layer I placed below my image to better see the work of the Background Eraser tool. Everything that you see in purple has actually been removed from the main image, so it is time to replace it with some simpler sky.
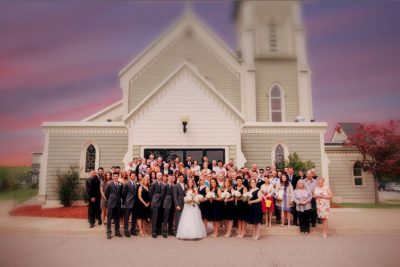
But we can also go a little further, and add a very different sky, and then, play with other settings to get a totally new look to this "ordinary" photo.
In conclusion
The Background Eraser is a great tool to use, but just like any tool, it will be useful in certain situations, while it won't be able to cover all the types of backgrounds to remove. PaintShop Pro contains many tools that can accomplish similar tasks, with their own advantages. As the user, have a look at this "toolbox" and you can create wonderful projects.
 If you want to learn more about removing backgrounds and replacing them to create new images, check out our Back Off Master Class.


