

As for many years so far, Corel has released a newer version of PaintShop Pro. This is now the version X8. This version includes many new or improved features and in this blog post, i will list and detail the features that are least geared toward photographers, but more useful for scrapbookers, card makers and other graphic artists using PaintShop Pro for other purpose than photo editing.
Text wrapping
This is a feature that will be greatly welcomed by scrapbookers and card makers (photographers too, i think). Unlike a regular text editor, PaintShop Pro didn't have the ability to confine text inside of specific boundaries. The user had to revert to either tweaking the text with spacing, kerning adjustment, leading adjustment to achieve a look that was intended, only to have to do more tweaking if the user found a typo or needed to change the text even slightly. This was a big time waster.
Now, in PaintShop Pro X8, there is this new feature that will allow the user to keep text inside the boundaries of a vector shape OR a selection, offering a phenomenal flexibility to have text wrapping around any shape or inside any shape. Let's look at it "in action". I'll use this photo to start:
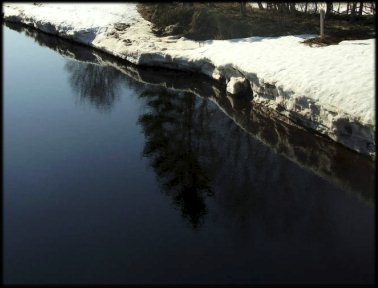
In order to put text inside that darker area of the water, let's create a selection. I am using the point-to-point freehand selection tool.

Clicking inside that selection with the Text tool, i can type the text i want, with any font, size, color or other attribute. If the text is too long, it will extend further than the selection, but you then have the option to either edit the text or change some attributes like the size, kerning, leading, and such.
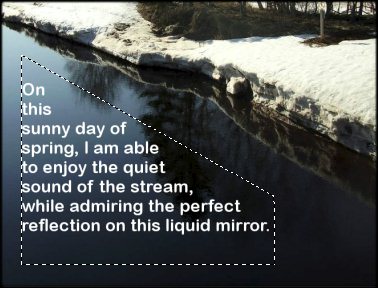
One little hidden characteristic of that new feature is that if you save your image in a .pspimage format and need to edit your text later, even if you had deselected that area, it will stay within the boundaries you had set initially, so you don't have to redo that selection to correct a typo!
This new feature will be very useful for scrapbookers who can now add journaling inside a set shape (like a rectangle) or along the edge of a particular element on the page or on their photo.
Magic Move
This new tool is will be mostly for photo manipulation and is a bit of a sister tool to the Magic Fill. In fact, the Magic Move is a combination of a floating selection that you can move and the Magic Fill as it will fill in the area you picked the selection from. Here is an example using these flamingos.

After selecting the bird on the bottom right using the selection tool of my choice (i picked the Magic brush and the freehand selection tool), I will click the new Magic Move icon which will turn the selection into a floating one. Then, i will need to select the Pick tool and move that selection where i want, and "drop" it there. Automatically, the area where the initial flamigo was, will be filled in.

It is possible, like for the Magic Fill, that the area is not perfectly filled in. In this case, you can simply use the Magic fill itself to tweak the end result. No bad on this one?
Text/Shape Cutter Preview
Although i think that one can probably achieve the text cutting effect without using that tool (ex: using the text created as a floating selection), the new addition will offer another preview of what the selection will be once it is cut, before it is cut, by darkening the unused area, a bit like the Crop tool does when you click on the Cutter Preview.

And if you are happy with what will appear through the cutout, you click on the Shape cutter icon, it will copy and paste that area into a new image that you can use anywhere.
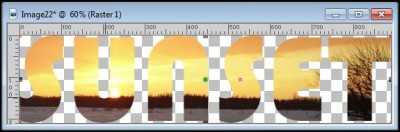
This can be a great tool to create titles from text or shape, or making an alphabet from a scrapbook paper.
Search Layer
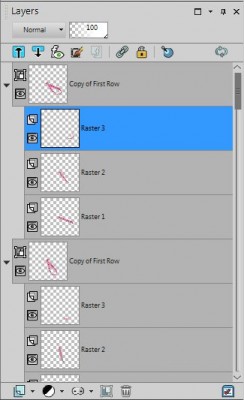
As a scrapbooker, i will often have a lot of layers on my project. Those layers can easily add up to 50 or more especially if i have text made of individual letters, shadows on a separate layer, or a variety of decorative elements like staples, buttons, etc. Having to scroll through all those layers to find the correct one i need to tweak can be tedious if the element is small and can't be easily clicked on with the Move tool. It also lets you search a layer based on the designer's name if you have the layers named that way (dragging an element from the Organizer or opening as a layer using a script will retain that filename).
Once you click on the icon, you get the search box that will appear where you can enter the word you want.
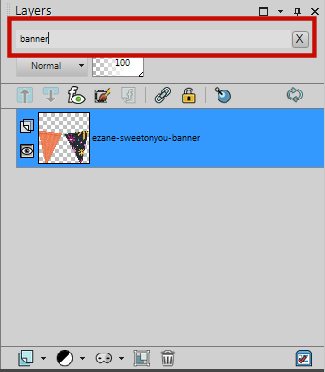
As soon as you type in the word for the element you are looking for, only the layers that will match that keyword will show up while the others will seamingly disappear. But don't worry, they are not gone. Click on the layer you want (or the single one that shows), and once you remove the name from the search box or click on the X at the end of it, all the layers will reappear and the one you had selected will still be selected.

What is interesting is that you can also search through the hidden layers, those you don't see and can't click on, on your project.
New Merge options
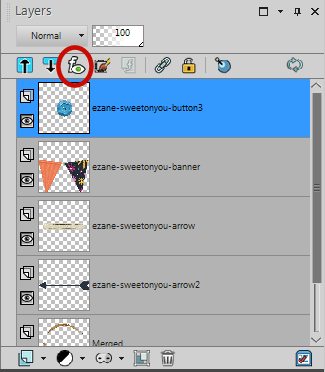
These are nice tools added to the Layers > Merge menu or the contextual menu when you right-click on a layer of the Layer Palette. There are 3 new options:
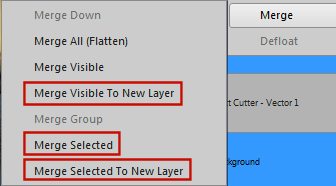
Merge Visible To New Layer: this is great if you need a single layer to have all the elements (maybe to copy a preview?) but don't want to merge everything. The merged layer will be then placed right above the active layer.
Merge Selected: since PaintShop Pro now allows to select multiple layers, you can finally merge only those you select. This will be a great time saver instead of going through the Merge Down 10 times, for example, if you have 10 individual letters in a title. A little added note: you can merge layers that are hidden, and they will magically "reappear" in the merged layer.
Merge Selected To New Layer: this one is simply a combination of the previous two new options.
Maximum Brush size
Yes! Brush tips can now be as large as 3000 pixels. That is three times larger than what we had in version X7. Can you imagine that for a standard scrapbook layout of 3600x3600, you can have a single brush that will cover almost the whole page. This will be great to create larger background designs!

New Selection Styles
When using the regular Selection tool set to a rectangle, an ellipse or any other shape available in the drop-down list, it was a very tedious to create a shape of a precise size or ratio. You would have to either use the Custom Selection tool (which would only work with squares and rectangles) or keep a close eye on the Status bar at the bottom, but moving very precisely is not easy. That is where the new Selection Styles come into the rescue.
Fixed size: with this setting, you can determine the exact size of a selection, and unlike the Custom Selection, you can "draw" that selection anywhere, multiple times without having to do any calculation.
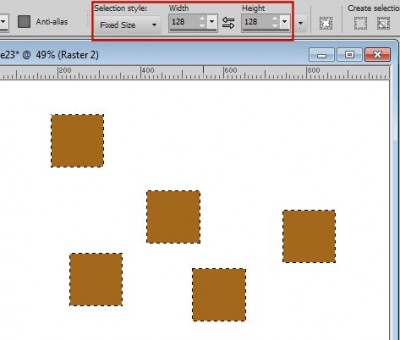
Furthermore, this will work for squares and rectangles but also for any other shape from the list available under the Selection Type. No more guessing. No more calculating.
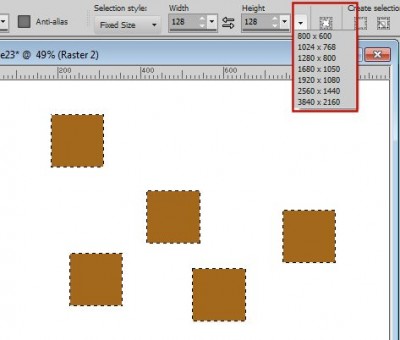
To make this tool even better, they even provide some preset sizes too. Notice that those are similar to the screen resolutions, so you can easily create desktop projects from any image you have.
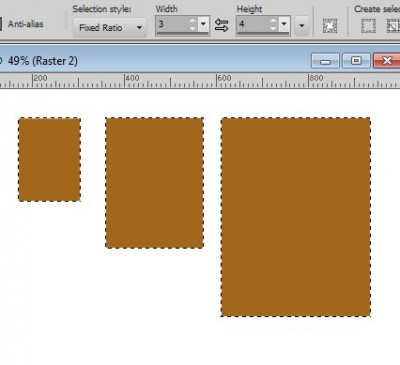
Fixed ratio: this is also a good one, especially if you need to crop an image to a particular size to be printed, or cut to fit in a frame or if you want to create elements (like frames) to fit a particular shape. As you can see, in this example, all the rectangles were created using a 3:4 ratio, and it was done in seconds as i didn't have to calculate anything.
Expand and Collapse
This is another time saver for those who create projects using a lot of layers. With a click of an icon, you can collapse all the groups of layers at once. Similarly, with a click of the other icon, you can expand them all.
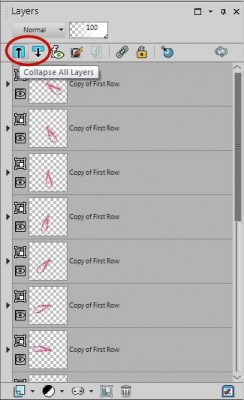
Imagine the time you can save with this ONE click!
Batch process interface
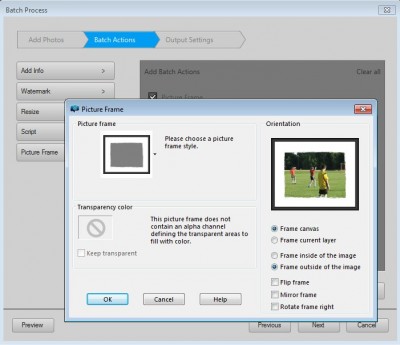
You might have to run some commands or scripts on multiple images at once, and the previous Batch process interface was a bit daunting and confusing. In this version, the process is made so much more simple and intuitive, guiding you through each step.
The first step is to pick the images you can to modify.

The next window will let you pick what action you want to apply to those images. You have a choice of many common applications, from renaming, watermaking, framing, running a script and such. Depending on the particular effect you want to apply, clicking on the edit icon at the end of the line will let you specify what to apply (which frame as in this example, which script, what new name, etc.). Interestingly, you can also apply more than one effect in one batch process.
Finally, you get more options in the next window to indicate where you want that edited image to go, whether it should overwrite the previous one, whether it should have a new name, what format, etc.
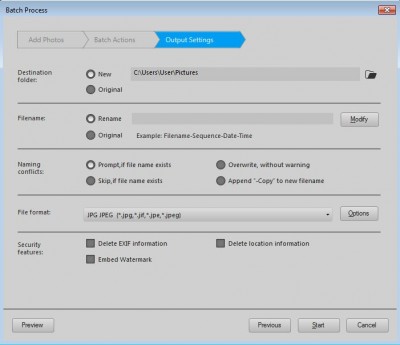
I have always disliked the Batch process in previous version because, although everything was working fine, everything was also on a single window, and i felt it was overwhelming. Now, you can resize multiple layouts to prepare them for printing, save a copy into a specific folder, and so on, all in one process that will be very smooth.
File Saving for JPG
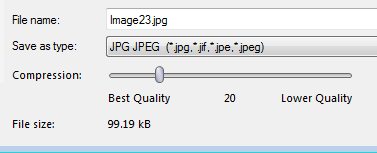
Until now, i always used the JPG optimizer to save my images so i could control the compression and the file size since the Save As... never had that option. But now, it does. As soon as you choose .jpg as the file format, you will see the slider appear underneath, allowing you to adjust how much you want that image compressed, or how big or small you want the resulting file.
Talk about another tweak to the program to save you time (and disk space!).
Swatches
In earlier versions of PaintShop Pro, in the Material Properties window, in addition to the familiar colored square, we had a series of swatches, which made it easy to pick a "standard" color. In PSP X7, with the new Material Properties that displayed that less familiar color wheel, we lost the swatches. But in PSP X8, those swathes are back, and there are also more of them.
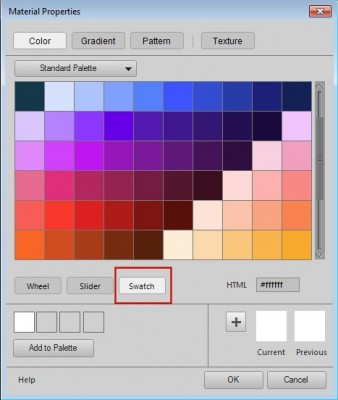
My only complaint about this is that i feel like the swatches don't need to be that big, and require me to scroll down. But it is an addition, at least!
Real Time Gradient Adjustment
In previous versions of PaintShop Pro, one could change the gradient from a vector object by selecting a new one in the list of gradients, however, we needed to apply a new gradient before seeing the result.
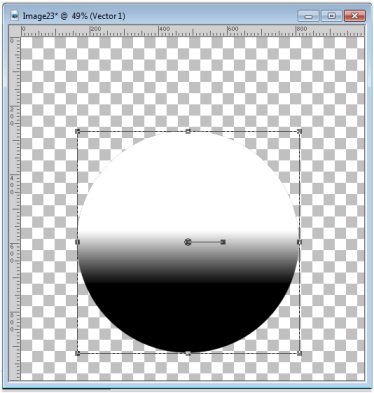
Now, while the vector object is active and the Pick tool is selected, you can reopen the Material Properties window under the Gradient tab, and change the gradient, the angle, the repetitions and even edit the gradient itself.
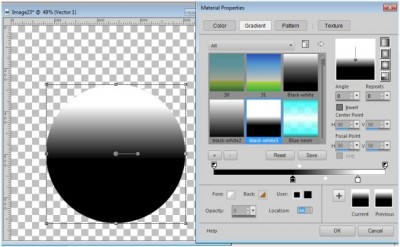
This can be a great time saver if you want to use some black-white gradient as a mask or if you need to tweak the gradient to match something around that element. Once you click OK, you are prompted to save the new gradient (if you edited the color stops) with a new name. This is great since in previous versions, you had to save the gradient first, then apply it, and if it didn't match, you had to do it again. It was like editing blindly.
Other improvements
For those of you who are heavily involved with photo editing and photography, there are other additions and improvements like more camera being supported, improved high DPI support (whatever that means), lens information and more. But if you are using PaintShop Pro for scrapbooking, card making or other non-photographic projects, you likely don't need to be concerned about those.
Overall, what do I think?
I am very happy to see all those new features and tools that can be used by non-photographers. I think that scrapbookers and card makers will be really happy to use this new version. I know there are still bugs, but that seems to be a standard situation for just about any program so i am not worried about them since i didn't find any MAJOR bugs that will prevent you from using the program.
Go for it. Get the newer version. And if you are still not 100% sure, download the trial version for 30 days and run with it. You will love it.
Disclaimer: this article may contain affiliate links. Making a purchase using this link will not cost you anything more while i will get a small commission. Thank you for considering using those links.


11 thoughts on “What is new in X8?”
Thanks so much for the info on the new changes in X8. Any chance that X8 will accept X7’s custom workspaces?
I always put off getting a new version because I hate having to set up yet another workspace….seems crazy that Corel doesn’t make them interchangeable.
Yes and no. You can import the X7 workspace but by doing so, you might not see some new features like the additional Merge options for the Layer Palette, or the Layer Search Function. If there is a new feature or command and it didn’t exist in the saved Workspace, it is unsure they would appear. They might but they might not. The safest way is to redo it from scratch, even if it is more annoying to do.
I have 14 and can’t upgrade
I suggest you try with the trial version to see if these features are enough for you to upgrade. You will have that for 30 days. Then, wait for a big sale. If you are already comfortable with X4, you might be able to wait a bit and by then, the first patch fixing bugs might be already released.
I don’t know about anyone else , but I am tired of paying for upgrades and if you don’t get one of them you cant get others . It is a money making scam . I like PSP , but tired of , so many upgrades that cost out the butt .
Debbie, you don’t have to get every upgrade. You are eligible for the upgrade price with up to two versions back meaning you can always skip one version before getting the next and in that case, paying $60 every two years does not seem so bad. For Adobe users, the BEST they can hope for is to pay $120 PER YEAR, non stop to keep up.
I have upgrade since 9 to 14 . Tired of the program giving difficulties , so tend to stick with the ones that don’t have the bugs . I didn’t ask or comment about photoshop . Do not have that program . Talking about psp
It is true. New releases often have bugs. And this one is no different. Also, various systems can lead to different difficulties.
And your strategy to stick with what works for you is probably the best. You can always give the trial version a go, and see if it meets your need, and if it works fine for what you use PSP. If it works, you buy it, if not, you wait. Many people do that, just like you and they are quite happy.
Thank you for the clear explanations…I’m eager to try some of the new features that I might have otherwise overlooked. One thing I noticed is that PSP X8 loads faster on my wimpy computer than PSP X7 does, but it doesn’t give me that little timer thingy when it is applying an effect (or I don’t know where to look). Overall, feeling pretty positive about the new version.
Thank you for explaining and showing all the new features – you should really design the “help” menu for PSP – your way of explaining the details is so much better than Corel does. I did purchase the program based on your review. I love all the new features – thanks again.
Glad it helped and thank you for your nice comment about my explanation.