
Are you taking tons of photos of people, places and events surrounding you? Do they always turn out great? Out of 100 photos, how many you would consider real keepers? How many you would immediately toss out? If you have that many photos, you probably can spare half of them to fill the trash and still have plenty to play with, but if you are only taking few photos, here and there, or if you are using photos that are in limited numbers, for whatever reason, it is hard to choose to toss out some of them. Even “bad” photos still hold memories, and tell stories. Maybe you only have one or two photos of Grandpa who passed away, or only a handful of photos that were spared from a computer crash. How can you choose if you have so few? Often, you can’t. Or maybe you don’t want to. And really, you don’t have to either as there are ways to use “bad” photos in your digital scrapbook layouts. Various tips here can give you ways to turn either bad or boring images into interesting and fun photos.
1- Try to fix it
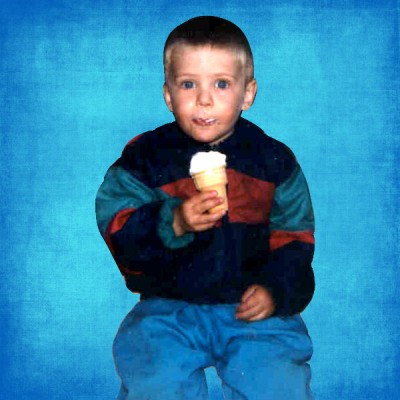
Many photos might be too dark, too grainy, and such. Surprisingly, you can enhance photos enough to make them usable. Here is an example of a photo that was destined to the trash, but a lot of adjustments managed to get it somewhat “usable”. The ebook called 8 Secrets to Quick Photo Fixes with Paintshop Pro is available to the right of this post. It covers some really QUICK retouches for photos. It is not detailing photo editing to complete restoration because sometimes it can take a lot of work to get a photo to a great level (or not so great, depending on the starting condition).


Since I had only two pictures of that event, I was happy to salvage this one.
2- Blend in the background
Many photos that are blurred, underexposed, overexposed or otherwise “not the best” can be used as a blended background. Since the blending is mean to not be the focus, so the photo does not need to be sharp or perfect. Look at this photo and how it can be blended in with another paper. It then gives a mood to the background paper and still allows you to cover parts with other photos or elements since this is not the focus. Paintshop Pro offers an array of blend modes that can be used in combination with a varied opacity. Depending on the color of the photo and the paper you want to blend it in, different blend modes might give better results than others.

3- Crop creatively
Some photos are taken accidentally off the edge. Sometimes, the subject is “cut off” by either another person or an object. Who says you need to have the full view of the person or object in a scrapbook layout? Seeing only part of the subject can be a good enough “teaser” or “suggestion” to build a story around. You can crop to only one interesting element of the overall image, like the feet of a newborn or you can simply crop to create a mood like in this image. The initial image was not the best first because it was totally off center, and really looked bad, and second, because it had no definite focus point, making it a boring photo. But with some cropping, the excess environment that added absolutely no value to the photo, has disappeared and now, a real focus was created, making this photo really interesting.


Now, instead of a photo of someone going off the frame, with a boring background, we have a photo that has much more potential. Don’t you think?
4- Turn to black and white (or sepia)
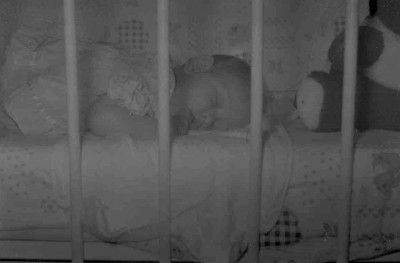
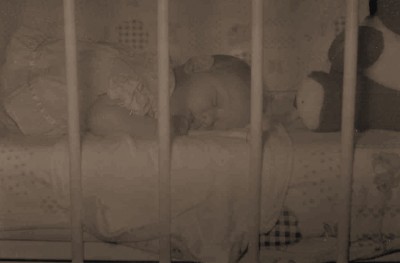
Some photos can be oversaturated, under saturated, or have weird colors. Sometimes, it can happen if an old photo has been exposed to light too much or to other damaging elements. Turning those photos to black and white (or sepia) will eliminate the wrong colors. Depending on the colors you started with, you might need to adjust the brightness and contrast a bit to get more definition between the different levels of grey.

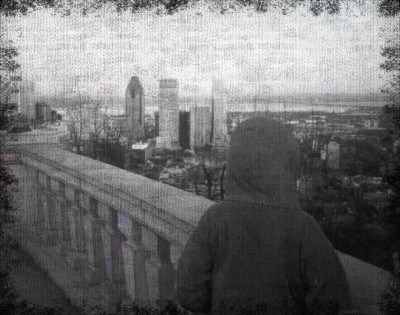
5- Apply a distressed texture
If the photo you have is bad, why not make it look bad “on purpose”. Very old photos are often bad, grainy, distressed, wrinkled, and scratched. You can use various overlays to recreate that look. That way, the viewer will not know what is bad, and what was “made” bad. See this example. Although the photo was not really that bad in the first place, it was pretty ordinary. First, I added a grunge overlay and used the Multiply blend mode, then I added the grunge edge overlay. At this point, the photo already looked old and interesting. After that, I thought I could desaturate the whole base photo and I liked how that gave the overall photo a pretty neat look. While I was able to play around a bit, I decided to undo the desaturation that was on the whole photo and apply it only to the sections around the child, leaving a pop of color that contrasted with the black and white city line. I am pretty sure this picture will end up in a scrapbook album!


6- Add artistic effects
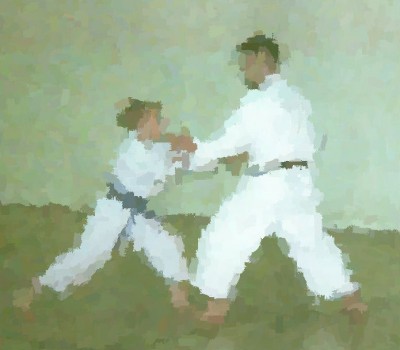
Paintshop Pro includes many photo effects that you can apply to your photos. They will tend to “distort” the image but the effects will be obvious to the viewer so nobody would really know how sharp the original photo was. The Brushstroke is probably my favorite, possibly because I have some oil paintings at home and that effect simulates those paintings very well. But you can certainly play around with the Art Media Effects and the Artistic Effects. Depending on your initial photos, and the settings you use, you can get a great variety of results, making your photo usable to incorporate into a scrapbook page.
7- Extract from the background
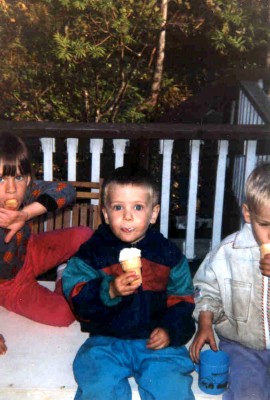
If you have a photo and your subject is clear enough but the background is composed of a mismatch of various objects and elements, or if the colors of those surrounding elements are totally distracting from the important part, sometimes, cropping is not enough. Another option is to extract the subject from the picture, eliminating everything around. In this example, the photo of my kids was not really good as two of them were cut off the picture, so I figured I could extract the central one, removing both “half-siblings” helping focus on him. With the extracted subject, I could create a whole scrapbook layout about him, focussing really on him.
8- Resize down
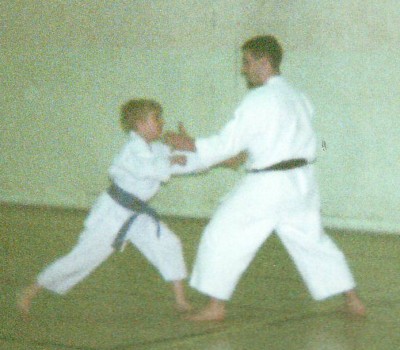
Not every photo has to be full size in a scrapbook layout. Sometimes, even a small picture can be enough to illustrate or even focus on the person, object, or event. Some scrappers particularly like the style where they only display small pictures. It is their favorite. Even if it is not your usual style, you might want to consider that type of layout so you can use that “not-perfect” photo. In this case, I used some photos in the film strip in a smaller size. I didn’t have any larger photos of my son at that stage of his karate training so I really needed to use those. They are older photos and were scanned (I admit the scanning was not the greatest). This tip can also be used with a photo montage where the not-so-great photos can be smaller in a mosaic of other photos.

Do you have any photos that are not so great but you still can’t part with them? Did you ever use “bad” photos in your layout and ended up making a great page? Tell us how you used them. Link to your blog or gallery if you want. Share this article with your friends; they might also have some “not-so-great” photos they would love to use.


9 thoughts on “8 ways to use bad photos in a scrapbook page”
I sure needed this. It will be a big help for me and that huge box of family photos.
Definately some useful information, keep up the good work. I have found it difficult to get tutorials for Corel Paint Shop Photo
Glad you like the information. Keep browsing the campus for great PSP tutorials.
Never throw away ‘bad’ photos if you are a digi scrapper. All Cassel’s suggestions are spot on. Portions of blurry photos also make exciting trims and elements with various photo effects. Distortion tools are also great for papers. Parts make great flood fills for alphas. There is no end to your creativity as a result of a potentially ‘bad’ photo!
Yes Vicki, I am planning on compiling some of those ways to repurpose “bad” photos. They can always be useful.
So useful Cassel, thank you so much for sharing 🙂
Glad you like it. Hopefully you can use some of those tips.
Useful tips…glad I’m not the only one who has one-of-a-kind but not-so-great photos. Thanks for the ideas!
You sure are not the only one! I hope you can use some of those not-so-great photos in layouts and show them to us!