

In PaintShop Pro, you can place text along a vector path for some very creative effects, but what about picture tubes? Can you place them along a path quickly without having the move elements one by one and measure the spacing every time? Of course! There is a better way, and that is by using the VectorTube script. This scripts is quite old (2003!) but still works with the newest versions of PaintShop Pro. This script, coded by Joe Fromm, Peter Ward, is available for download HERE. Let's look at how it is used in various types of projects.
Setting your tube
Since the script will apply the picture tube to a vector path, you need to set the tube the way you want. On a raster layer, test the tube, the scale, the step, and the placement mode. Is it what you want? If not, adjust those settings before running the script.
Setting your path
Although you can place text on path on ANY vector line, they are not always considered PATHS. That seems odd, I agree, and I got fooled more than once when I started using this script. There are 6 ways you can create a vector object: Ellipse tool, Rectangle tool, Preset Shape tool, Symmetric Shape tool, Pen tool, and Text tool. Among them, only 2 will be a "real path" as needed for the VectorTube script: the Preset Shape tool and the Pen tool. This means that for the other vector objects, you will need to convert them to a path.
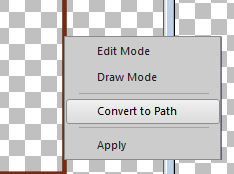 There are two ways you can convert the vector object to a path:
- right-click on the vector object on your project, and select Convert to Path
- go to Objects > Convert to Path
- if you have an older version of PSP (X2 and older) you can also right-click on the vector object in the layer palette, and select Convert to Path
If the Convert to Path is greyed out, it is because it is already a path, so you are ok. If you run the script and nothing seems to happen, check to make sure the object was converted to a path. If it was not, no stroking will happen and you won't have any warning or message; you will just think it is not working.
 Running the script
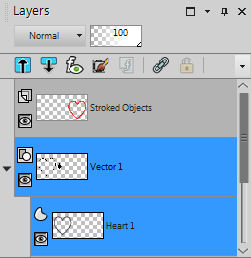
Making sure that the picture tube is set the way you want, activate the vector object (that has been converted to a path), and run the script. You will then see the tubes being placed along that path automatically. Notice that this is created on a separate raster layer called "Stroked object" and your vector object is untouched. This allows you to run the script multiple times, on the same vector path, using different tubes, or different settings of the same tube. This also means that you can, in the end, delete or hide the vector object if you don't need it in your project.
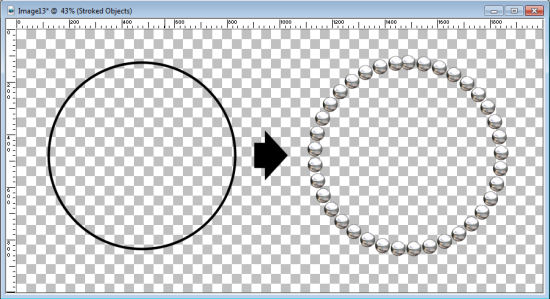
Using single image tube
If your tube has only a single image, it will be repeated along the path as often as needed. The advantage of this is that if you are using an element that has an obvious direction, or light source, that will stay identical on each copy of the tube, making the whole montage more realistic than if you had the light source or the shadow rotating in different angles.
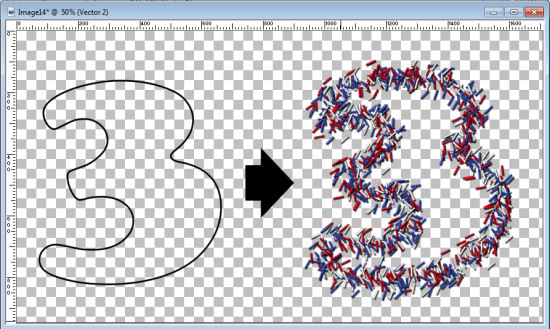
Using a directional tube
Using directional tubes means that the tube image will be rotated based on the direction of the cursor movement. In the case of this script, it will determine the angle of the path and choose the image accordingly, making the applied tube as if it were hand-drawn and following the cursor. With any shape you want, you can use a rope, string, or chain tube to create a fun frame.
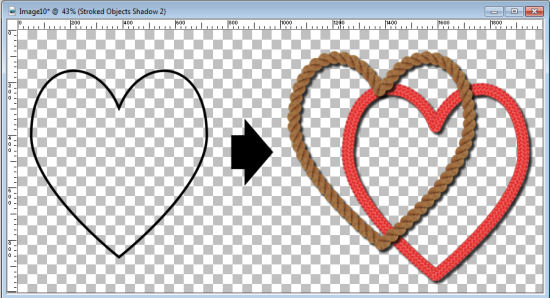
There is one rope tube included with PaintShop Pro, but you can also get an array of rope/string/chain tubes HERE too.
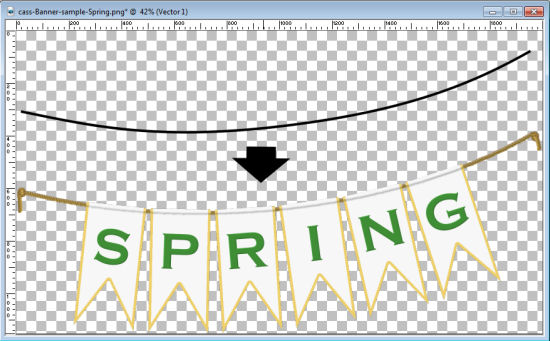
This is also perfect if you want to place a string in a particular way in order to attach tags, banners or decorative elements. Since you can tweak the vector path, you can be more precise in its placement, and end up with a string that is exactly where you want it, without having to draw it by hand.
Using scattered tubes
In addition to having tubes placed exactly ON the path, you might want to have some tubes scattered along the path, but not necessarily on a narrow path. This can be achieved if you have picture tubes that are looking like they are scattered around, like confetti or spilled, like beads or sprinkles.
A set of sprinkle tubes (in 12 colors) is available HERE.
As you can see, there is a lot of creativity that is unleashed when combining vector path, picture tubes and a super-smart script called VectorTube. I have used this script hundreds (if not thousands) of times for various projects. It makes the end result so great looking, in just a fraction of the time it would take to place the tubes manually, and it is so much more accurate than I could ever hope to do by hand.
What will you use this script for? Show us your project using the VectorTube by linking in the comments below.


4 thoughts on “Using the VectorTube script”
The Directional Tube Script is my overall favorite. I use it to create new elements every time I make a new digital scrapbook kit as it is so versatile..
This is a wonderful little script,but I have a problem… How do I install it in PSP X6 and X8.I have it in X and 9,but can,t find how to get it into the others.Can you help.By the way I love the Campus.Thank you so much for all the tips etc you give us.
To install the VectorTube script, just unzip it and place the file in the Restricted scripts folder, OR save it in your favorite folder and point your PSP to it in File > Preferences > File location.
I love this free little script and use it a lot. It is even more useful now that I have got Cassel’s brilliant directional tube script as it gives me so much more versatility to play with, made in a fraction of the time it did before. Highly recommended.